Purpose
Inquiries are used for multiple purposes. The majority of the time, they’re used to document requests for services. This can be for requests that are received via a call to the Access Line, a referral that’s been faxed from Social Services, a person coming in for a walk-in assessment clinic, etc.
Inquiries are also used to capture Crisis Line calls. An inquiry that starts off as a request for services but is transferred to the crisis line can be a single inquiry.
Inquiries do not require that the person asking for services is a client. This allows you to gather information and document the request without having to add the person to the system as a client. It also allows you to create a client with minimal information so as to quickly provide crisis services to them.
For more information about specific use cases of the inquiry, see the following articles:
- How to Document Calls to the Crisis Line
- How to Document an Inquiry
- How to Handle Calls on a Non-Crisis Line and Client Says they’re in Crisis
- How to Document a Call When You Don’t Provide Services Yourself
- How to View Requests for Services that are Pending
- How to Document a Call to the Mobile Crisis Dispatch Line and Complete the Mobile Crisis Dispatch Screening Tool
System Functionality
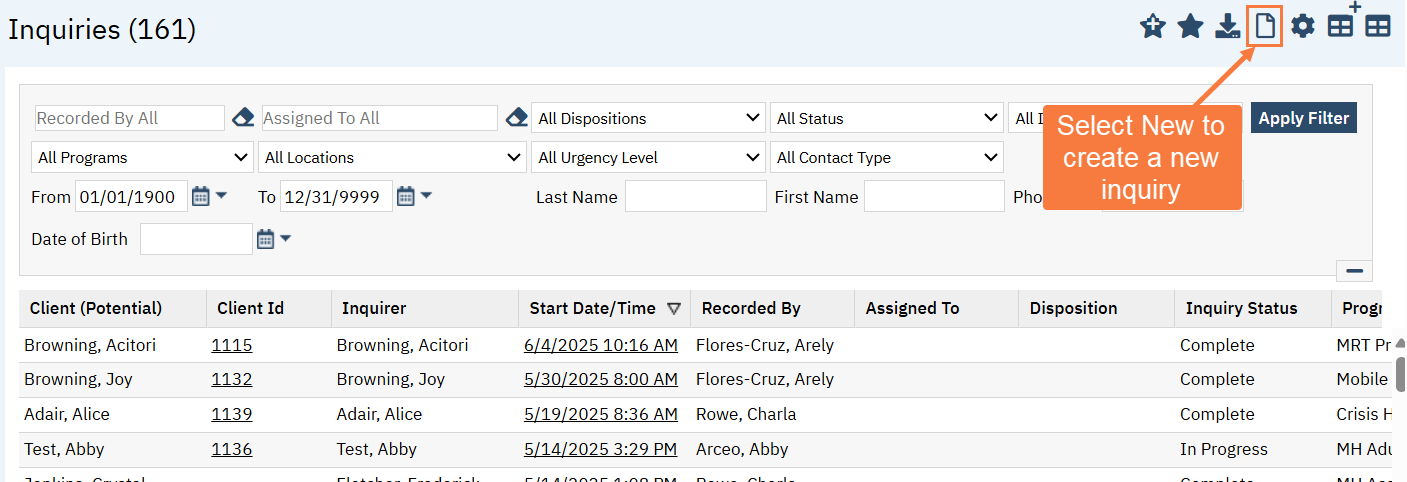
Inquiries are screens, not documents. As such, they use a list page/detail page combination. Each inquiry is recorded on the Inquiry Details screen. To get to this screen, you have to navigate to an Inquiries list page, which shows a list of all the inquiries that exist. Then you either need to select the inquiry you wish to view or edit, or you click the New icon to create a new inquiry record. Either option (click to select OR new) will take you to the Inquiry Details screen.
Note: The Inquiries List Page will automatically default the dates to the last 30 days. To expand the search window, click the From Calendar icon and click Apply Filter.
See also:
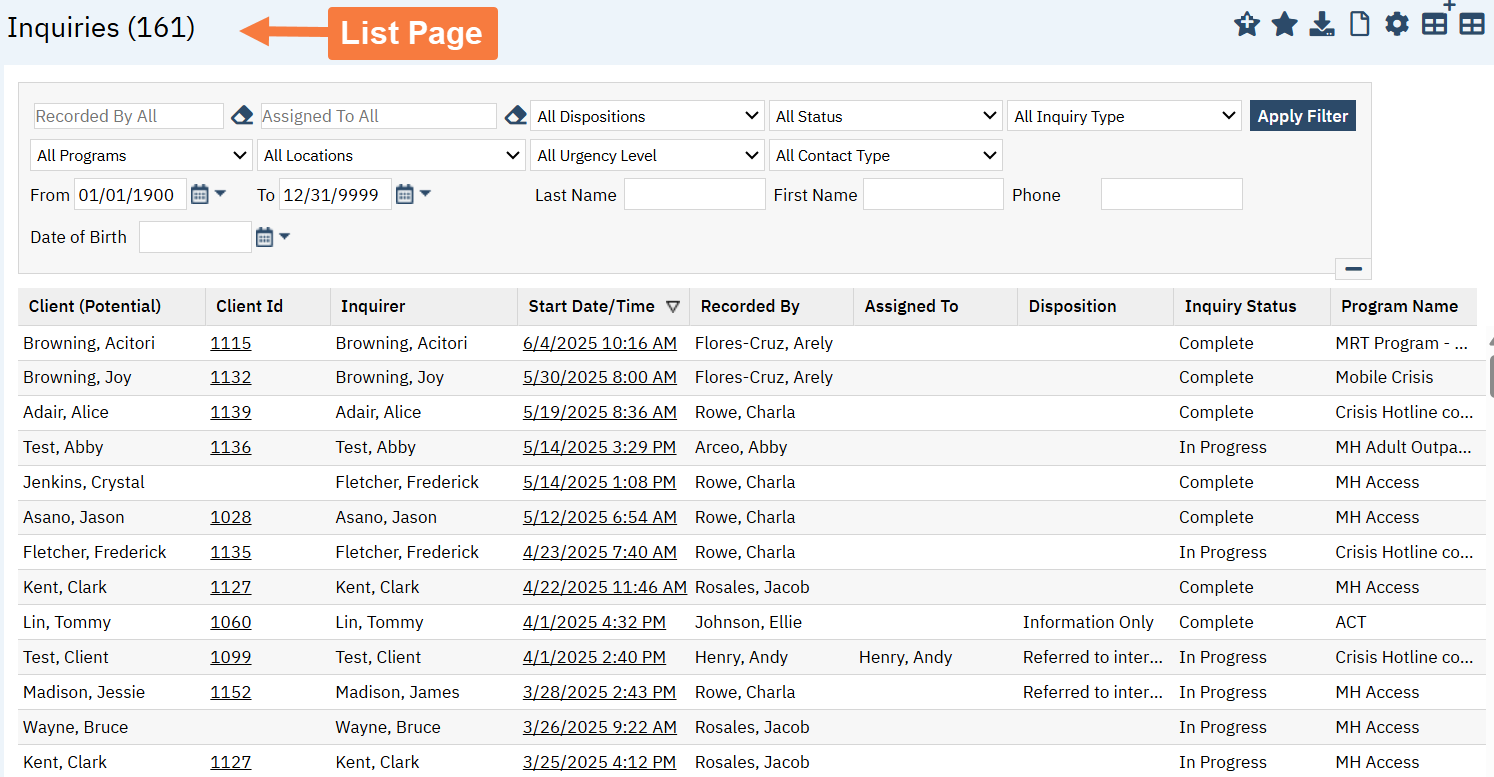
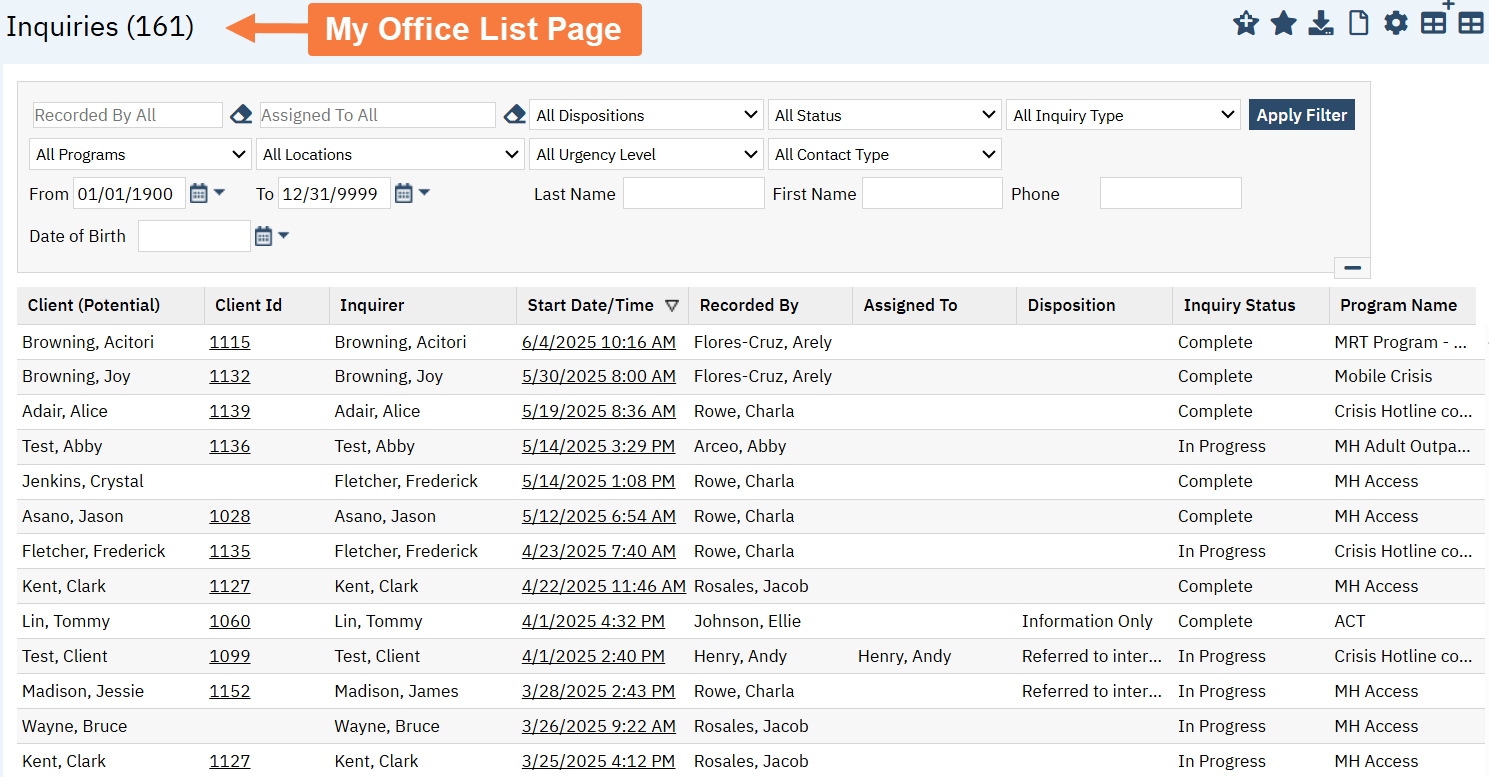
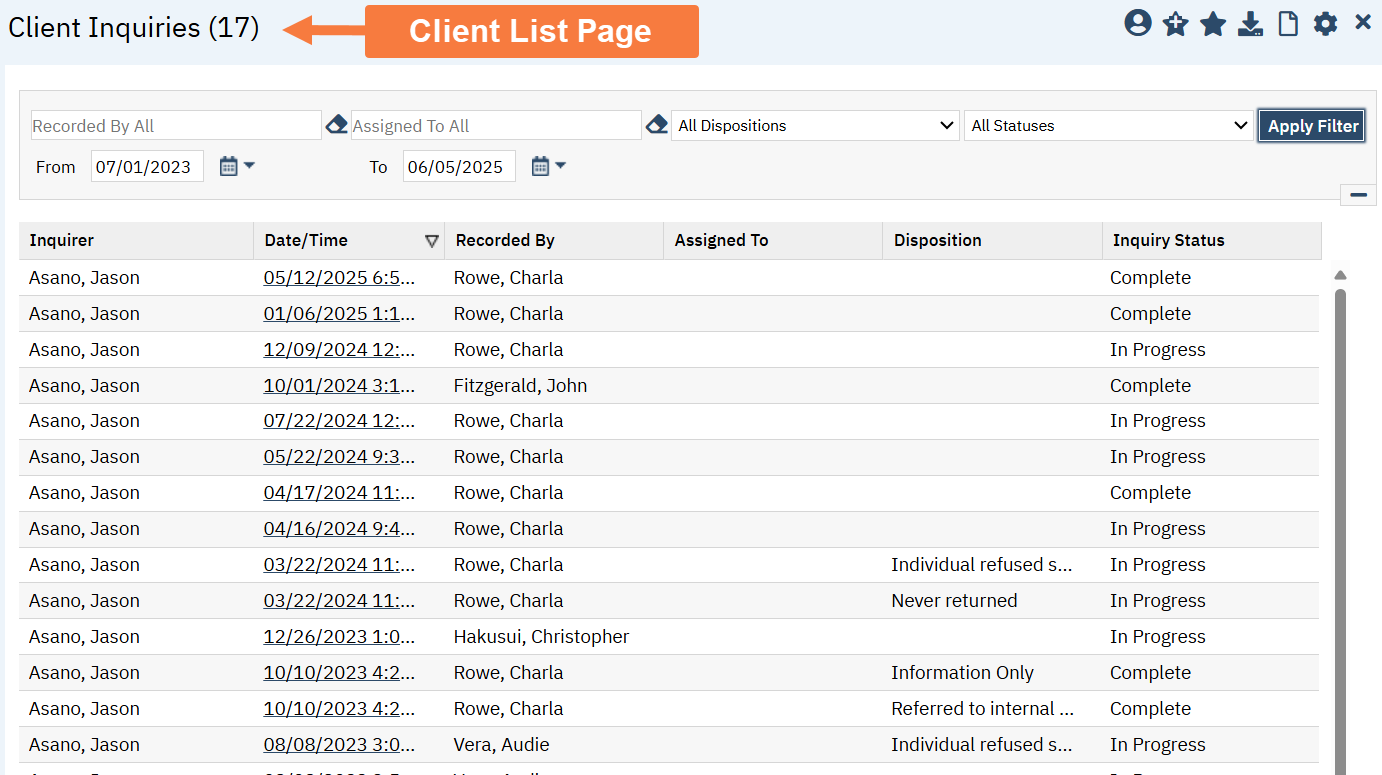
As with a lot of list pages, there are two options for inquiries: “Inquiries (My Office)” and “Client Inquiries (Client)”. As a reminder, the list page option with the suffix of “(My Office)” indicates that this list page will pull all of the inquiry records across the system. The list page option with the suffix of “(Client)” indicates that this list page will only pull inquiry records associated with the designated client. You are required to have a client selected before accessing this list page. If you don’t have a client’s record open, the system will ask you if you’d like to search for a client.
Basic Workflow
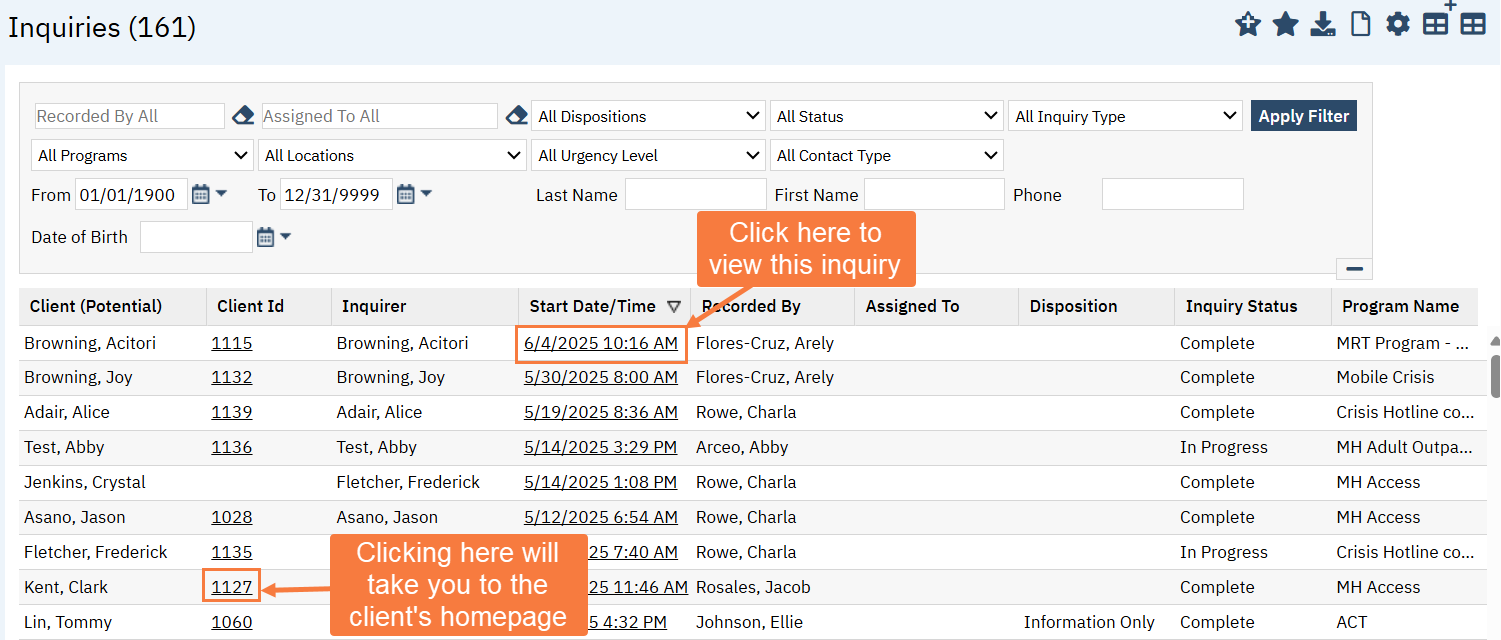
In order to create a new inquiry, or view an existing inquiry, you first need to navigate to the appropriate list page. Most often this will be the “Inquiries (My Office)” list page.
As with all list pages, you can select an existing inquiry by clicking on the “Start Date/Time” for the inquiry you wish to view. If you click on the “Client Id”, the system will instead take you to the client’s homepage.
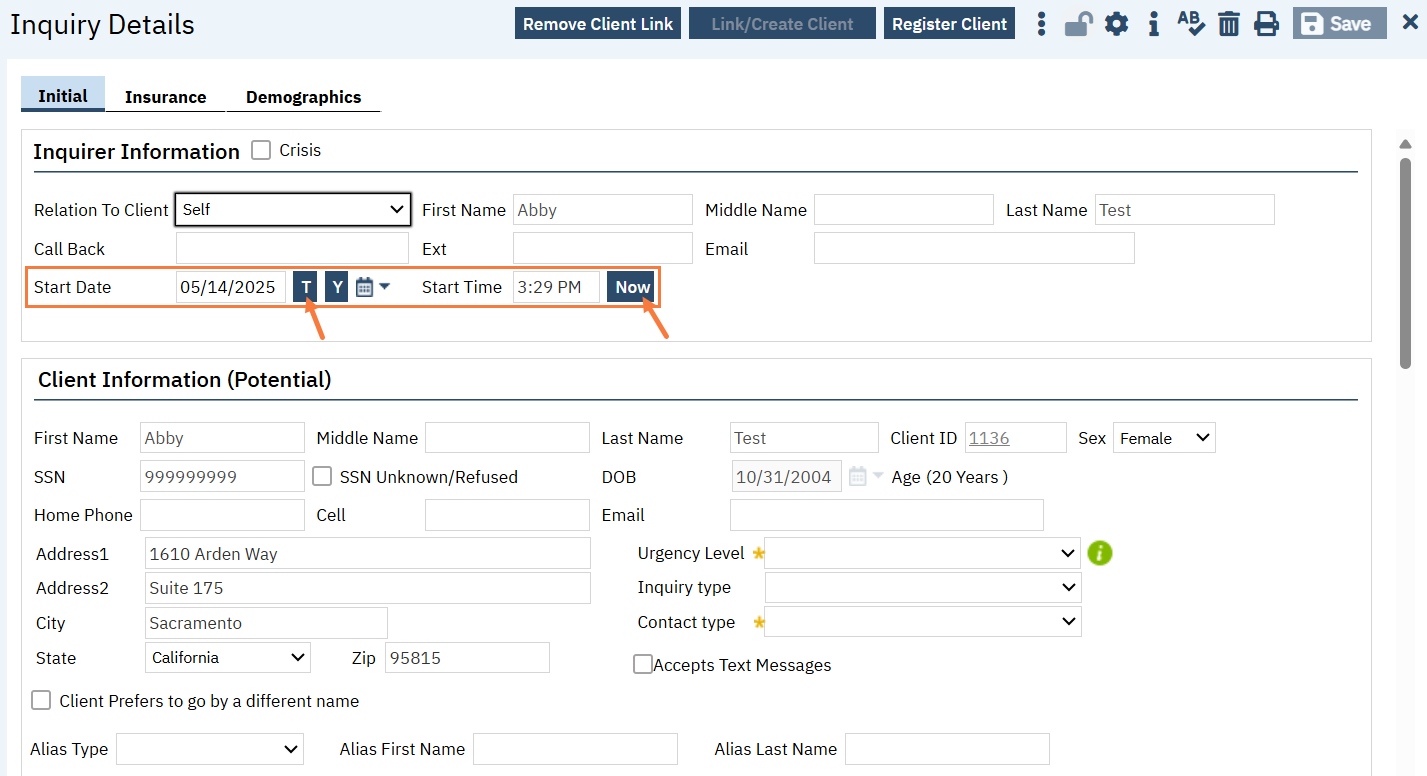
Once you’re in the Inquiry Details screen, you’ll want to make sure to document the Start Date and Time for the inquiry. This is basically the date/time you were made aware of this request. Most often, you will want to click the “T” for “Today” and the “Now” button to easily bring in the current date/time.
From there, fill out the sections as appropriate. More information about each section is below. Keep in mind that sometimes gathering more information may not be clinically appropriate. For example, in a crisis situation, you may not want to try to collect their demographic information in favor of expediting their crisis services.
Click “Save” as you go as needed to make sure your edits are committed to the system.
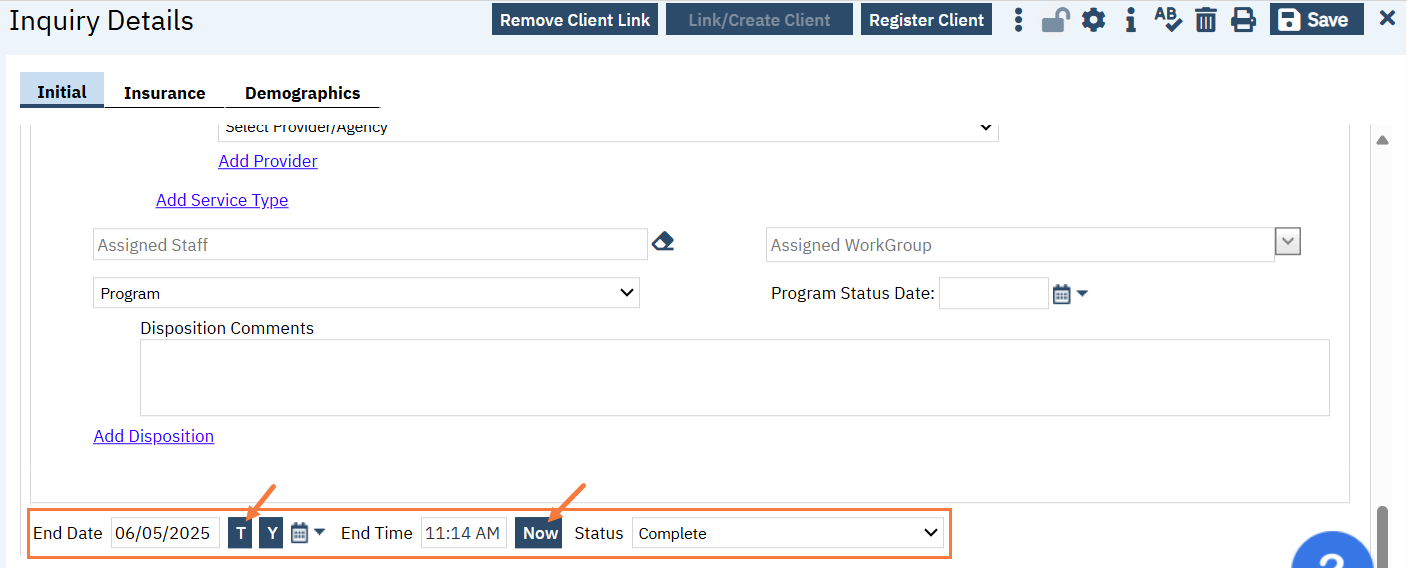
Once the inquiry interaction is over, which may depend on your county’s policies, you’ll want to mark the inquiry as “complete”. To do this, you should enter the End Date and Time and change the status to “Complete”. Once again, the “T” and “Now” buttons are available for you to quickly indicate the current date/time. Click Save to finalize the inquiry record.
There is new functionality that was released to production systems in June 2025 that will likely not be fully implemented until July or August 2025.
This functionality, if your county chooses to implement it, will lock the inquiry after you’ve set the status to “Complete” and clicked “Save”. This means the fields will no longer be editable. This is done to protect the integrity of the inquiry record.
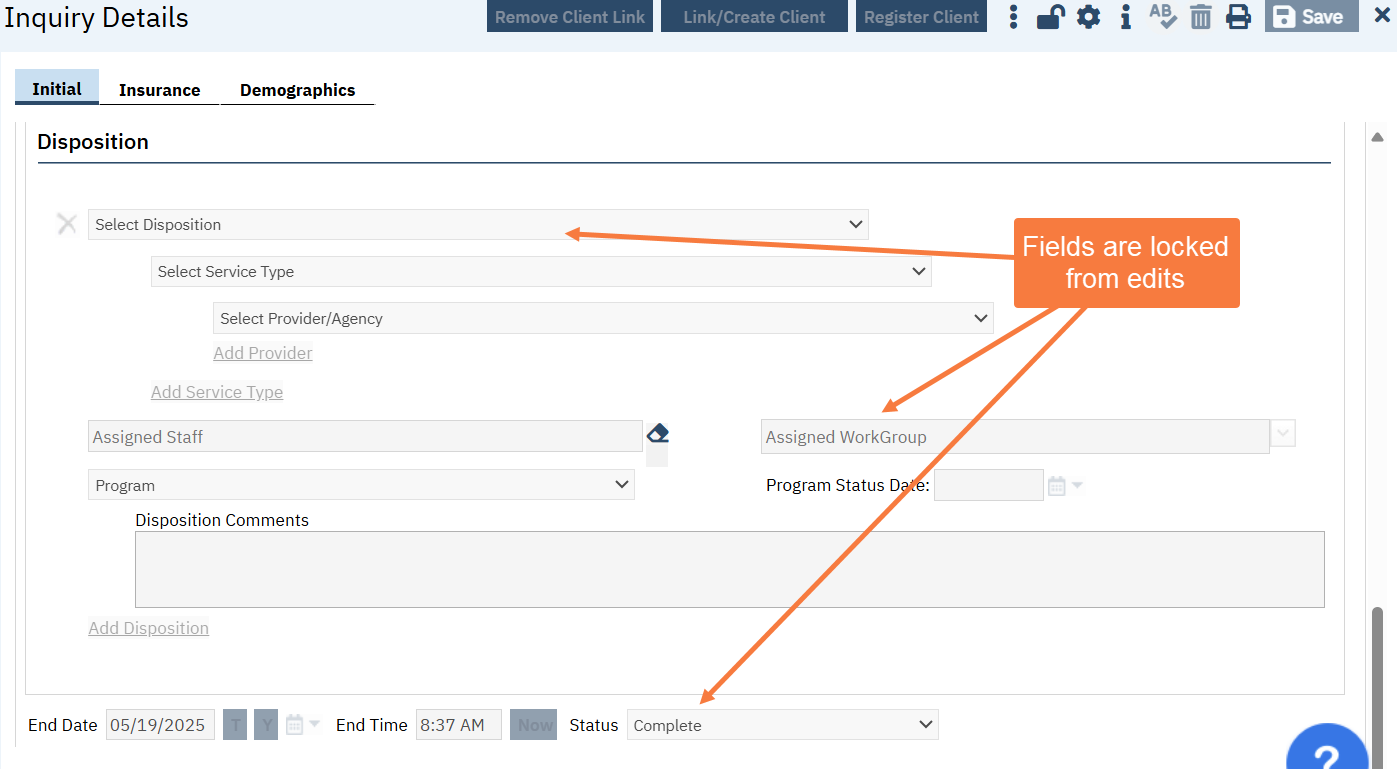
If an error needs to be corrected on the inquiry, a supervisor or system administrator can unlock the inquiry, which will allow edits to be made. Once the record is saved and the status shows “Complete”, the record will be re-locked.
Client Information Interaction
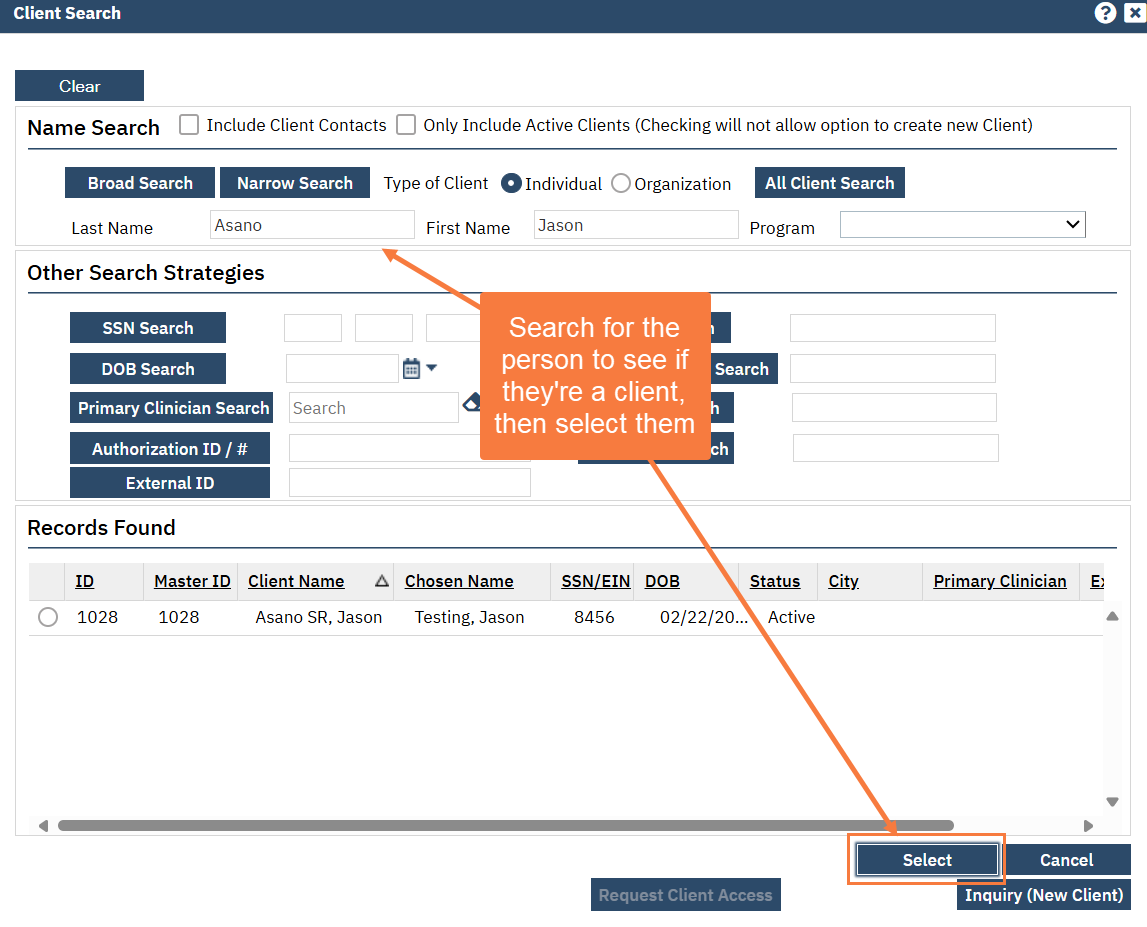
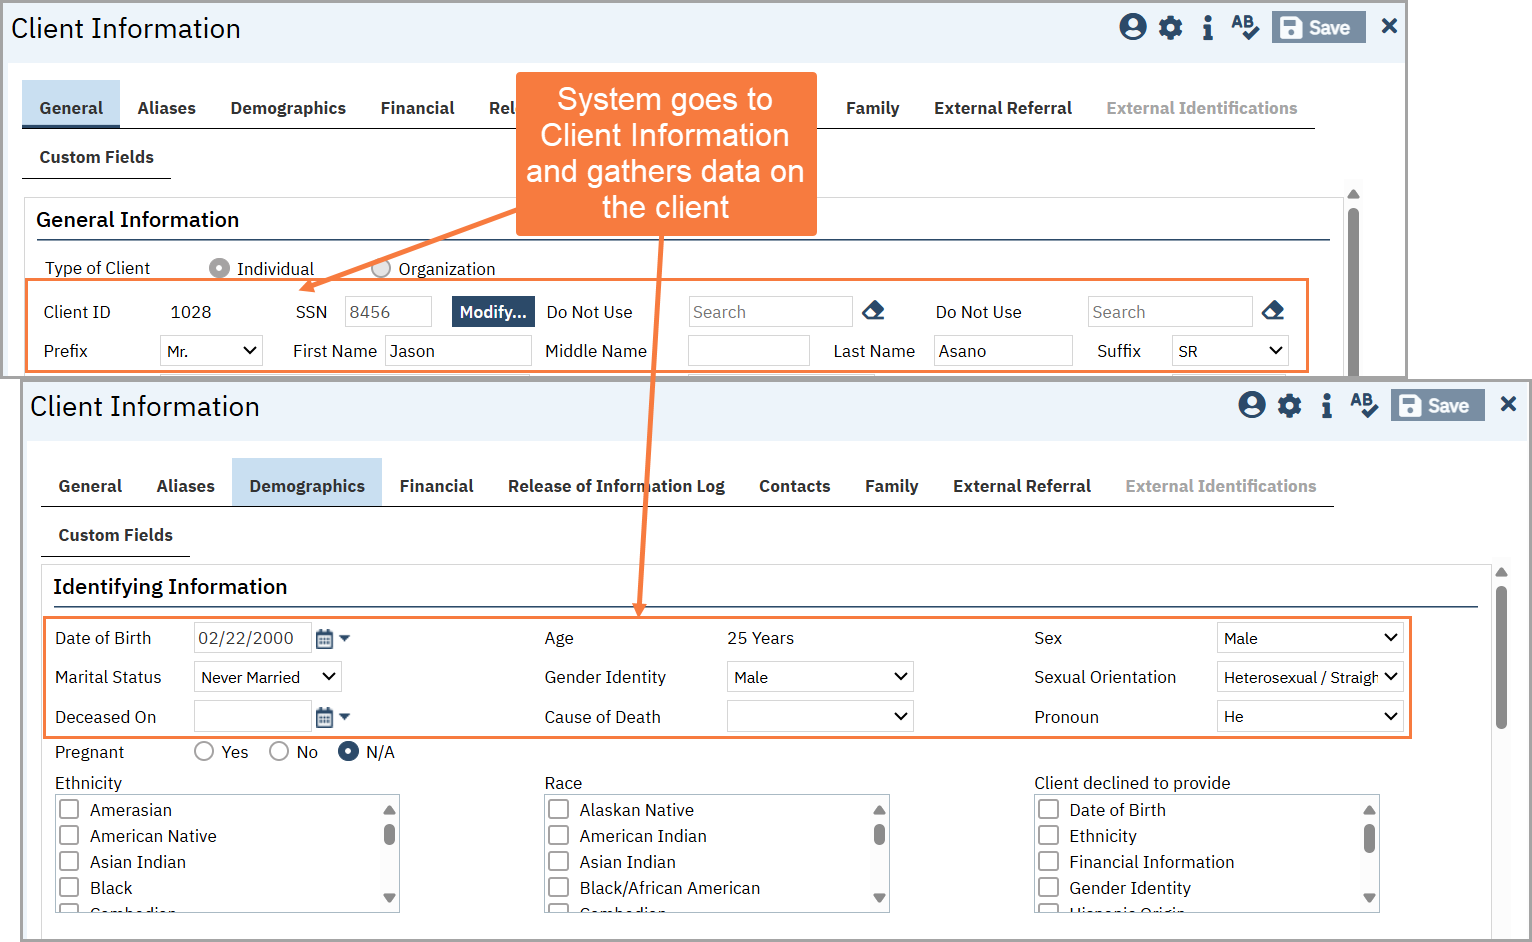
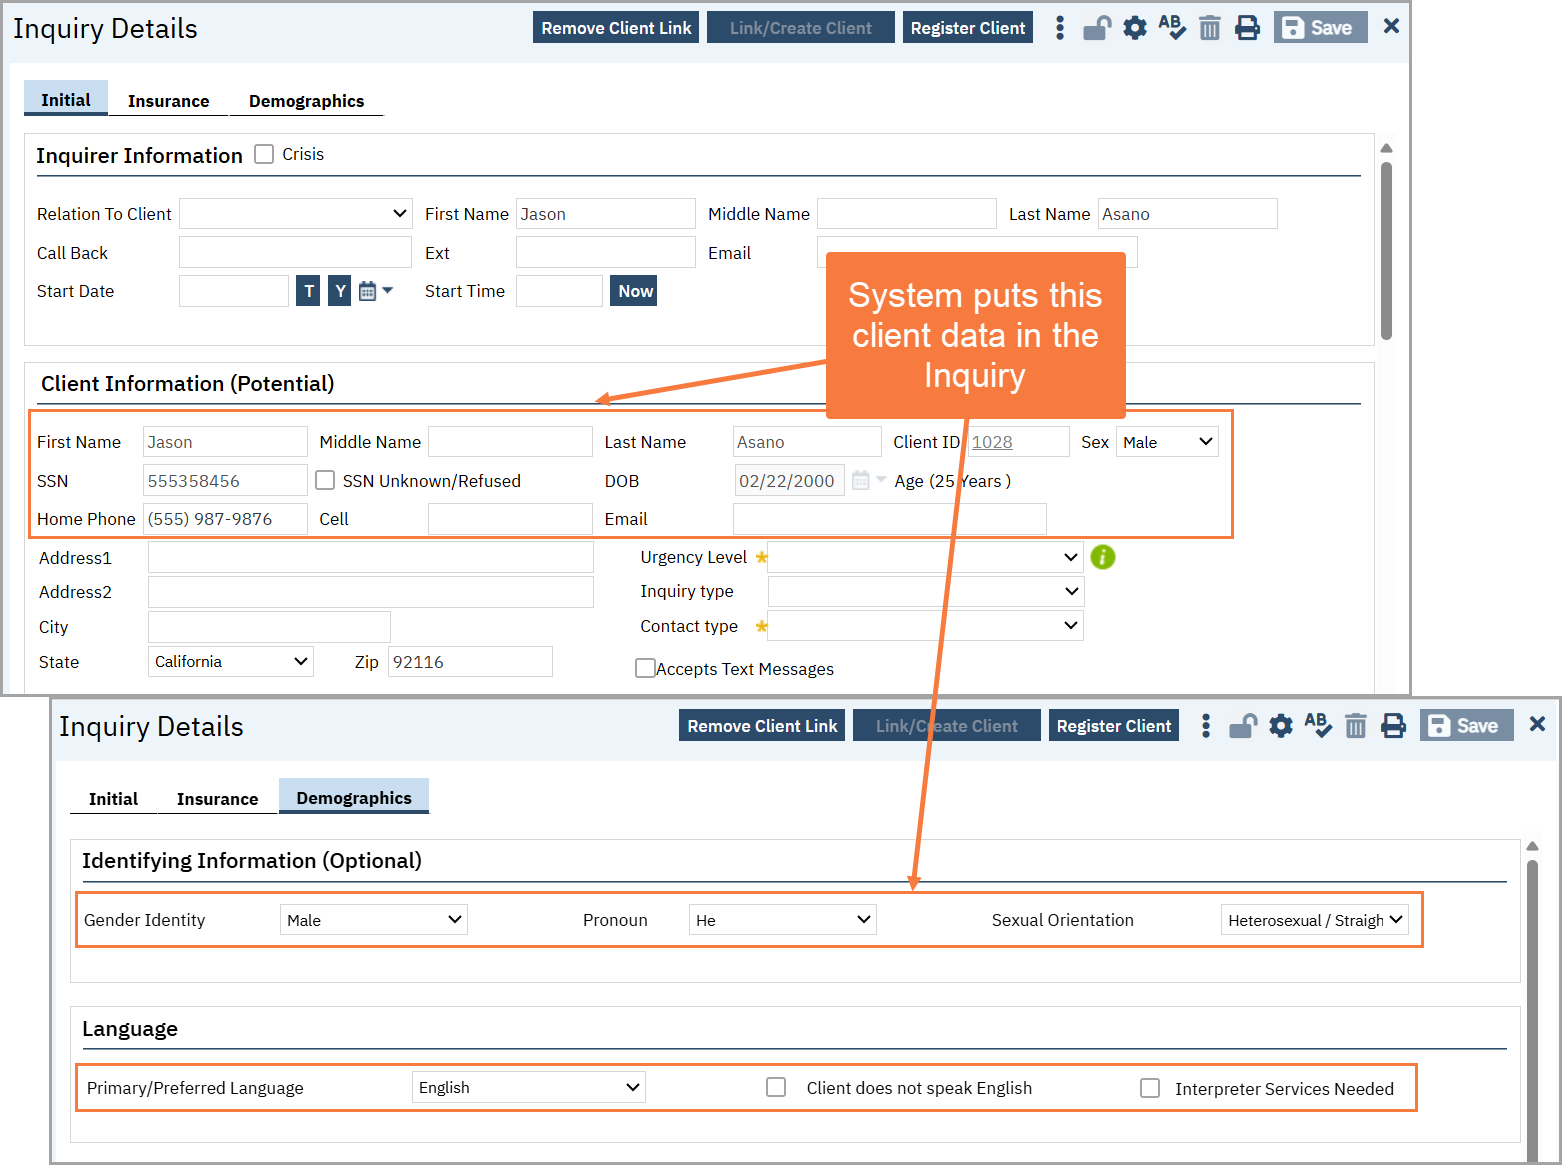
Inquiries interact with the Client Information screen. When you first create a new inquiry, the system brings up the Client Search window, prompting you to search to see if the individual is already known to the system. If you are able to find an existing client, the system will pull the client’s information into the inquiry automatically. This includes things like identifying information (e.g. name, date of birth, SSN, address, phone number) as well as demographics and insurance information. CalMHSA highly recommends using this search feature first so that you don’t have to re-enter the client’s information.
If you can’t find the client, that’s ok, as inquiries allow you to create a record for a person who is not yet known to the system.
Whenever the Inquiry Details screen is saved and there’s a Client ID linked to this inquiry, the system will push the information from the Inquiry Details screen over to the Client Information screen. This is done because most of the time the flow of screens is:
- New Inquiry
- Create Client
- Program Intake
- Client Information update (e.g. enter additional demographics, aliases, collateral contacts, etc.)
This push from the Inquiry to the Client Information screen means less data entry in steps 2, 3 and 4 for new clients.
For current clients, the flow is:
- New Inquiry
- Search/Select Client
- Client Information pulls into inquiry
- Inquiry is completed
- Client data updates are pushed to Client Information screen
This makes sense if the client is updating their information via the inquiry screen.
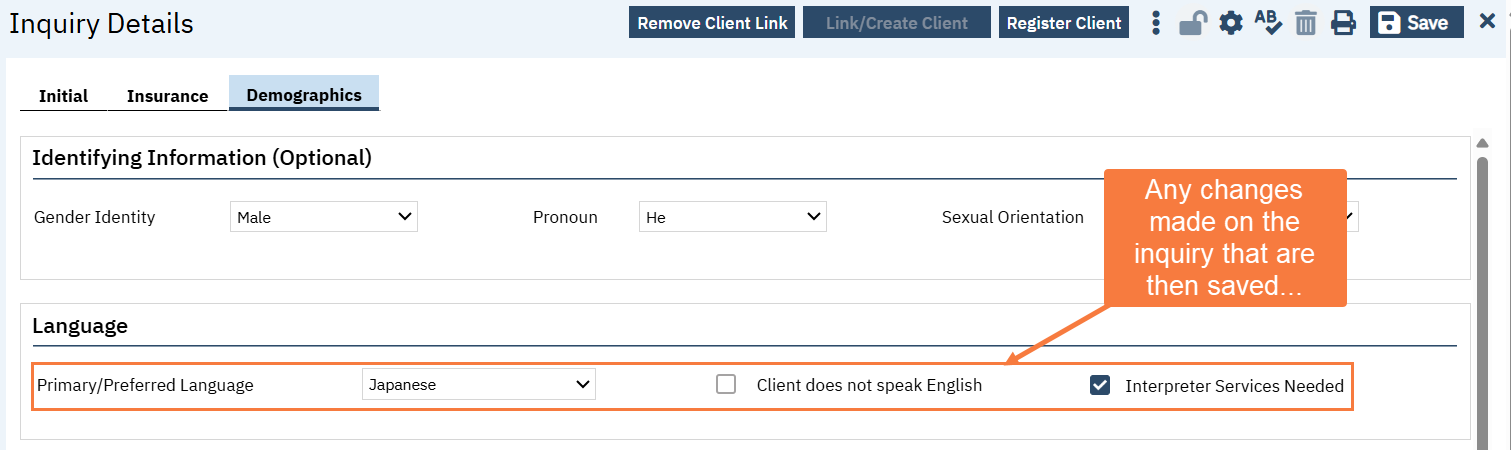
However, ANY time the inquiry is saved, client data is pushed back to the Client Information screen. So consider this scenario:
- New Inquiry
- DON’T Search Client
- Enter client data on inquiry
- Link the client
- System DOES NOT pull data from the Client Information, as you’ve already entered data in step 3
- Inquiry is saved
- System pushes client data in inquiry from step 3 to Client Information, overwriting any existing data
Knowing this push/pull relationship can help you understand any implications for client data entered into these two screens. We’ve heard from some counties that this scenario has “deleted” data out of the Client Information screen. What’s really going on is that not all fields were completed in step 3 (e.g. Language is left blank), so when step 7 happens, the system overwrites the existing data in Client Information (e.g. Language is English) with the data in step 3 (e.g. Language is blank). It’s not actually “deleting” anything, but is simply writing it over with a “blank” value.
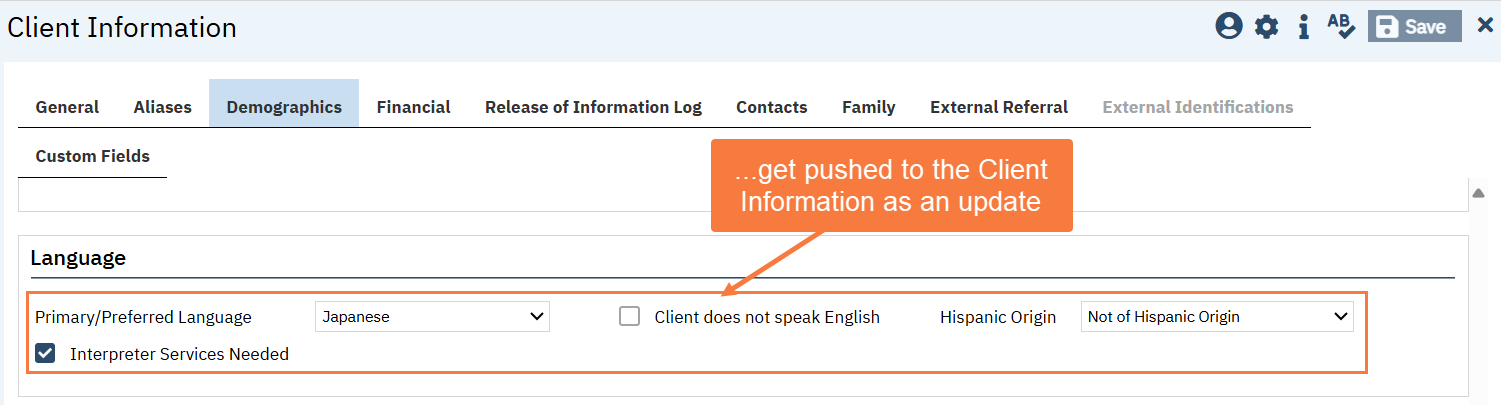
This is why CalMHSA recommends using the locking feature. Once an inquiry has been locked, even if it’s unlocked and changes are made, no client data updates will be pushed back to the Client Information screen.
This is helpful for very old inquiries that need to be updated and saved, but whose clients have already received multiple updates in the Client Information screen. Maybe when the inquiry was first created, there were very few demographics collected. Since then, the Client Information demographics have been fully completed. If the inquiry was locked back when it was first completed, any edits you make will not overwrite all the Client Information you collected in the subsequent months.
Inquiry Sections
When you’re in the Inquiry Details screen, you’ll see that there are multiple tabs. We’ll review each tab below, but we’ll first focus on the “Initial” tab, as this is where the majority of information, as well as all of the required information, is present.
Initial Tab
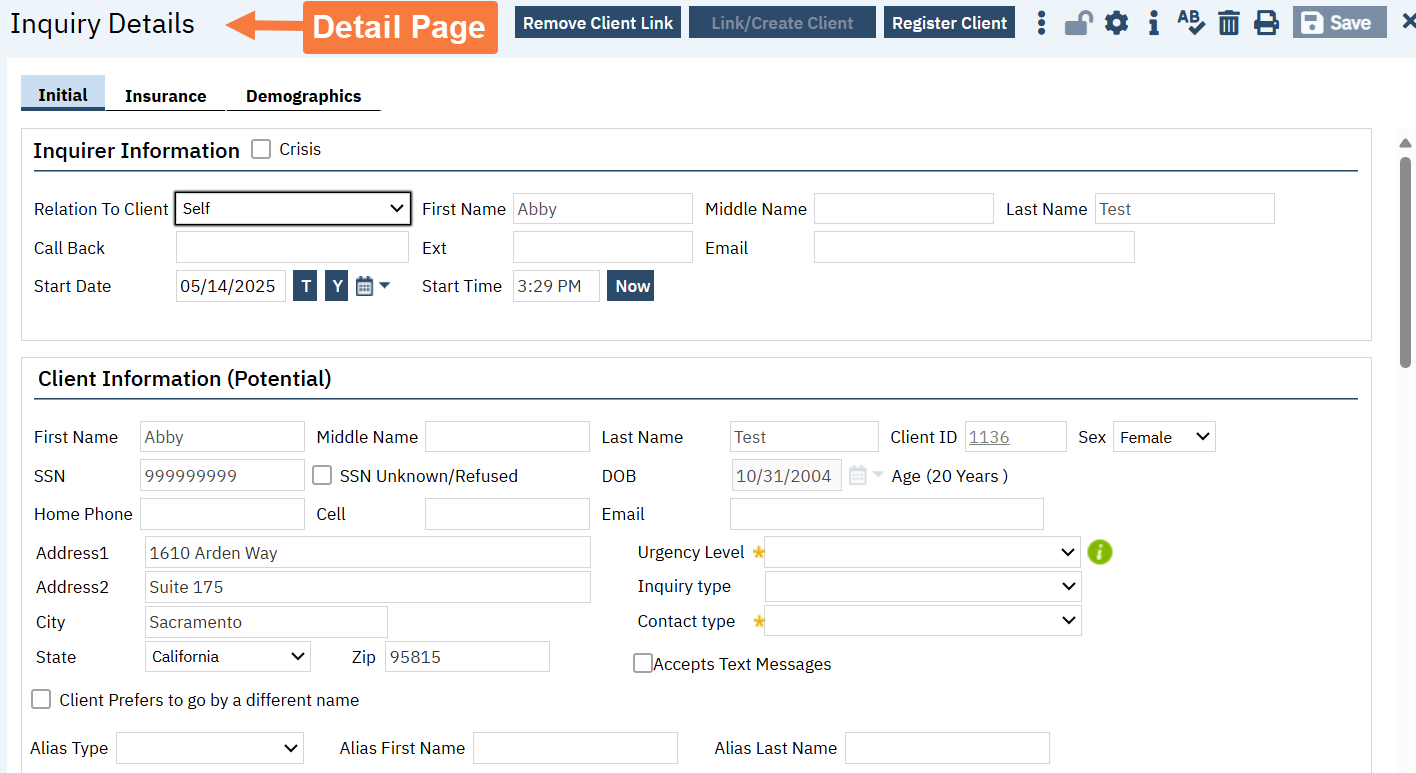
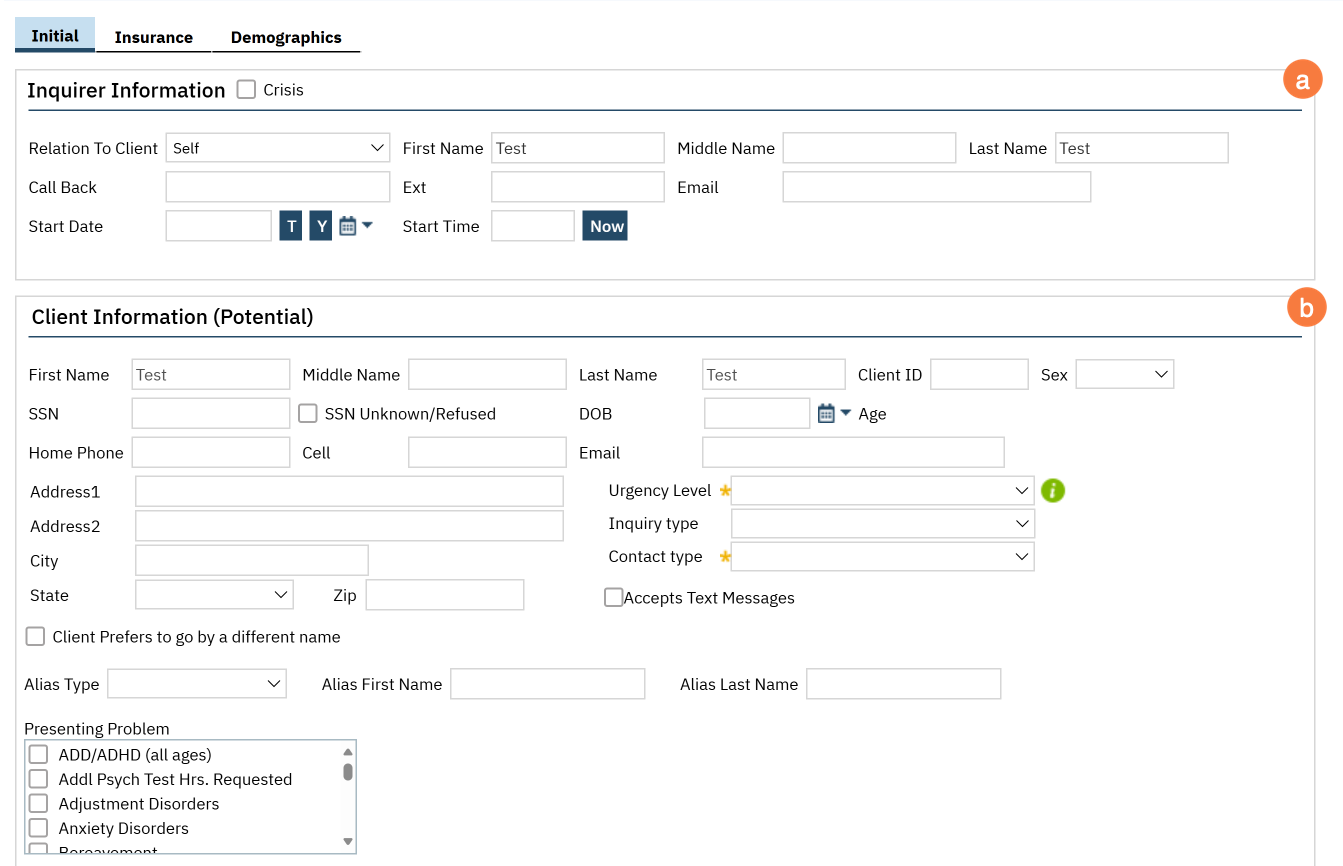
Inquirer Information (a)
This section is where you enter information about the person who is making the request (e.g. a parent calling on behalf of their child). This may or may not be the client themselves, in which case you can simply indicate that the “Relation to Client” is “Self”. This will link the information provided in this section to the information in the “Client Information (Potential)” section.
This section, or at least the header of this section, also includes a “Crisis” checkbox. Clicking this checkbox will open a new tab where you can enter a crisis note. This should only be used once the inquiry is linked to a client and the inquiry has been saved. Otherwise, some of the validations may prohibit you from saving.
Client Information (Potential) (b)
This section is where you enter information about the person who will be receiving services. This is the information that will push/pull with the Client Information screen. You can determine if the inquiry is linked to an actual client record or not by looking in the Client ID field. If the field is blank, that means this inquiry isn’t linked to an existing client (or the person you’re working with hasn’t been added as a client to the system yet).
To create a client from the inquiry screen, you’ll need to at least enter the client’s name (first and last), their date of birth, and their social security number (or check “SSN Unknown/Refused”. These are the same 3 fields you need to do a Client Search for before creating a new client, which is why these fields are required on the Inquiry screen.
Also included in this section are details about the inquiry event itself. This includes things like the urgency level, what the inquiry is about, and whether this was a call, face-to-face walk-in, or a referral form. These fields are required.
There are also a few fields related to “Presenting Problems”. This is used for some specific CARE Act reporting, but otherwise these fields are optional.
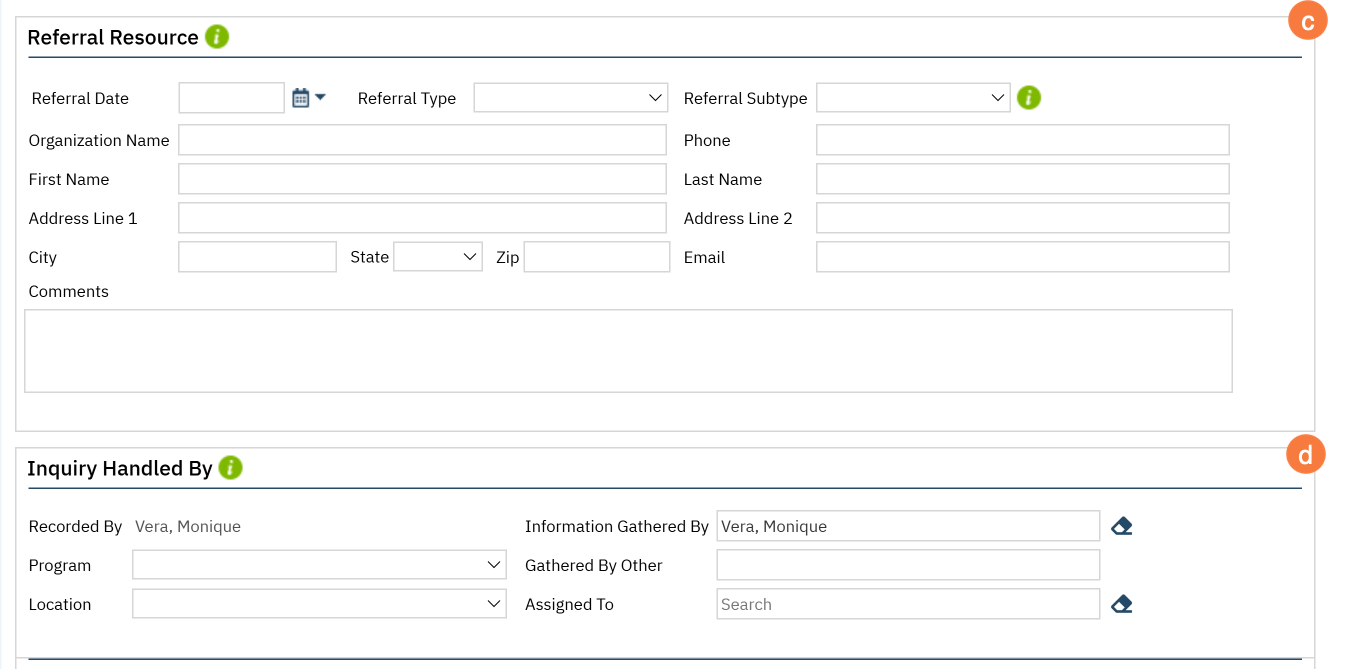
Referral Resource (c)
This section is used when you receive a referral from a partner agency. This allows your county to track how many referrals are received and what happened with them. If the request is simply a request by the client or the client’s parent, you can leave this section blank.
Please note that if you start to fill out some of this section, other fields in the section will become required.
Inquiry Handled By (d)
This section records who created the inquiry record and any staff members who worked on it. When you create a new inquiry, your name will automatically be entered in the “Recorded By” field. In some cases, such as when handing a call off to a crisis worker, other fields such as “Information Gathered By” or “Assigned To” may be updated to record the person you handed the call off to.
This section also includes the Program field which allows the system to protect SUD requests under 42 CFR Part 2. Always enter the program you were working in when you received the inquiry. Generally, you can leave the Location field blank, unless your county is using this field for county-specific reporting.
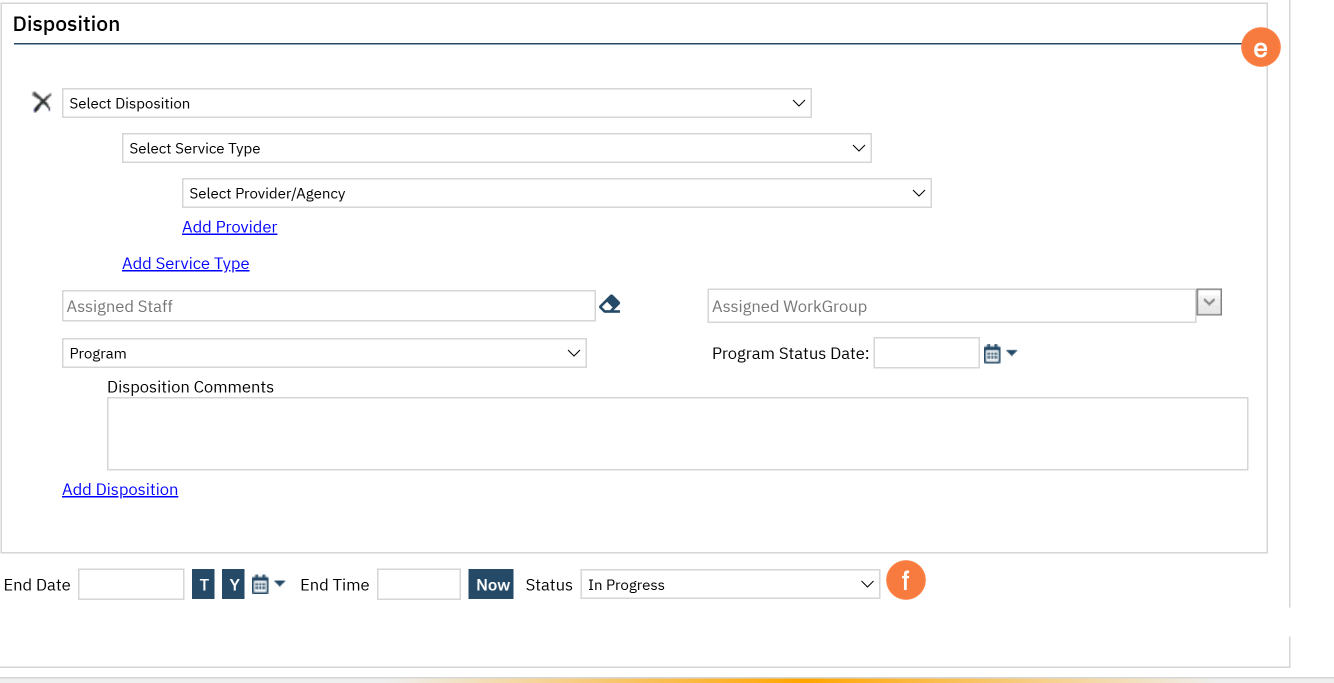
Disposition (e)
This section is part of the Care Coordination module, which is only partially implemented at this time. When the inquiry engagement ends, enter what the next steps are, or what the result of the inquiry was. Your county may have edited the options in these field, so ask your supervisor if you’re not sure what to input here.
Anytime a disposition is selected, you need to select either an Assigned Staff OR an Assigned Workgroup (you can’t select both). These fields aren’t currently being utilized, but the system still requires this. If you’re handing this step off to someone else, put their name in there. If this is just a documentation of what the result was (e.g. “Information Only”), you can put yourself in this field.
For certain dispositions (results of the inquiry), the Program fields will become available. These are used when referring a client to a program. By entering a Program name and a Program Status Date, the system will automatically put the client in “Requested” status for that program. This makes referrals much faster.
Some things to note about this:
- If the client happens to already be associated with that program (e.g. already enrolled or already in “requested” status), you don’t have to worry. No duplicate program enrollment will be created.
- There’s nothing that automatically alerts people to this referral, so it’s still good to let them know. CalMHSA is still working on the Care Coordination module, but the complexity means a long timeline for deployment.
- Your county may not be using this functionality and may have turned off this automatic request enrollment feature. Check with your supervisor if you’re not sure whether this is being used or not.
This section also includes the End Date and End Time fields, as well as the Status field for the inquiry (f). The default status for any new inquiry is always “In Progress”. Changing this to “Complete” and clicking “Save” will lock the inquiry, if your county has implemented that functionality.
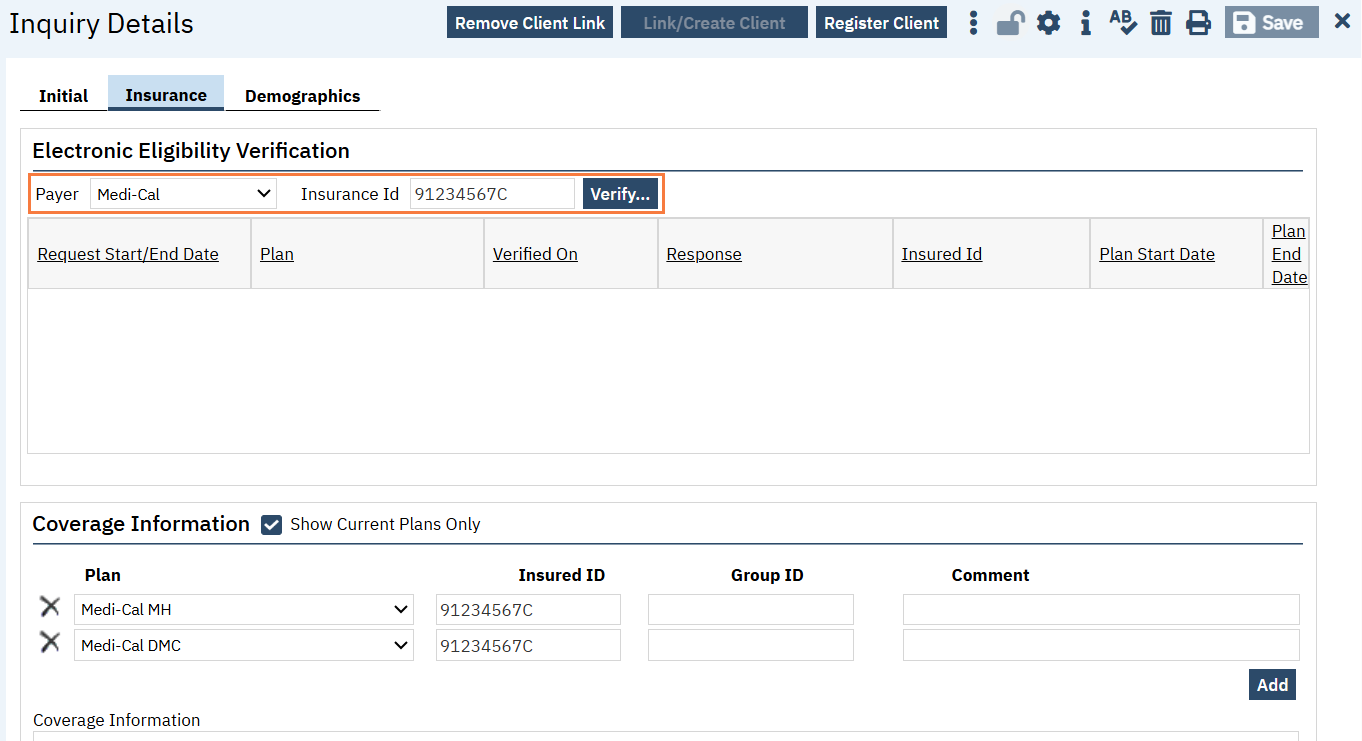
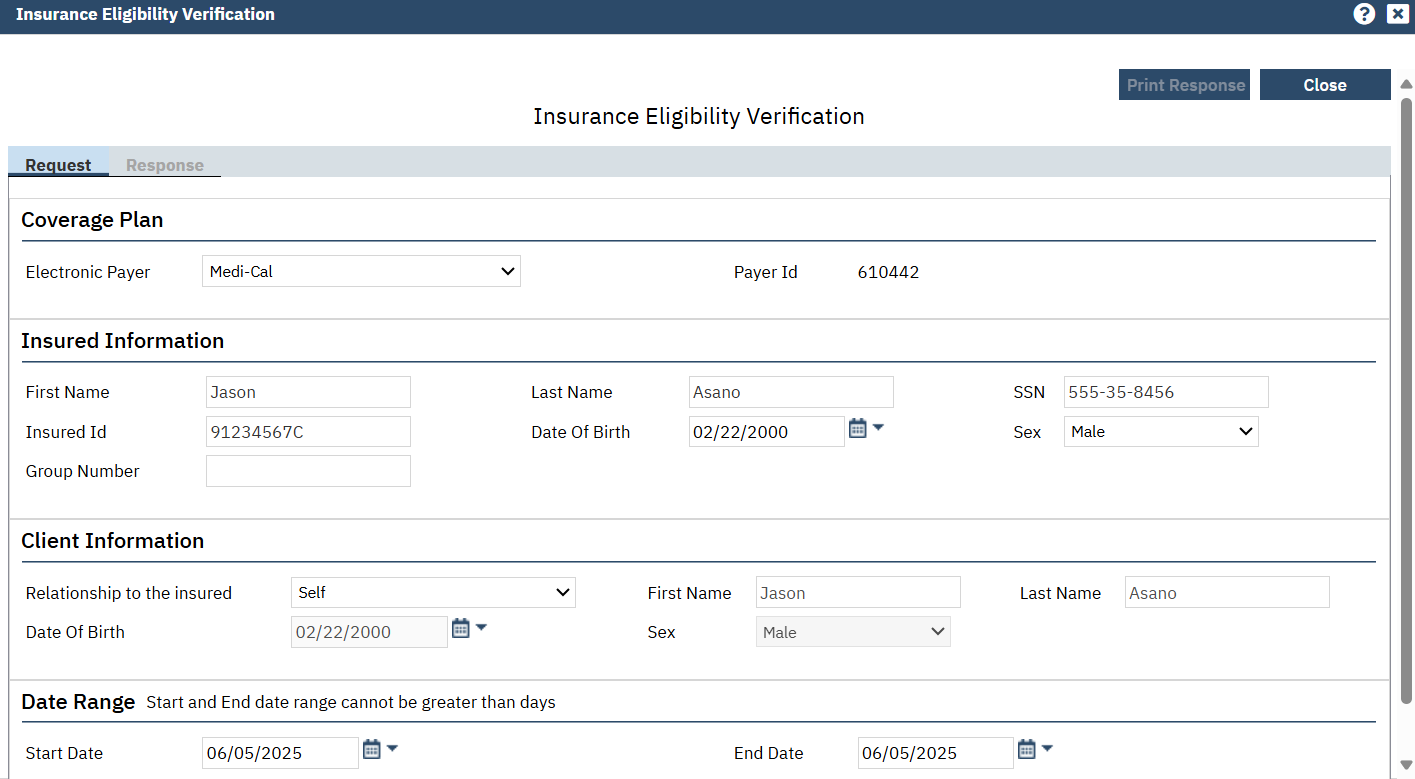
Insurance Tab
This tab can be used to check a client’s Medi-Cal eligibility. If this is an existing client, their coverage should have already been entered. If this is a new client, you can enter the client’s Medi-Cal number in the “Insurance Id” field and click “Verify” to pull up the “Insurance Eligibility Verification” window.
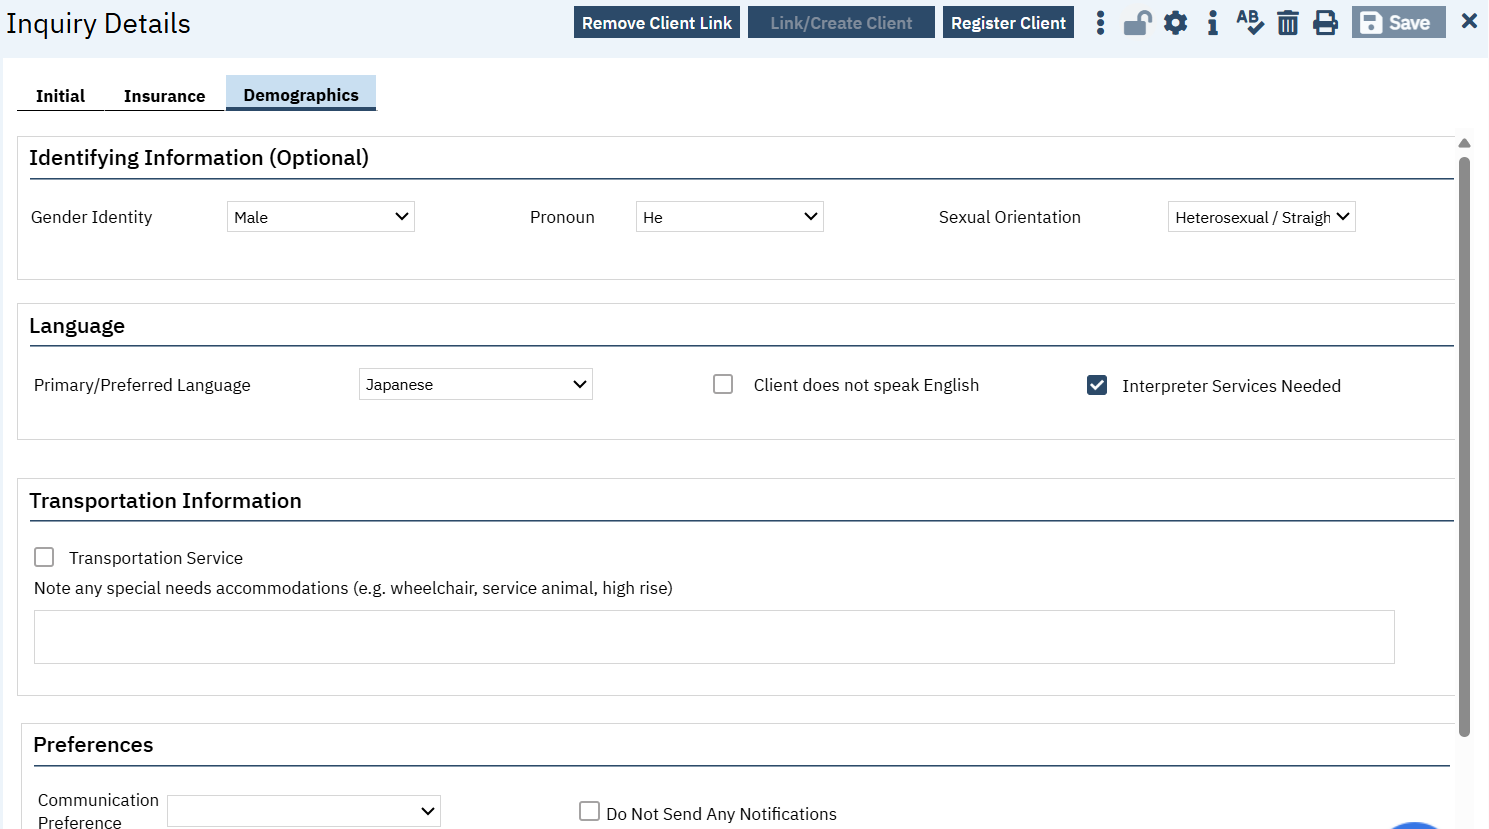
Demographics Tab
This tab can be used to document some key demographic information that may be helpful when first working with a new client. CalMHSA did not include full demographic data, as most of that is unnecessary to collect during the initial request. However, identifying information such as the client’s preferred pronouns and language can be vital to successfully connect a client to services.
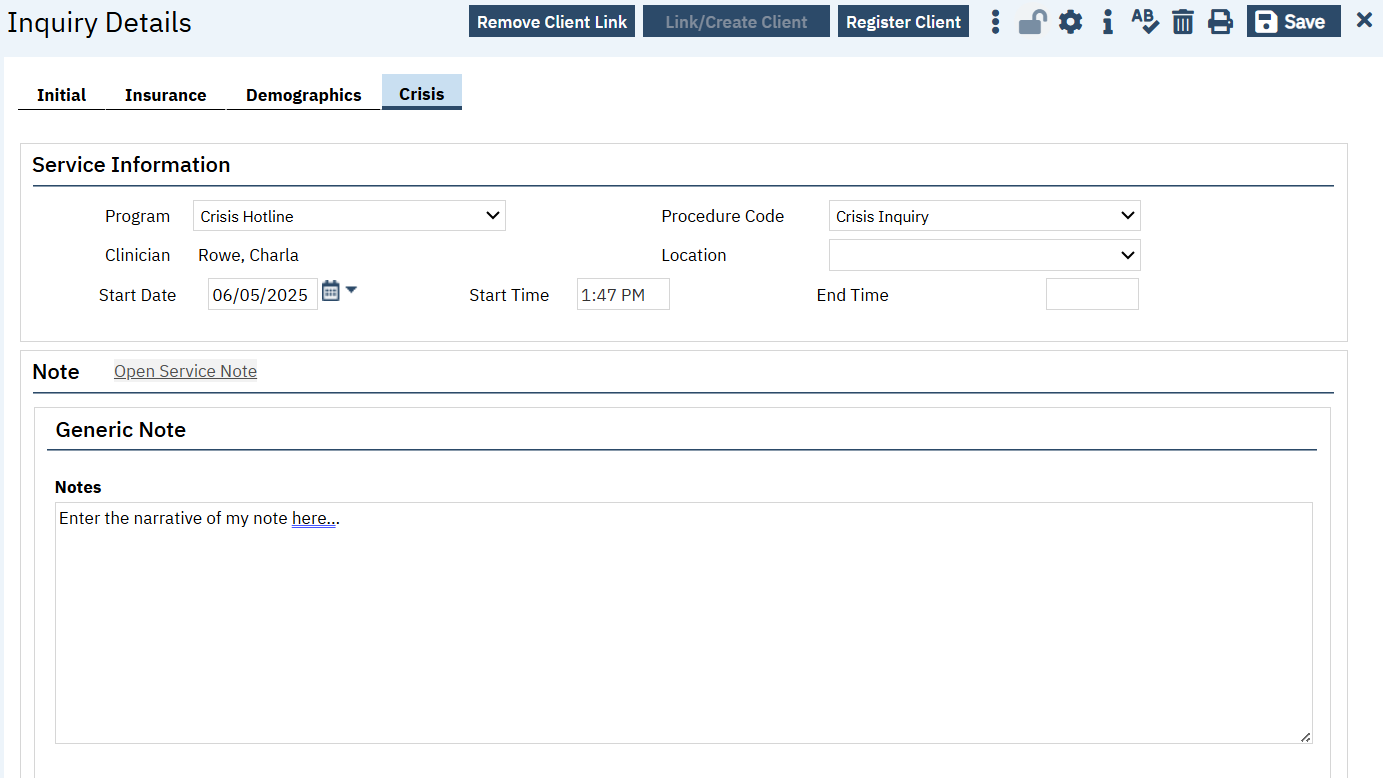
Crisis Tab
This tab is only visible when the “Crisis” checkbox is checked. This tab allows you to document a crisis service directly from the inquiry. Just like any other service, you’ll need to enter the Program first before entering the Procedure Code. You’ll also need to enter the Start Date and Time. Unlike other services, the inquiry requires an End Time (e.g. 11:35p) rather than a Service Time (e.g. 62 min). You’ll need to enter all of these fields before you can save your note.
The program field will be limited to only programs the client is current open to AND programs that do not require enrollment in order to receive services. These types of programs are generally limited to Crisis Line programs and are setup by your system administrator.
The procedure code field will be limited to only procedure codes using a note type that is allowed within the inquiry. For the most part, the only procedures you’ll be able to select will be “Crisis Inquiry”, which provides a simple text field progress note, and “Mobile Crisis Dispatch Screening”, which provides a complex screening tool for Mobile Crisis programs.
Once you select your procedure code, the Note section will populate with the appropriate note type. Enter all of the information directly into this section.
When you’re finished, enter your End Time and click Save. This will create a service from all the information entered here, including the creation of the service note. You can then go to that service and sign your note.
You don’t want to go back and forth between the inquiry and the service note, as it can cause problems with the system trying to figure out where the most recent information is saved. CalMHSA recommends entering everything in the inquiry until you’re completely finished. That way, all the information is stored in one place (the inquiry) and then that information is pushed all at once to the service note. Once you sign the service note, you shouldn’t have to update anything in the Crisis tab in the inquiry.
See also: