Crisis Line calls are documented on the Inquiry screen. This is simply how to document a call. Follow your county’s procedures for handling crisis situations. Also consider the context of your crisis call when asking for information. Address the client’s most pressing needs before attempting to gather information such as demographics or date of birth.
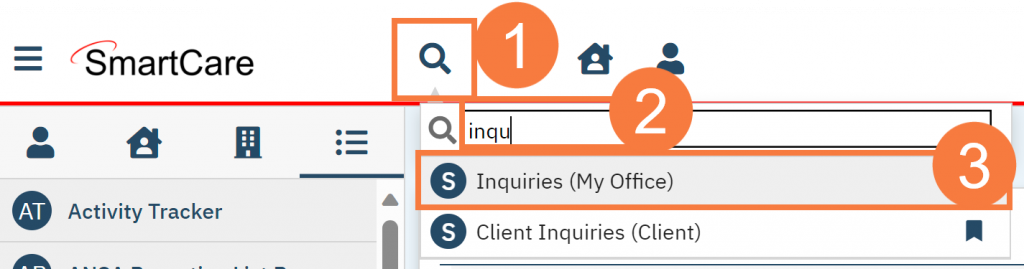
- Click the Search icon.
- Type Inquiries in the search bar.
- Click to select Inquiries (My Office).
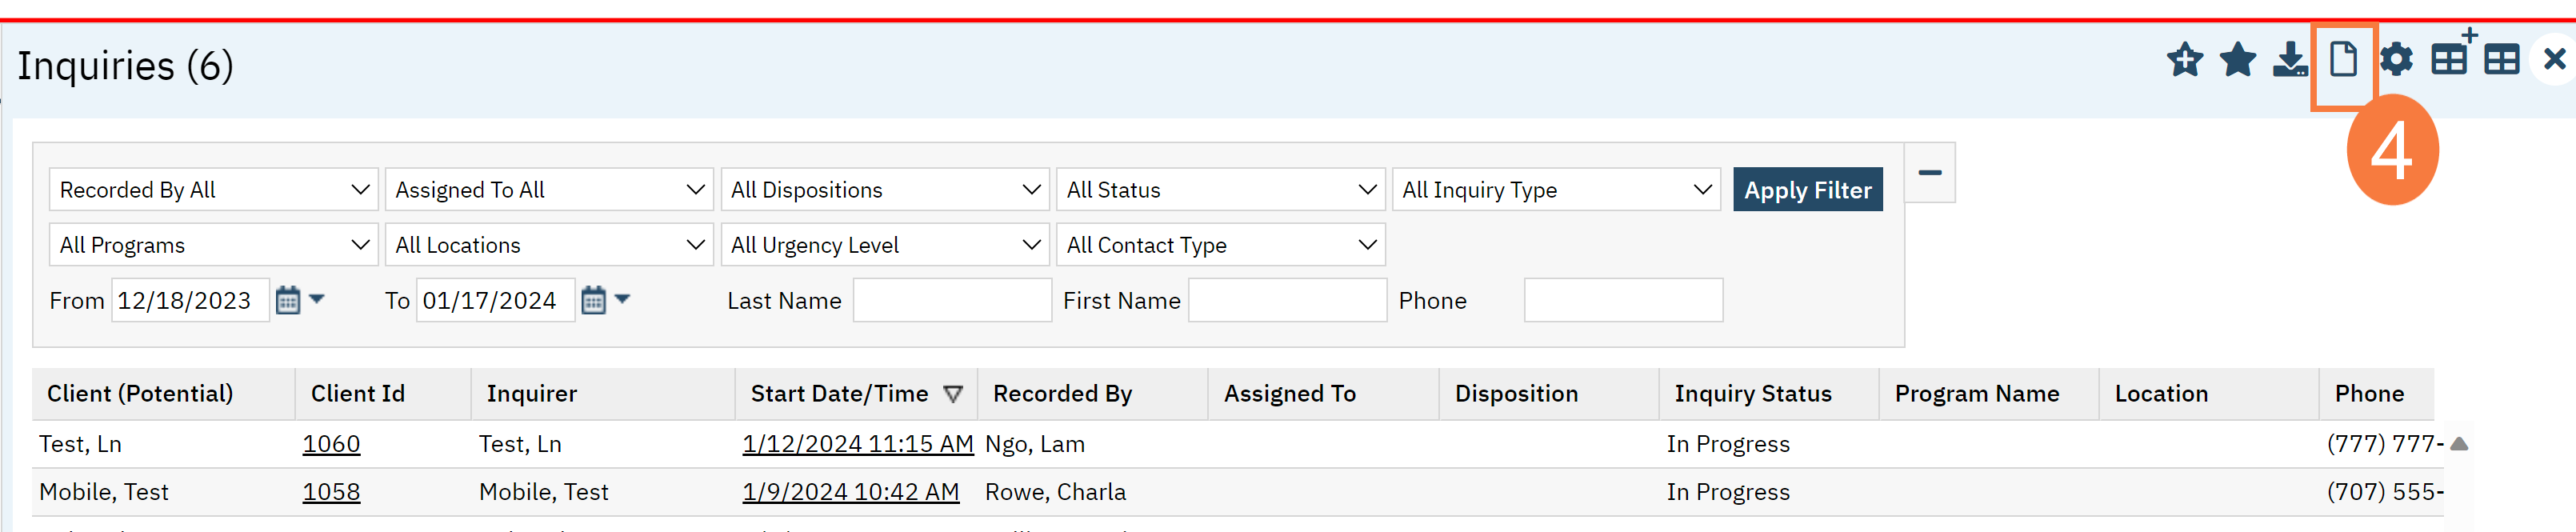
- This will bring you to the Inquiries list page. If this call was transferred to you, search the list page to determine if an inquiry has already been started for this client. If so, click the link in the Start Date/Time column. If an inquiry has not been started, or if the call was direct to the crisis line, create a new inquiry by using the new icon.
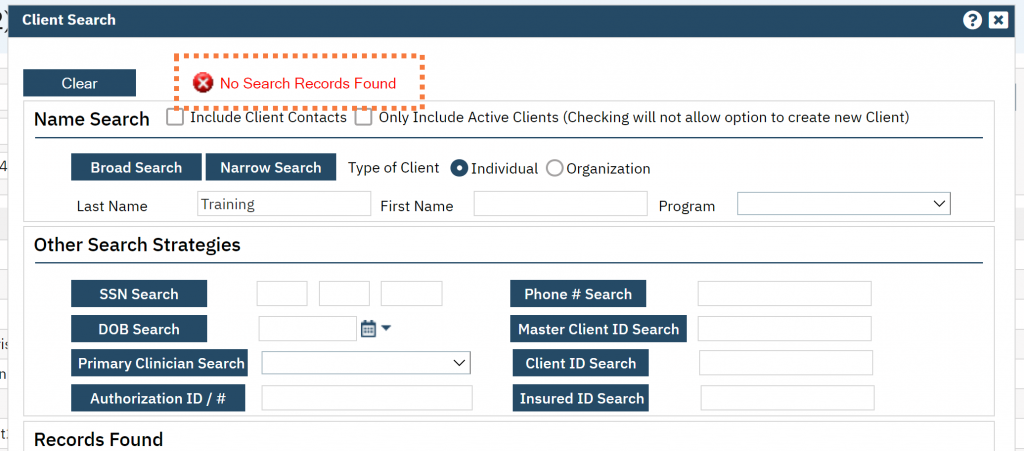
- This will bring up the client search window. Search to determine if the person is a client in the system. The search includes both current and past clients. You can also skip this step by selecting “Inquiry (New Client)” if you know for certain this person is not a client in the system (e.g. they don’t have a SmartCare client ID).
- If there are no matching records, an alert will show at the top of the Client Search window. You may want to try searching by DOB or SSN. If there are no results, select “Cancel.” This will take you to the Inquiry screen.
-
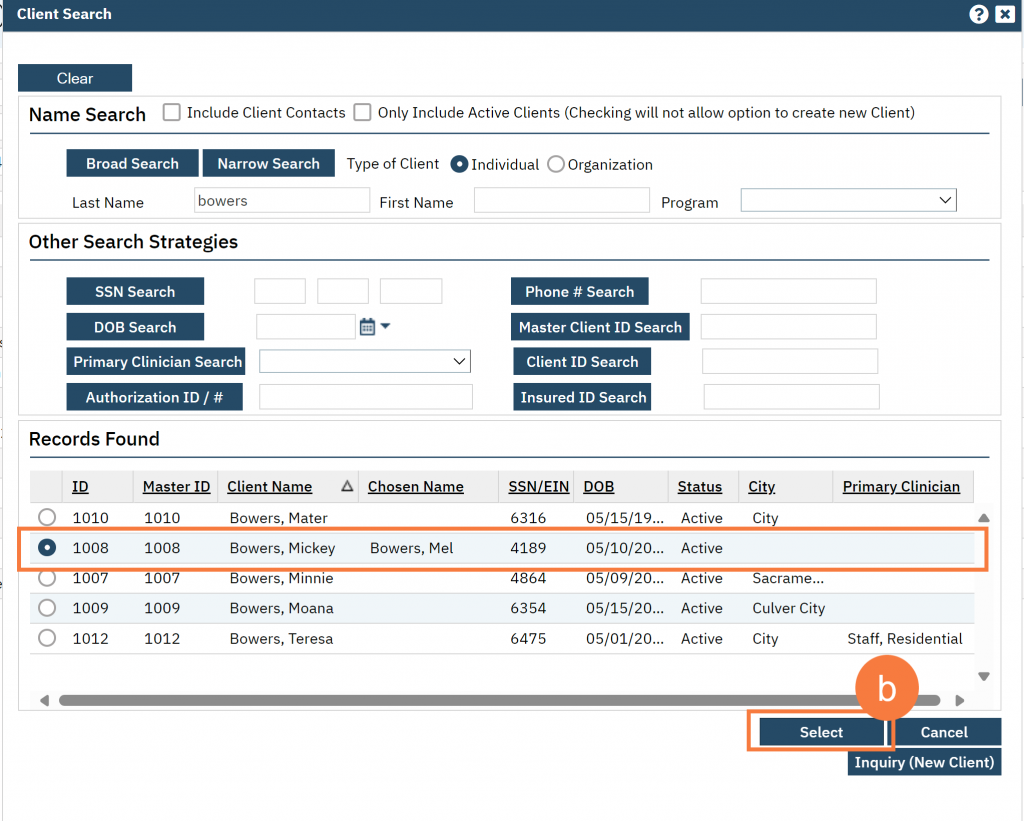
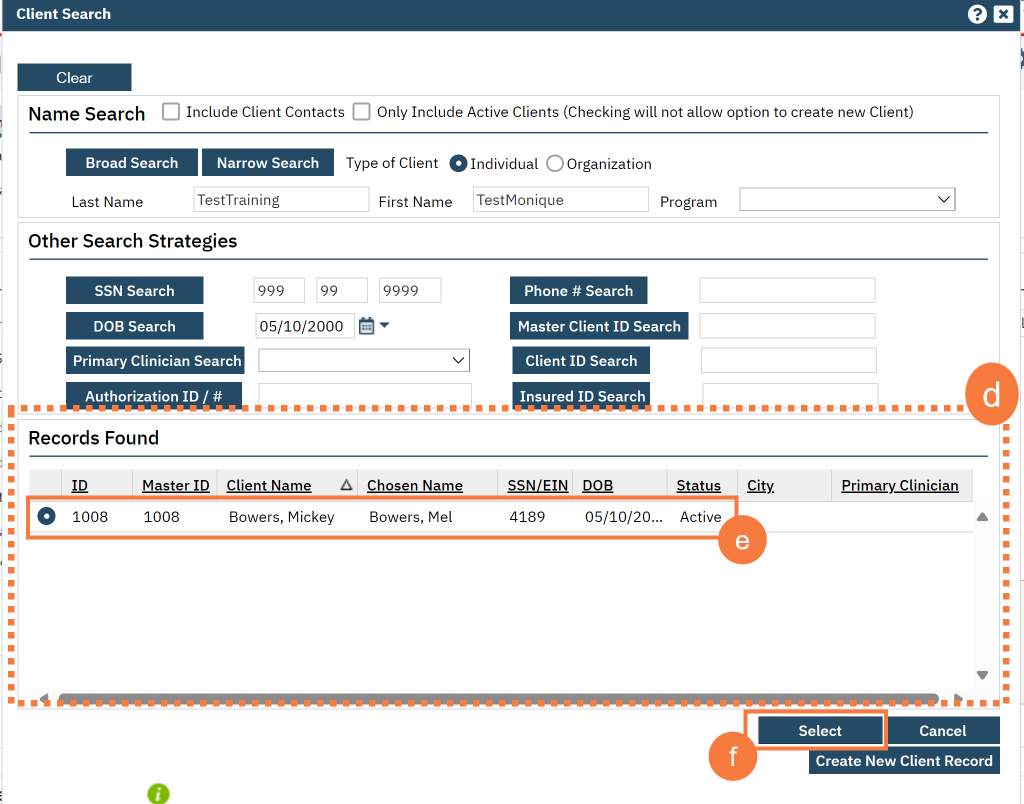
- Any search results will show in the “Records Found” area. Review the Records Found to determine if the person is already in the system as a client. If the person is already a client in the system, select the button next to the appropriate record. Click “Select” to link the Inquiry to the selected client. This will take you to the Inquiry screen and pre-populate the Client Information section.
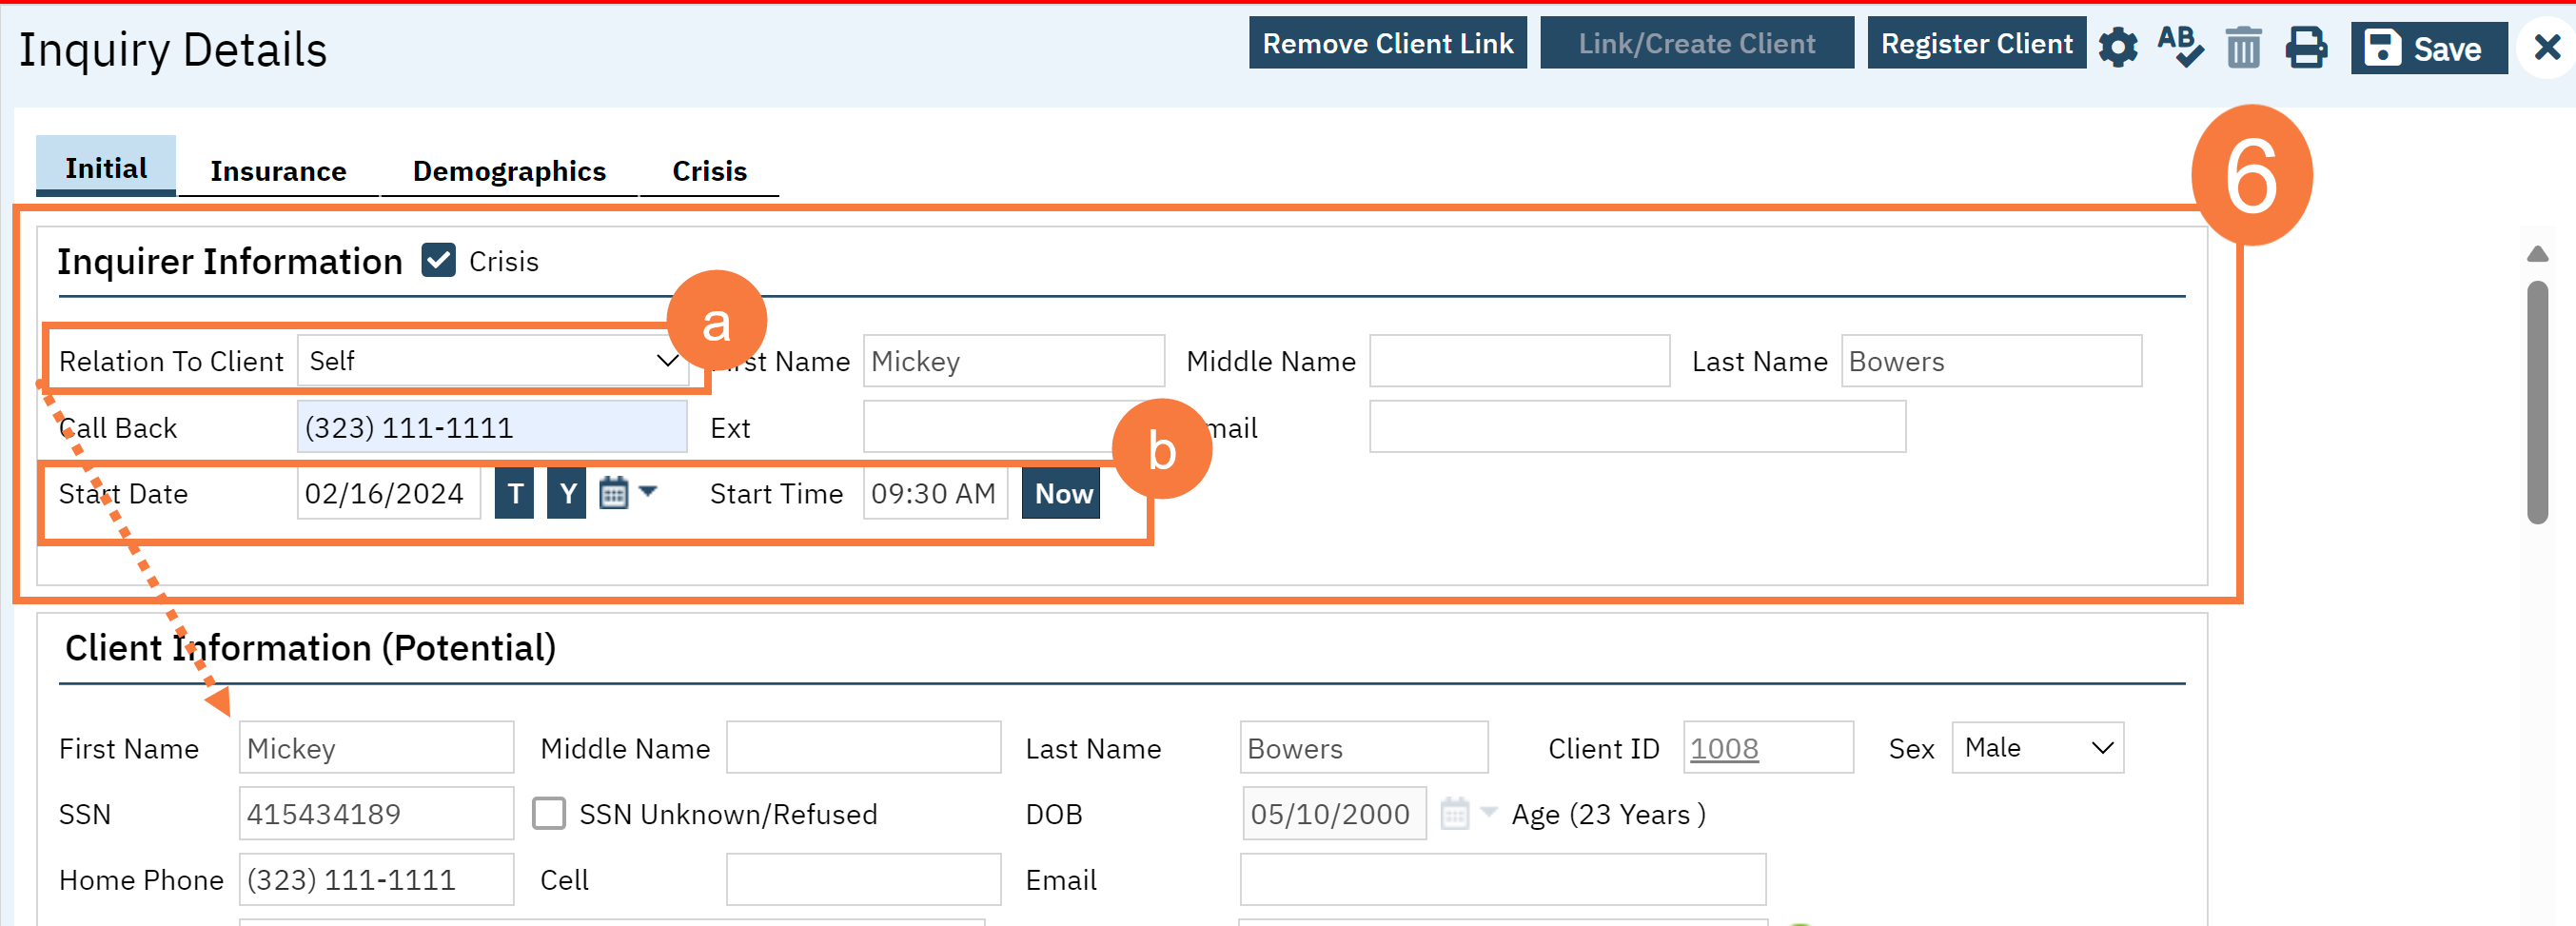
- Complete the information about the caller, or “Inquirer”.
- Complete the “Relation to Client” field. If the client is calling for themselves, select “Self”. If you’ve already selected a client, this section will auto-populate with the client’s information. If the person is not already a client, as you enter the caller’s information, it will push this information automatically into the “Client Information” section.
- Enter the start date and time of the call. There are buttons for “T” (today) and “Now” to help make this quick and easy.
- You may also consider getting a call back number, in case the client is disconnected or hangs up.
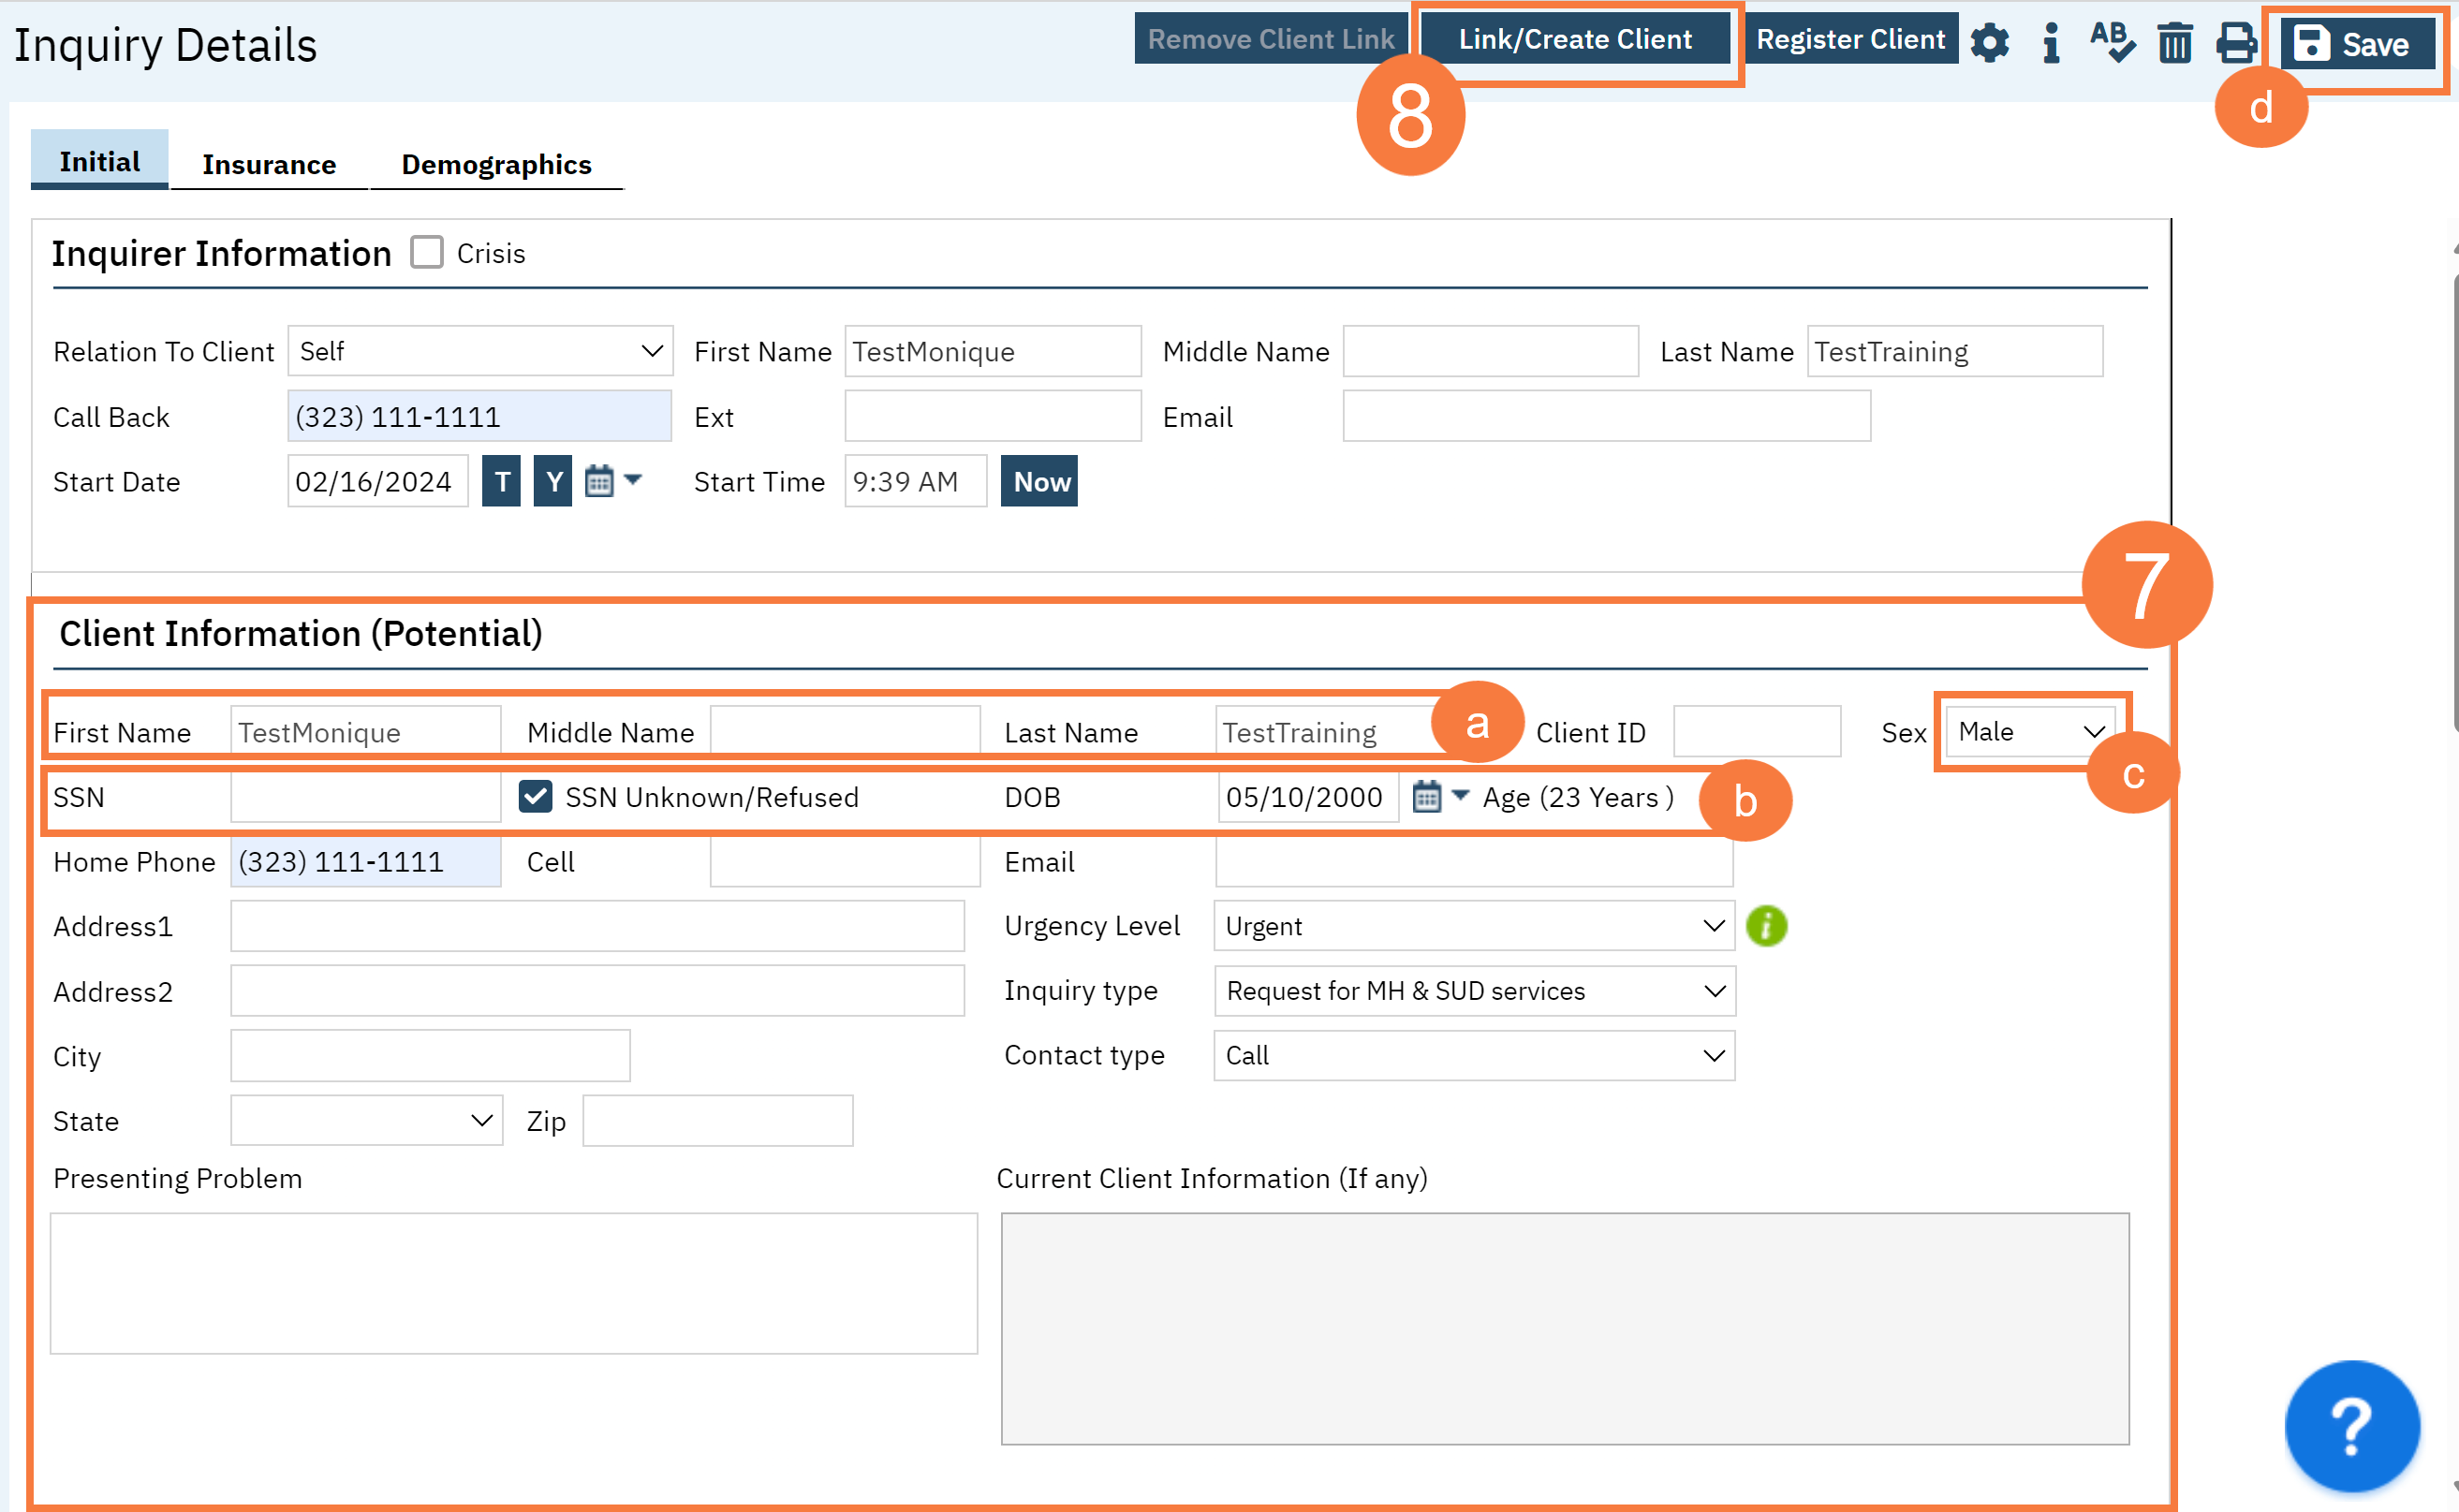
- If the person is not a current client, add them as a client. To do this, complete the information about the potential client.
- Complete the First Name and Last Name fields. Middle Name is not required but can be added as necessary.
- Complete the SSN and DOB fields. This is for the client’s social security number (SSN) and date of birth (DOB), respectively. If the client refuses to share, or doesn’t know, you can simply check the box “SSN Unknown/Refused.” Once saved, this will fill in the SSN with “999999999”, which is SmartCare’s version of “no SSN”.
- Complete the Sex field.
- Click Save.
- Select the “Link/Create Client” button. This will bring up the client search window, with a few extra buttons at the bottom.
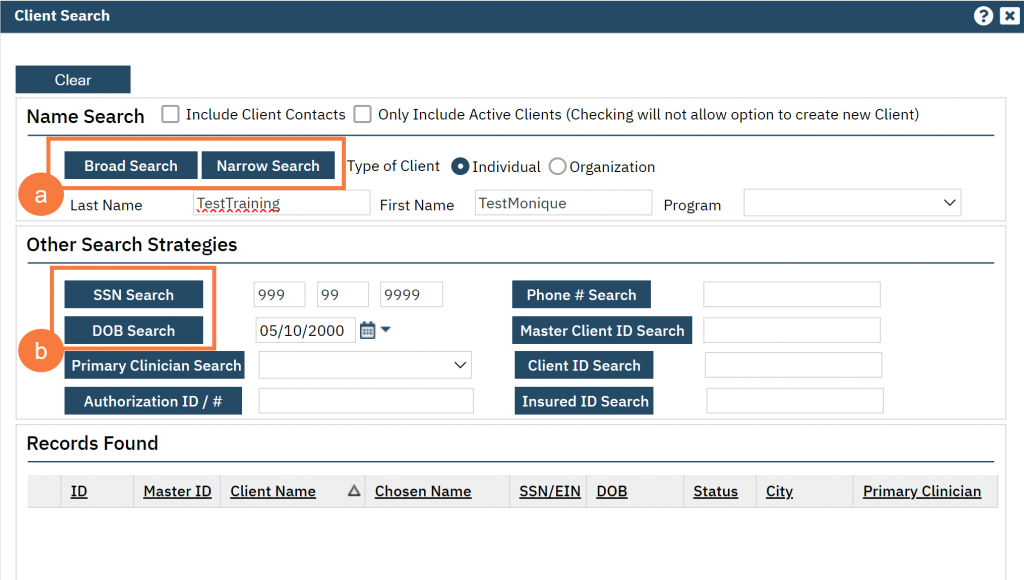
- You must search by name by clicking on either “Broad Search” or “Narrow Search”.
- You must also search by SSN and DOB by clicking on those respective buttons.
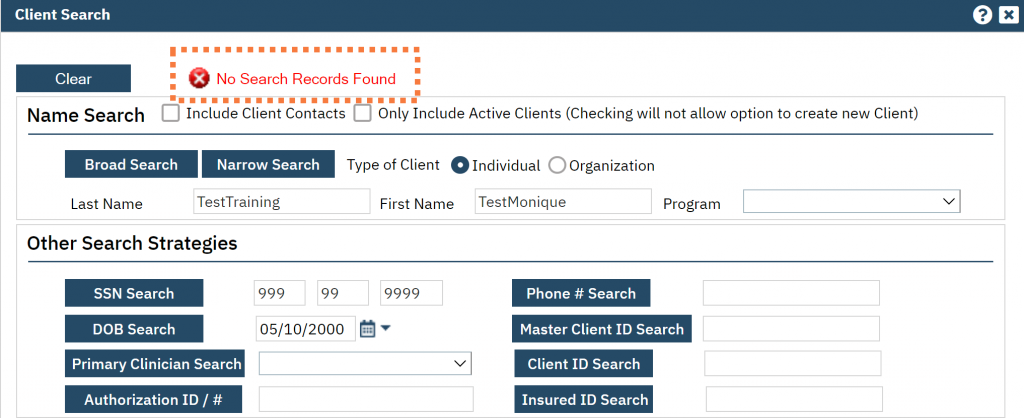
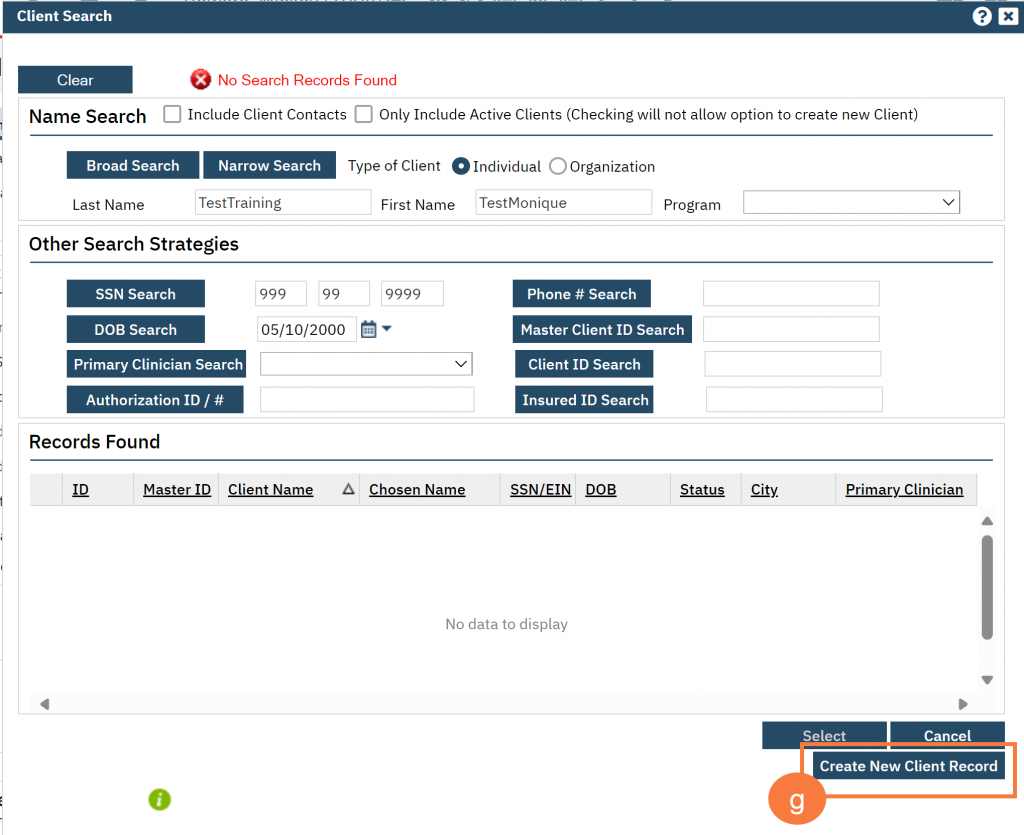
- If no records are found based on the search you do, an alert will show at the top of the window.
-
- Any search results will show in the “Records Found” area. Review the Records Found to determine if the person is already in the system as a client.
- If the person is already a client in the system, select the button next to the appropriate record.
- Click “Select” to link the Inquiry to the selected client.
-
- If the person is not a client, meaning no records were found matching the client’s information, click “Create New Client Record.”
-
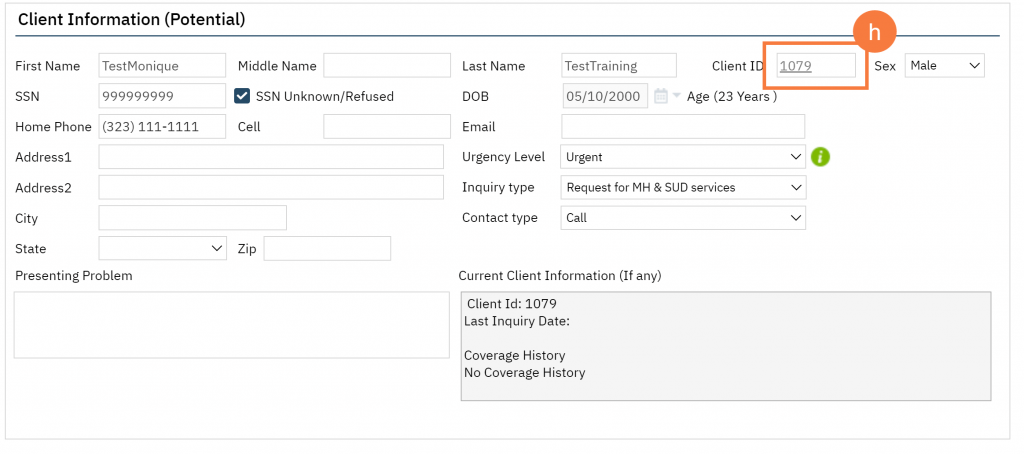
- This will take you back to the Inquiry screen but now a client ID number will be added.
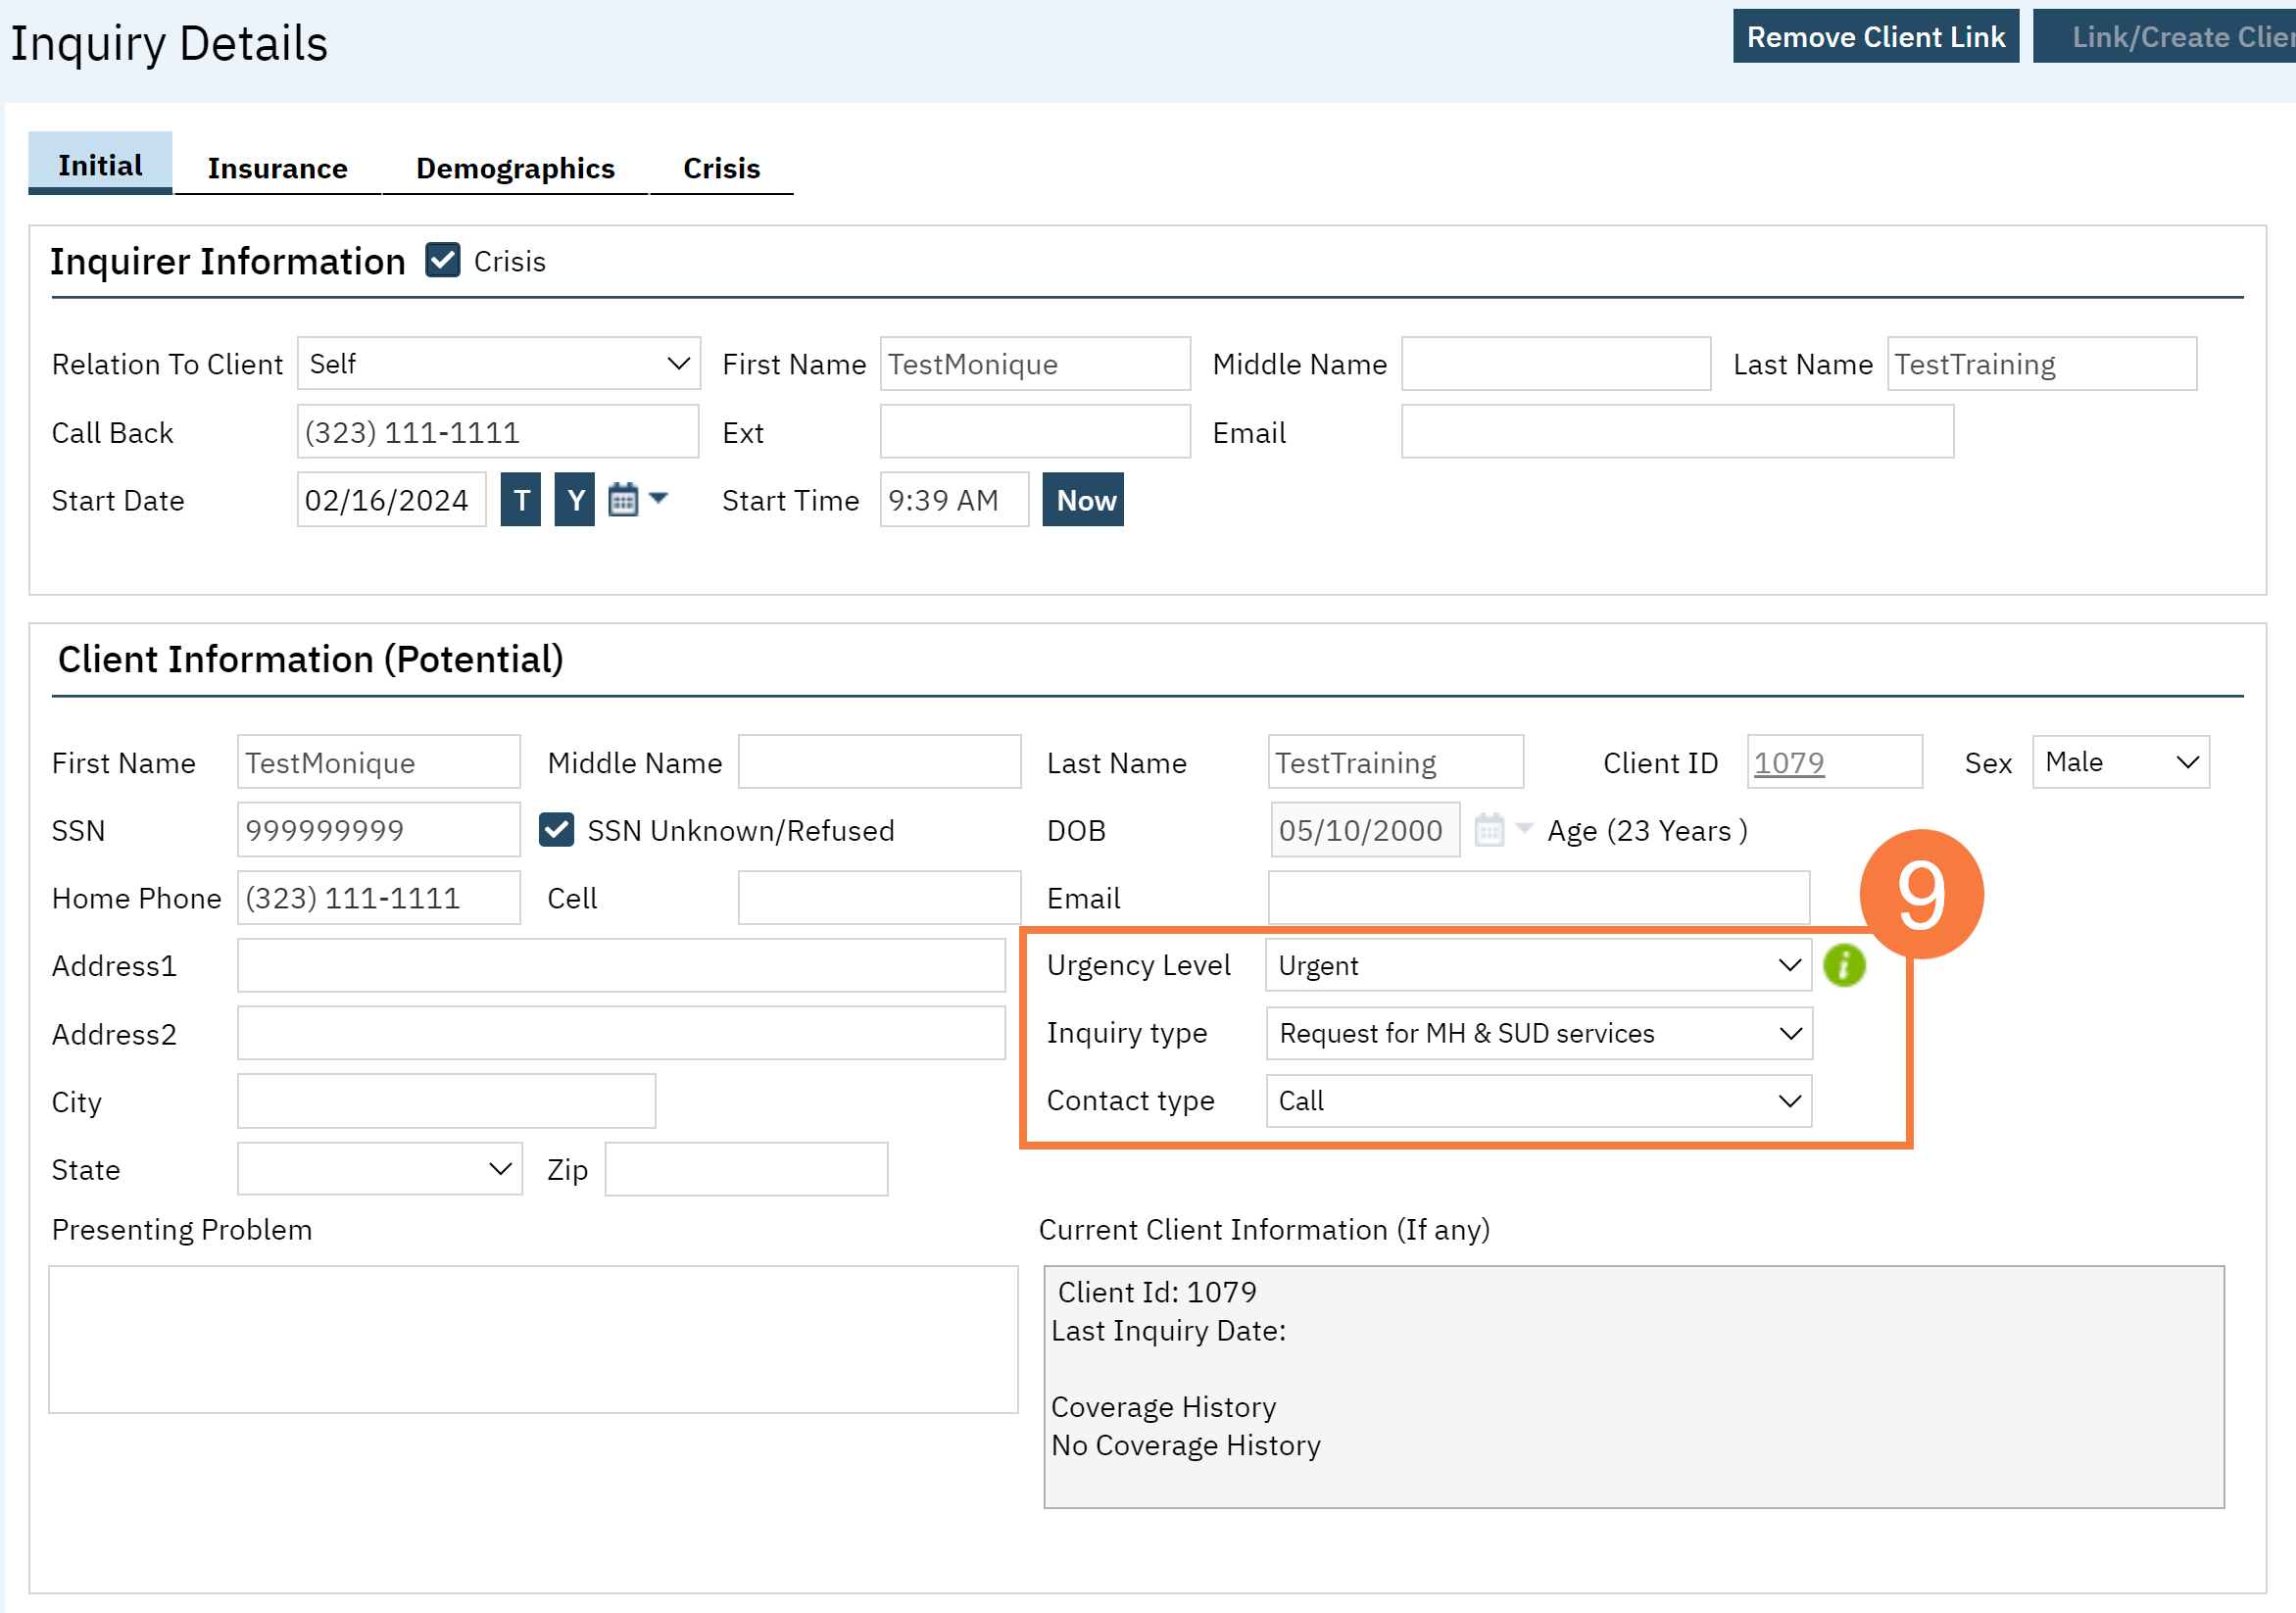
- Assess the urgency of the call, as sometimes people call the Crisis Line by mistake. Complete the Urgency Level, Inquiry type, and Contact type fields. The options for each field are listed in the tables below. This includes a description of when to use each option.
| Urgency Level | Description /Use Case |
|---|---|
| Emergent | Use if the call is an emergency |
| Not Urgent | Use if the call is a routine request for services |
| Urgent | Use if the call is an urgent request |
DHCS defines urgent as: “When the beneficiary’s condition is such that they faces an imminent and serious threat to their health, including, but not limited to, the potential loss of life, limb, or other major bodily function, or the normal timeframe for the decision making process would be detrimental to the beneficiary’s life or health or could jeopardize their ability to regain maximum function, decisions to approve, modify, or deny requests by providers prior to, or concurrent with, the provision of health care services to enrollees, shall be made in a timely fashion appropriate for the nature of the enrollee’s condition, not to exceed 72 hours.”
| Inquiry Type | Description/Use Case |
|---|---|
| Requests for services/screening | Use when the reason for the call is a request for new services |
| Crisis | Use when the reason for the call is for crisis services |
| Information | Use when the reason for the call is for information |
| Discharge/Transition Coordination | Use when the reason for the call is for another provider to coordinate transition of care to/from your agency |
| Jail Diversion | Use when the reason for the call is related to Jail Diversion programs |
| Consultation | Use when the reason for the call is for an outside provider seeking a consultation |
| Other | Use when the reason for the call is not addressed by any of the above |
| Contact Type | Description/Use Case |
|---|---|
| Call | Use when the inquiry was complete via telephone |
| Face to Face | Use when the inquiry was completed via in-person, such as a walk-in |
| Form | Use when the inquiry was completed via form, such as a referral that was sent to the county |
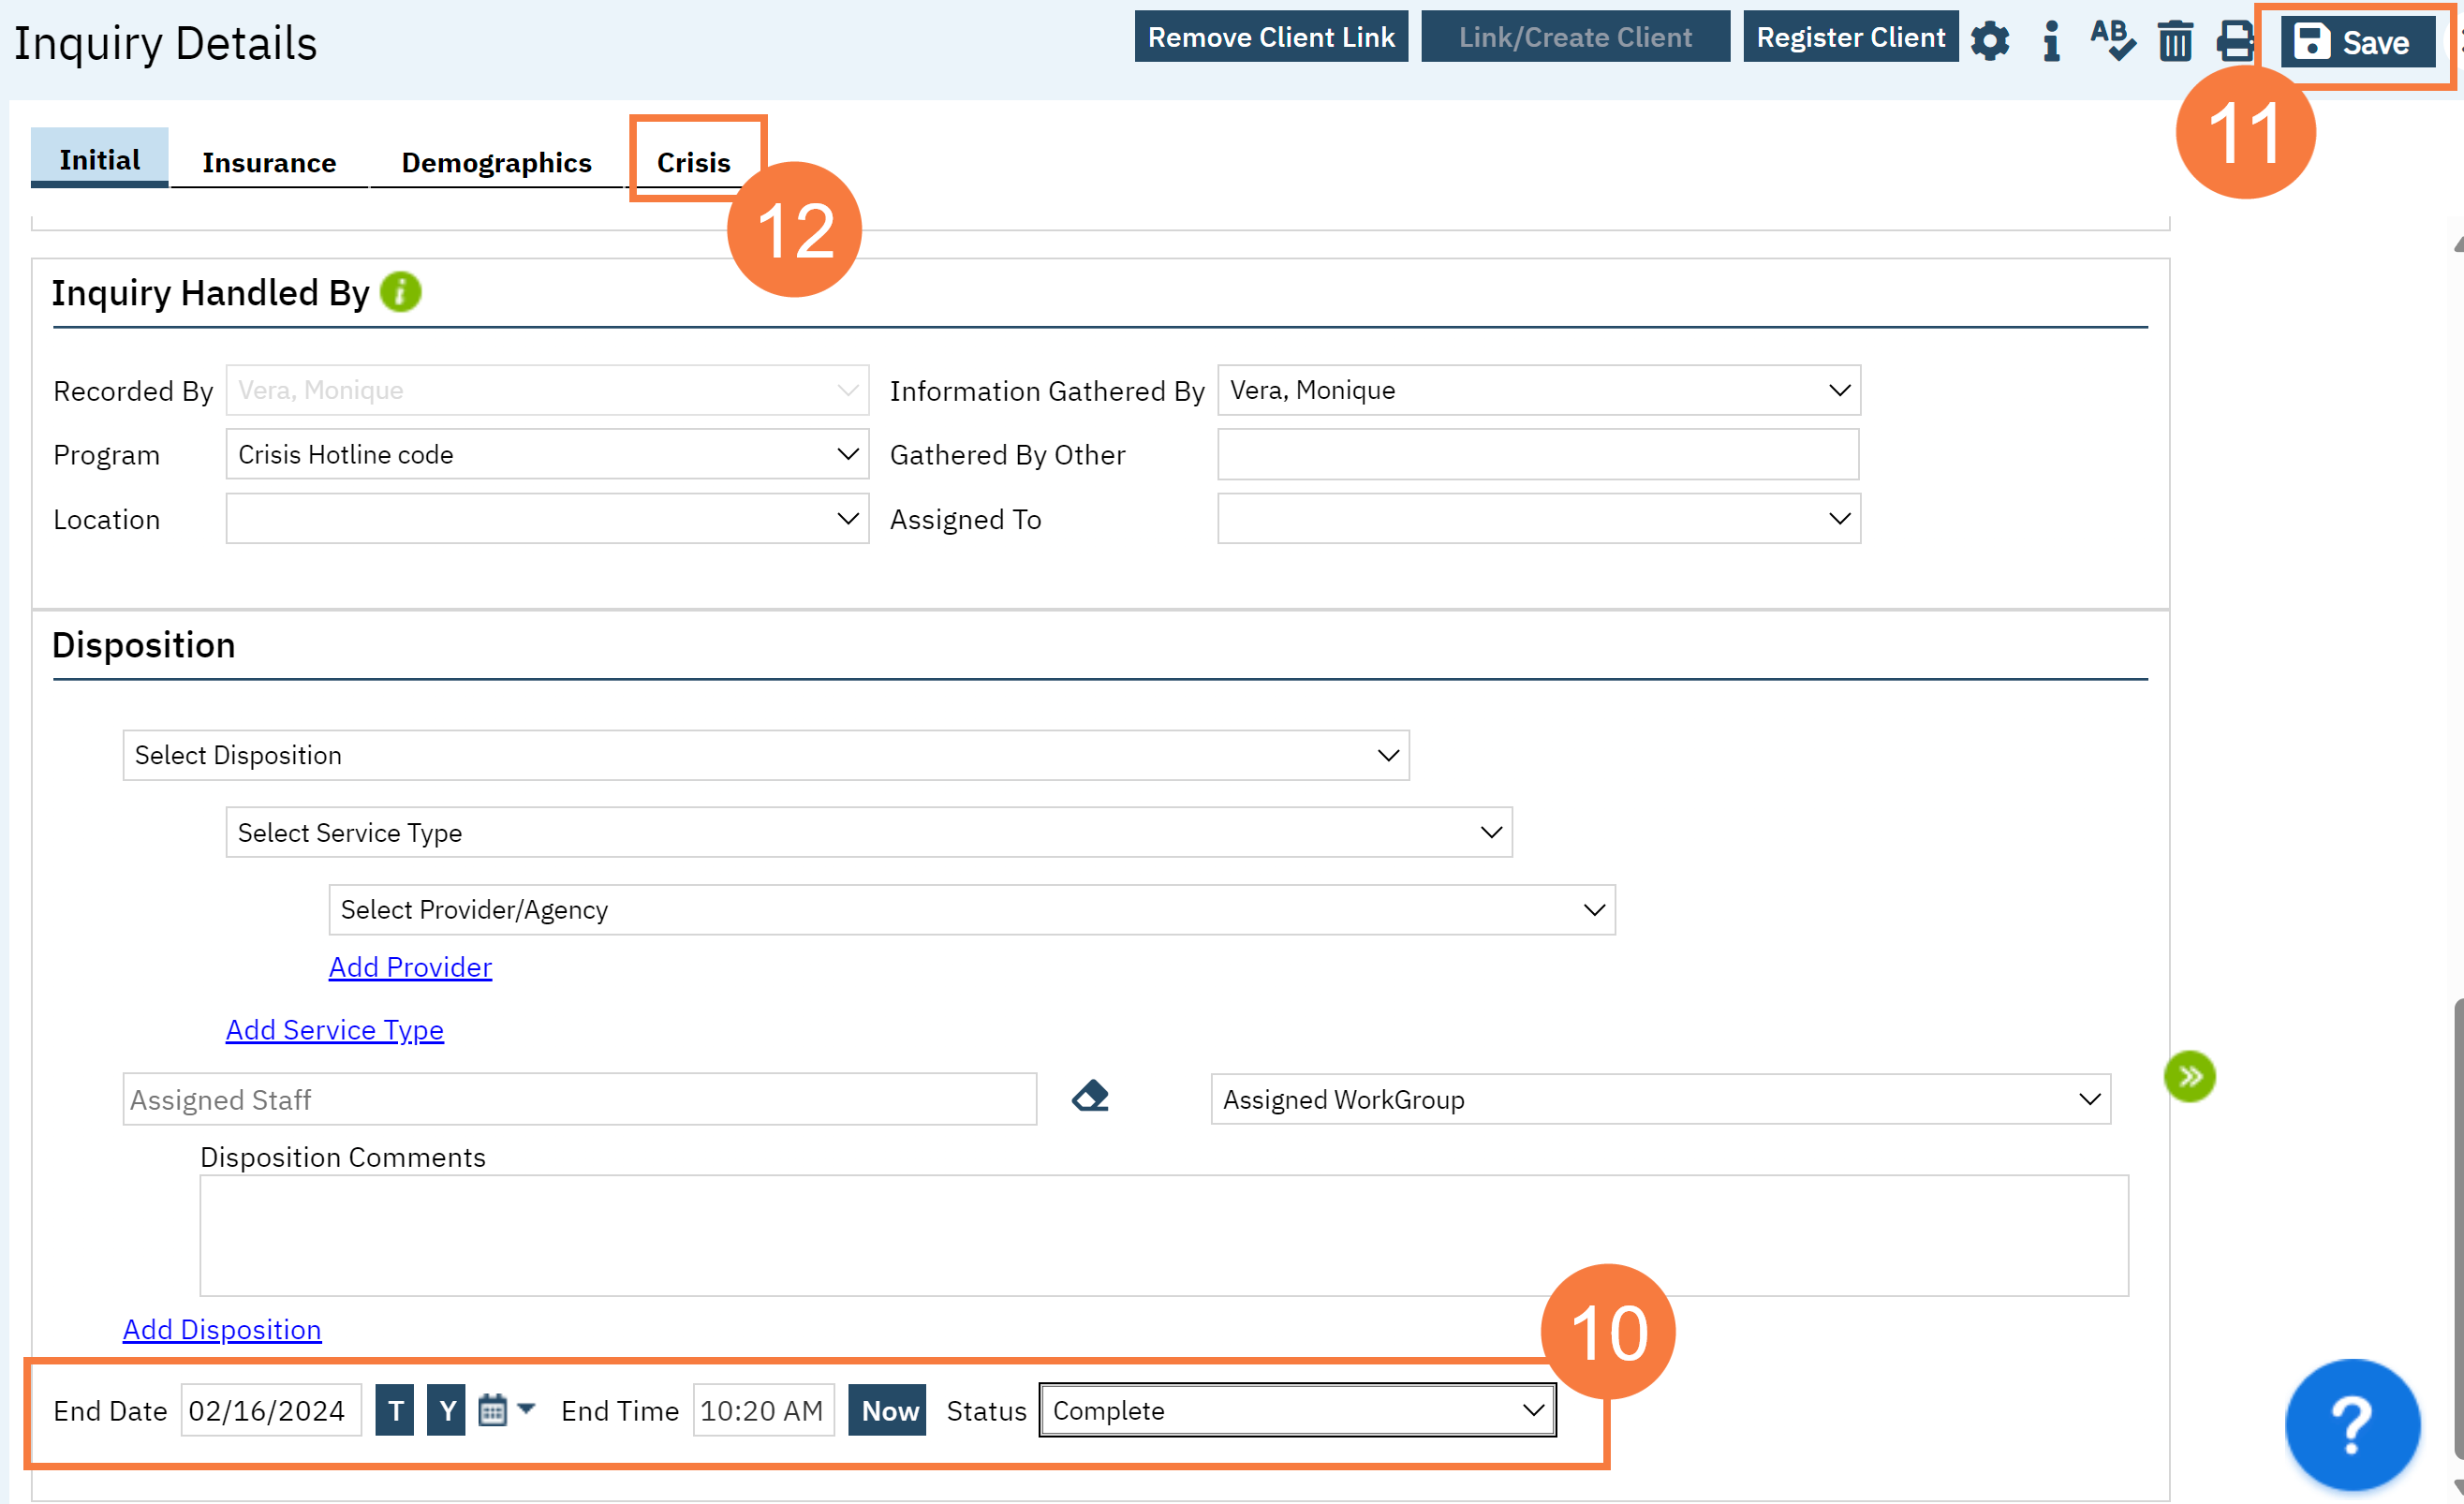
- If the person is actually in crisis, select the checkbox labeled “Crisis” at the top of the screen. This opens a new tab where you’ll document your call with the client. If the client is not actually in crisis, document the call as appropriate. If the client is requesting services, we recommend following the steps in

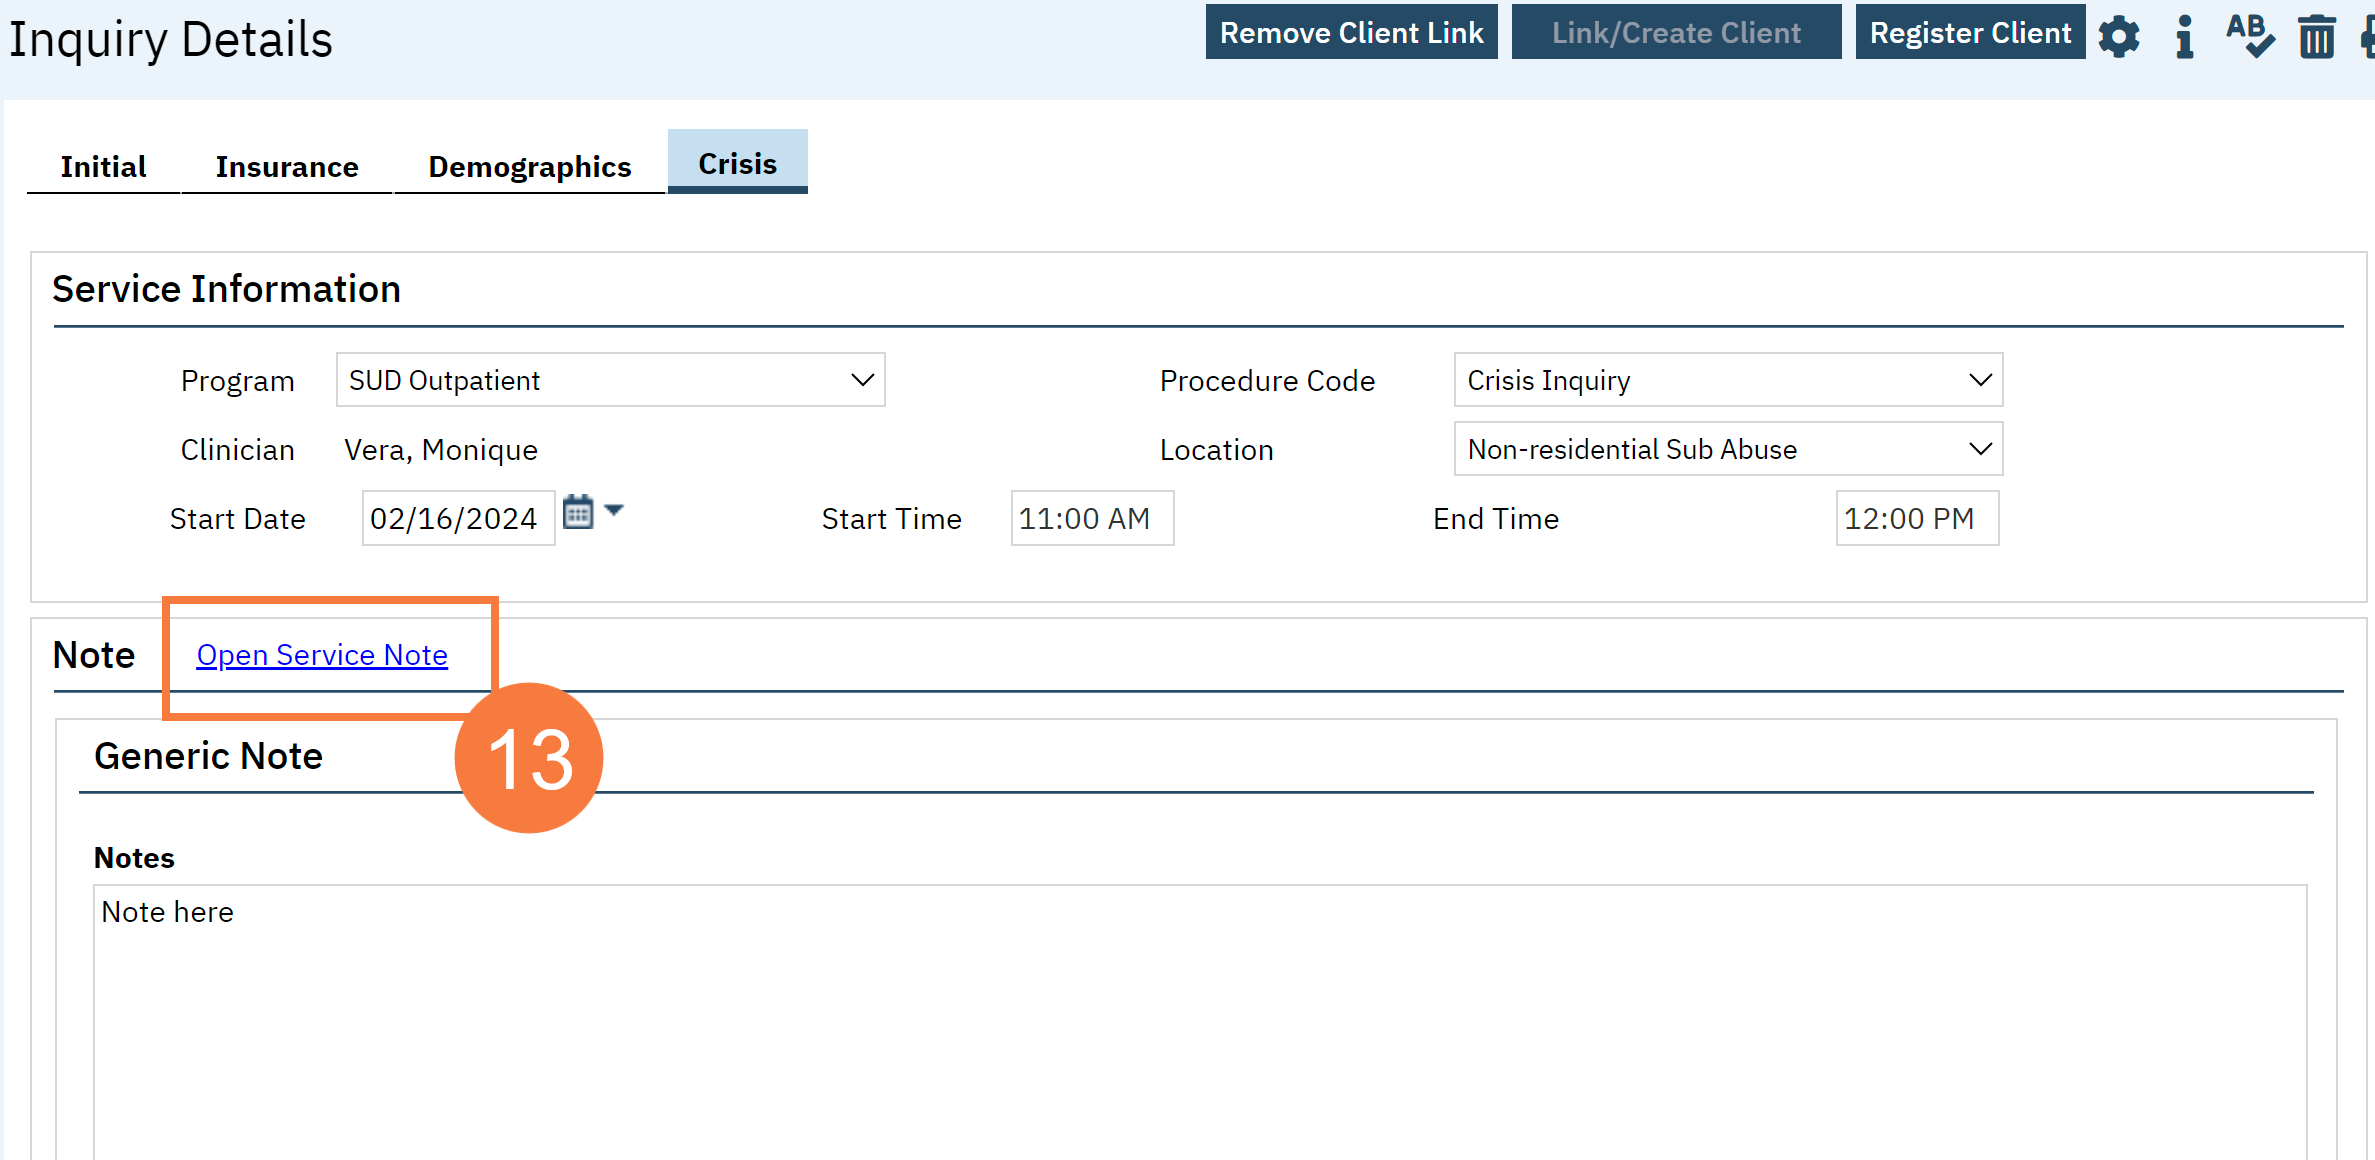
- In the Crisis tab, enter the service information. This will then open a text field for you to enter the note.
- Enter narrative information in the Narration field.
- Click Save.

- When you’re finished with the crisis call, navigate back to the Initial tab and scroll to the bottom of the page. Enter the end date and time of the Inquiry and change the status to “Complete”. Once again, there are “T” (today) and “Now” buttons to make this easier.
- Click Save.
- Navigate back to the Crisis tab.
- Click the newly available link for Open Service Note.
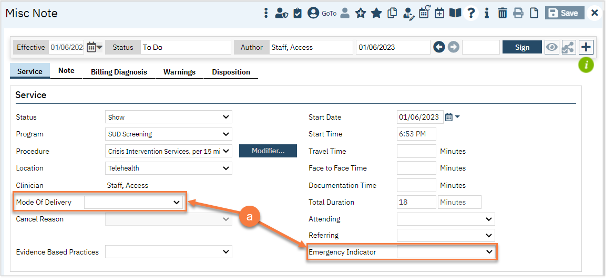
- This brings up a service note screen. It will pull most information forward, including creating a total duration, based on start and end times. Enter Emergency Indicator and Mode of Delivery, as well as any other necessary fields. Please note – DO NOT CHANGE the program or procedure field. This will break the link with the Inquiry and if you have to go back to the Inquiry to update it, your note will be overwritten.
- This brings up a service note screen. It will pull most information forward, including creating a total duration, based on start and end times. Enter Emergency Indicator and Mode of Delivery, as well as any other necessary fields. Please note – DO NOT CHANGE the program or procedure field. This will break the link with the Inquiry and if you have to go back to the Inquiry to update it, your note will be overwritten.
-
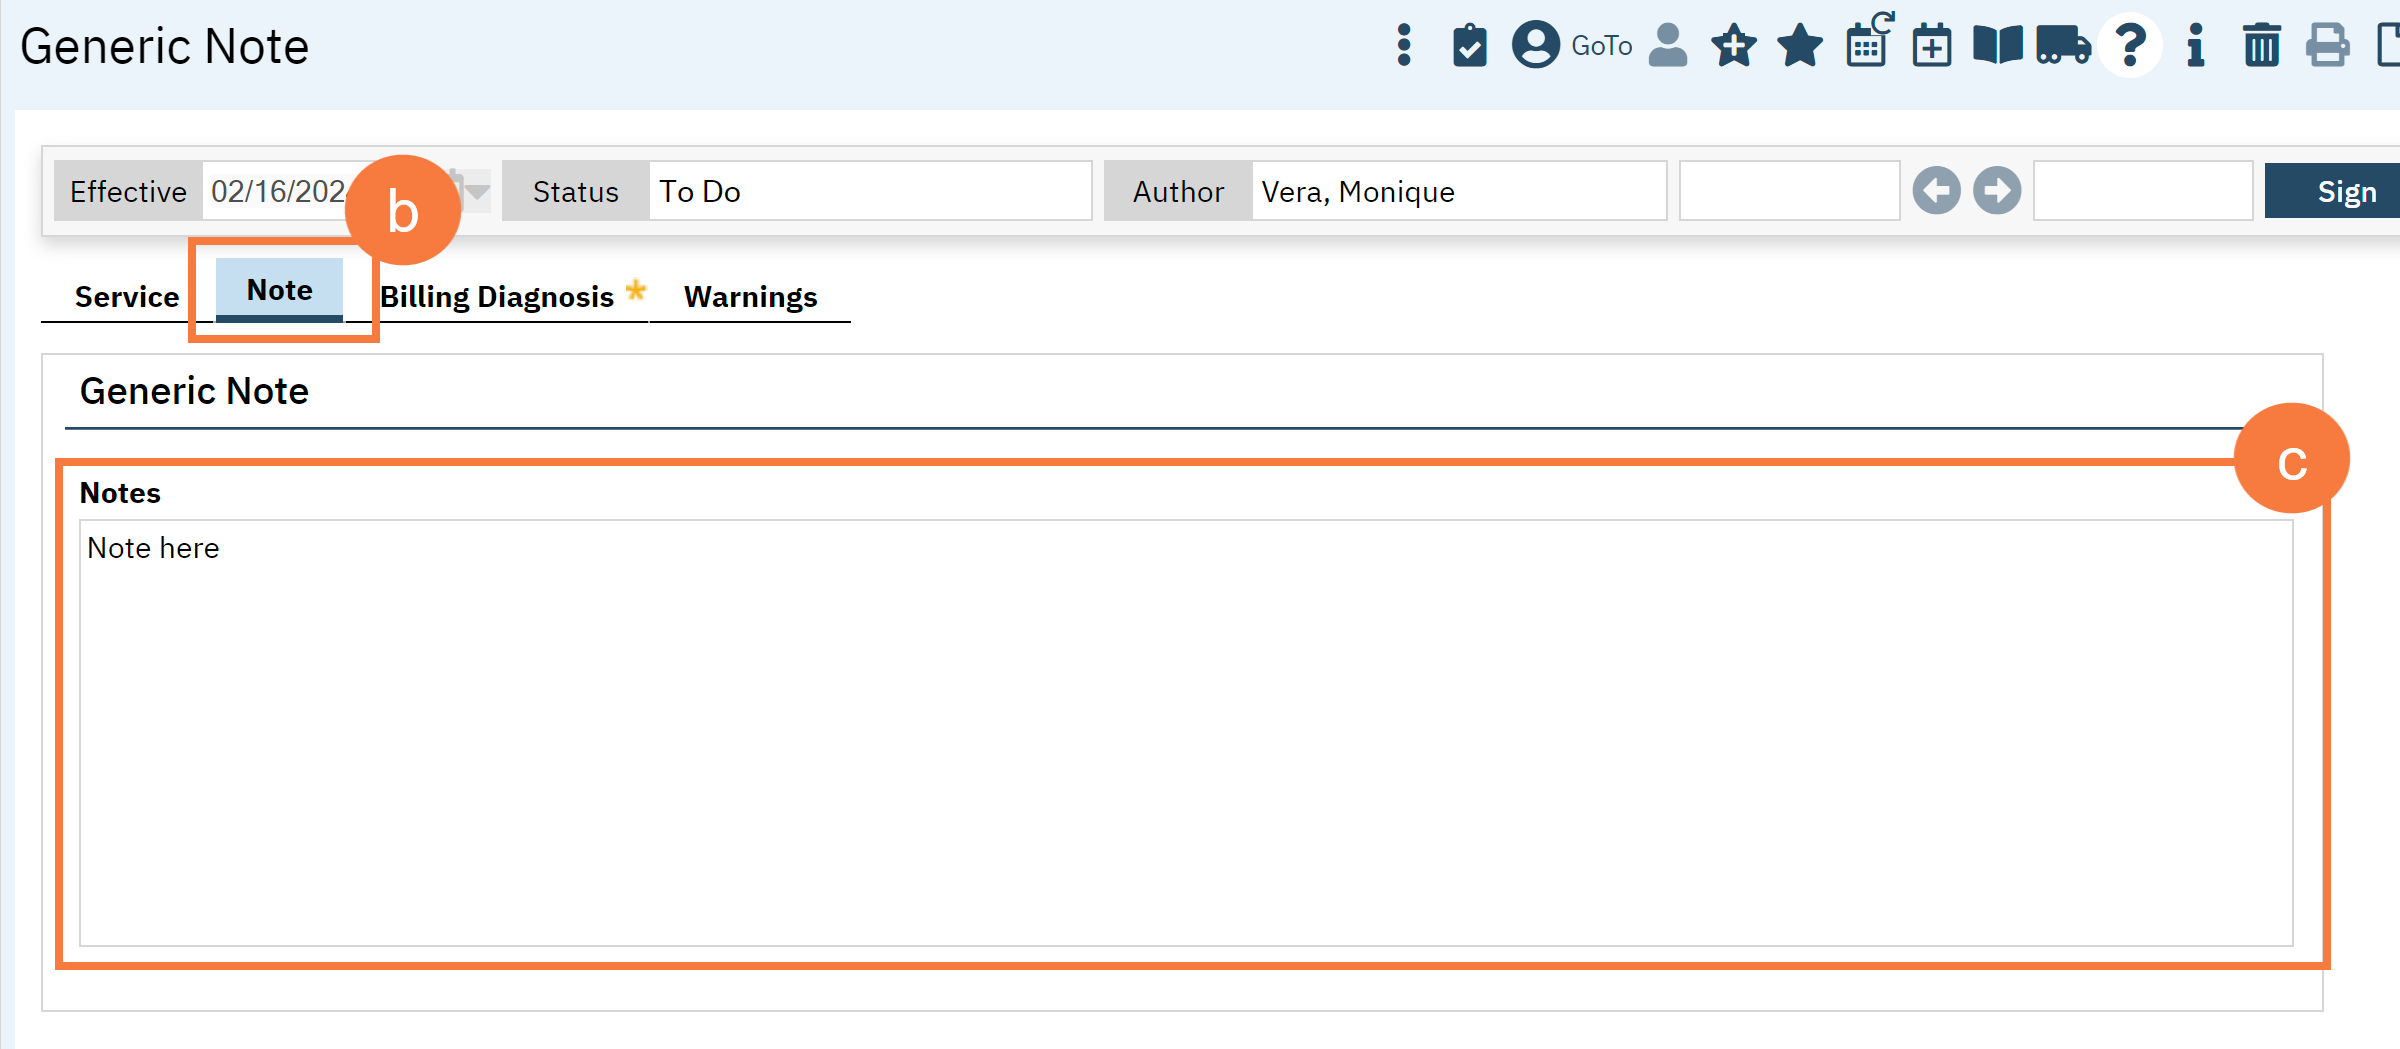
- Click on the Note tab to confirm your narrative note was pulled forward. Add any additional information as needed.
-
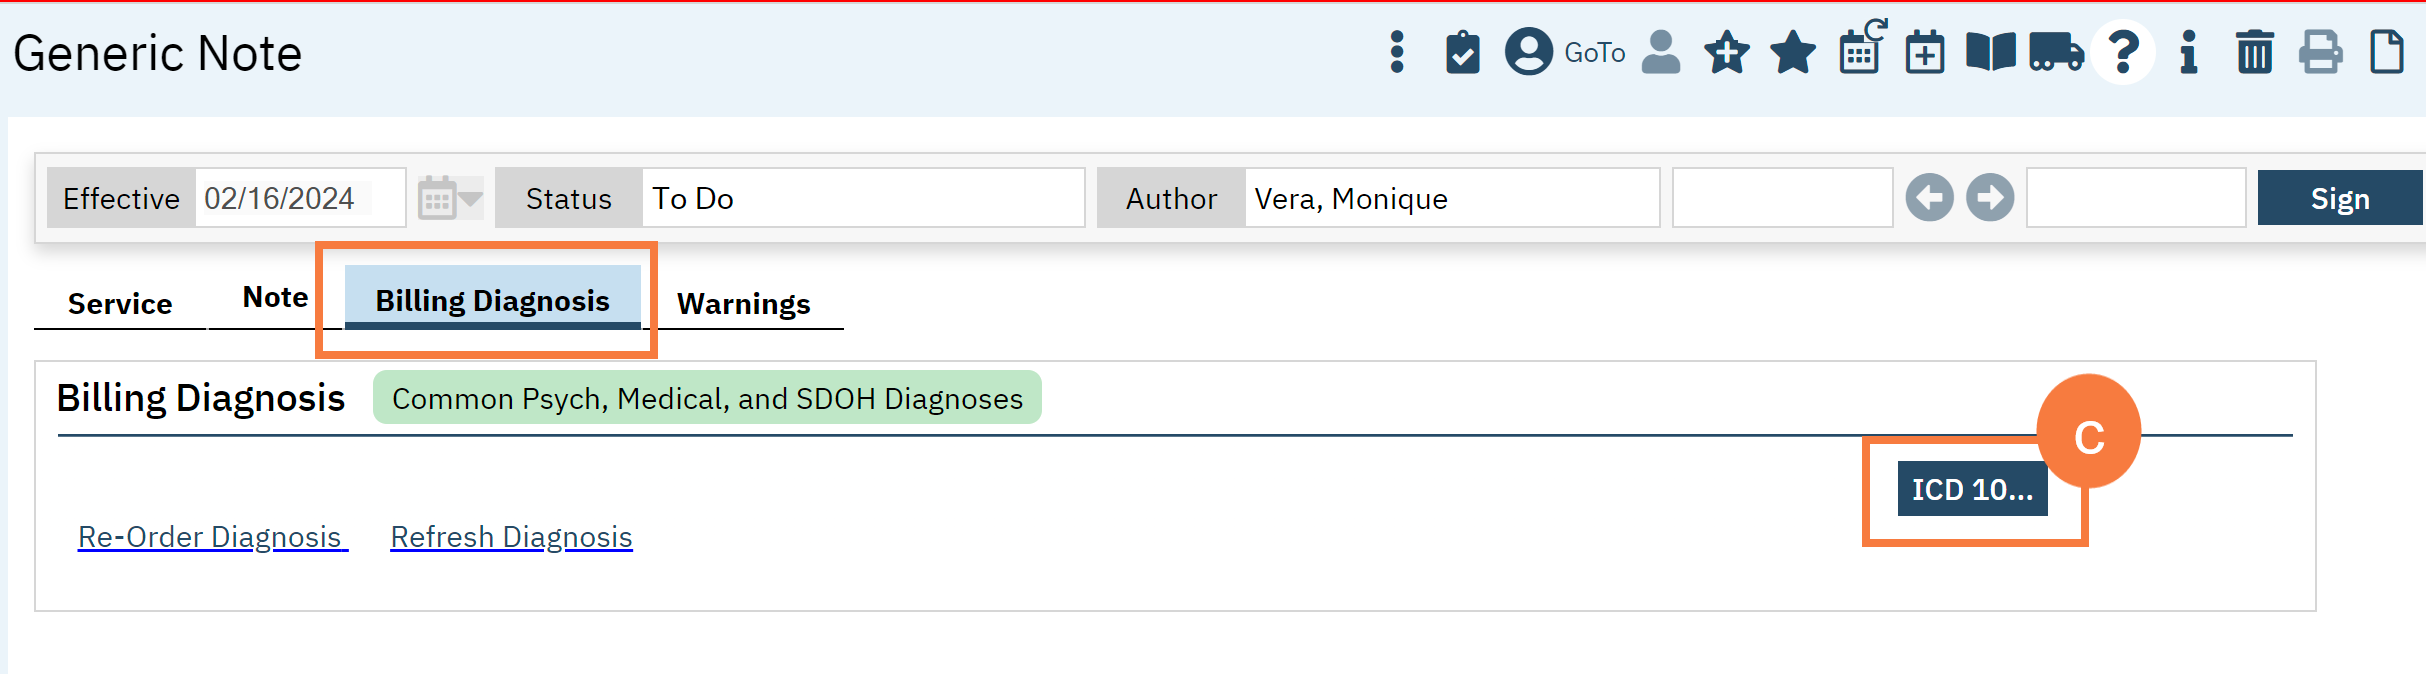
- Click on the Billing Diagnosis tab. If the client already has a diagnosis, you can leave this section as is. If this client does not have a diagnosis, click on the ICD 10 button.
-
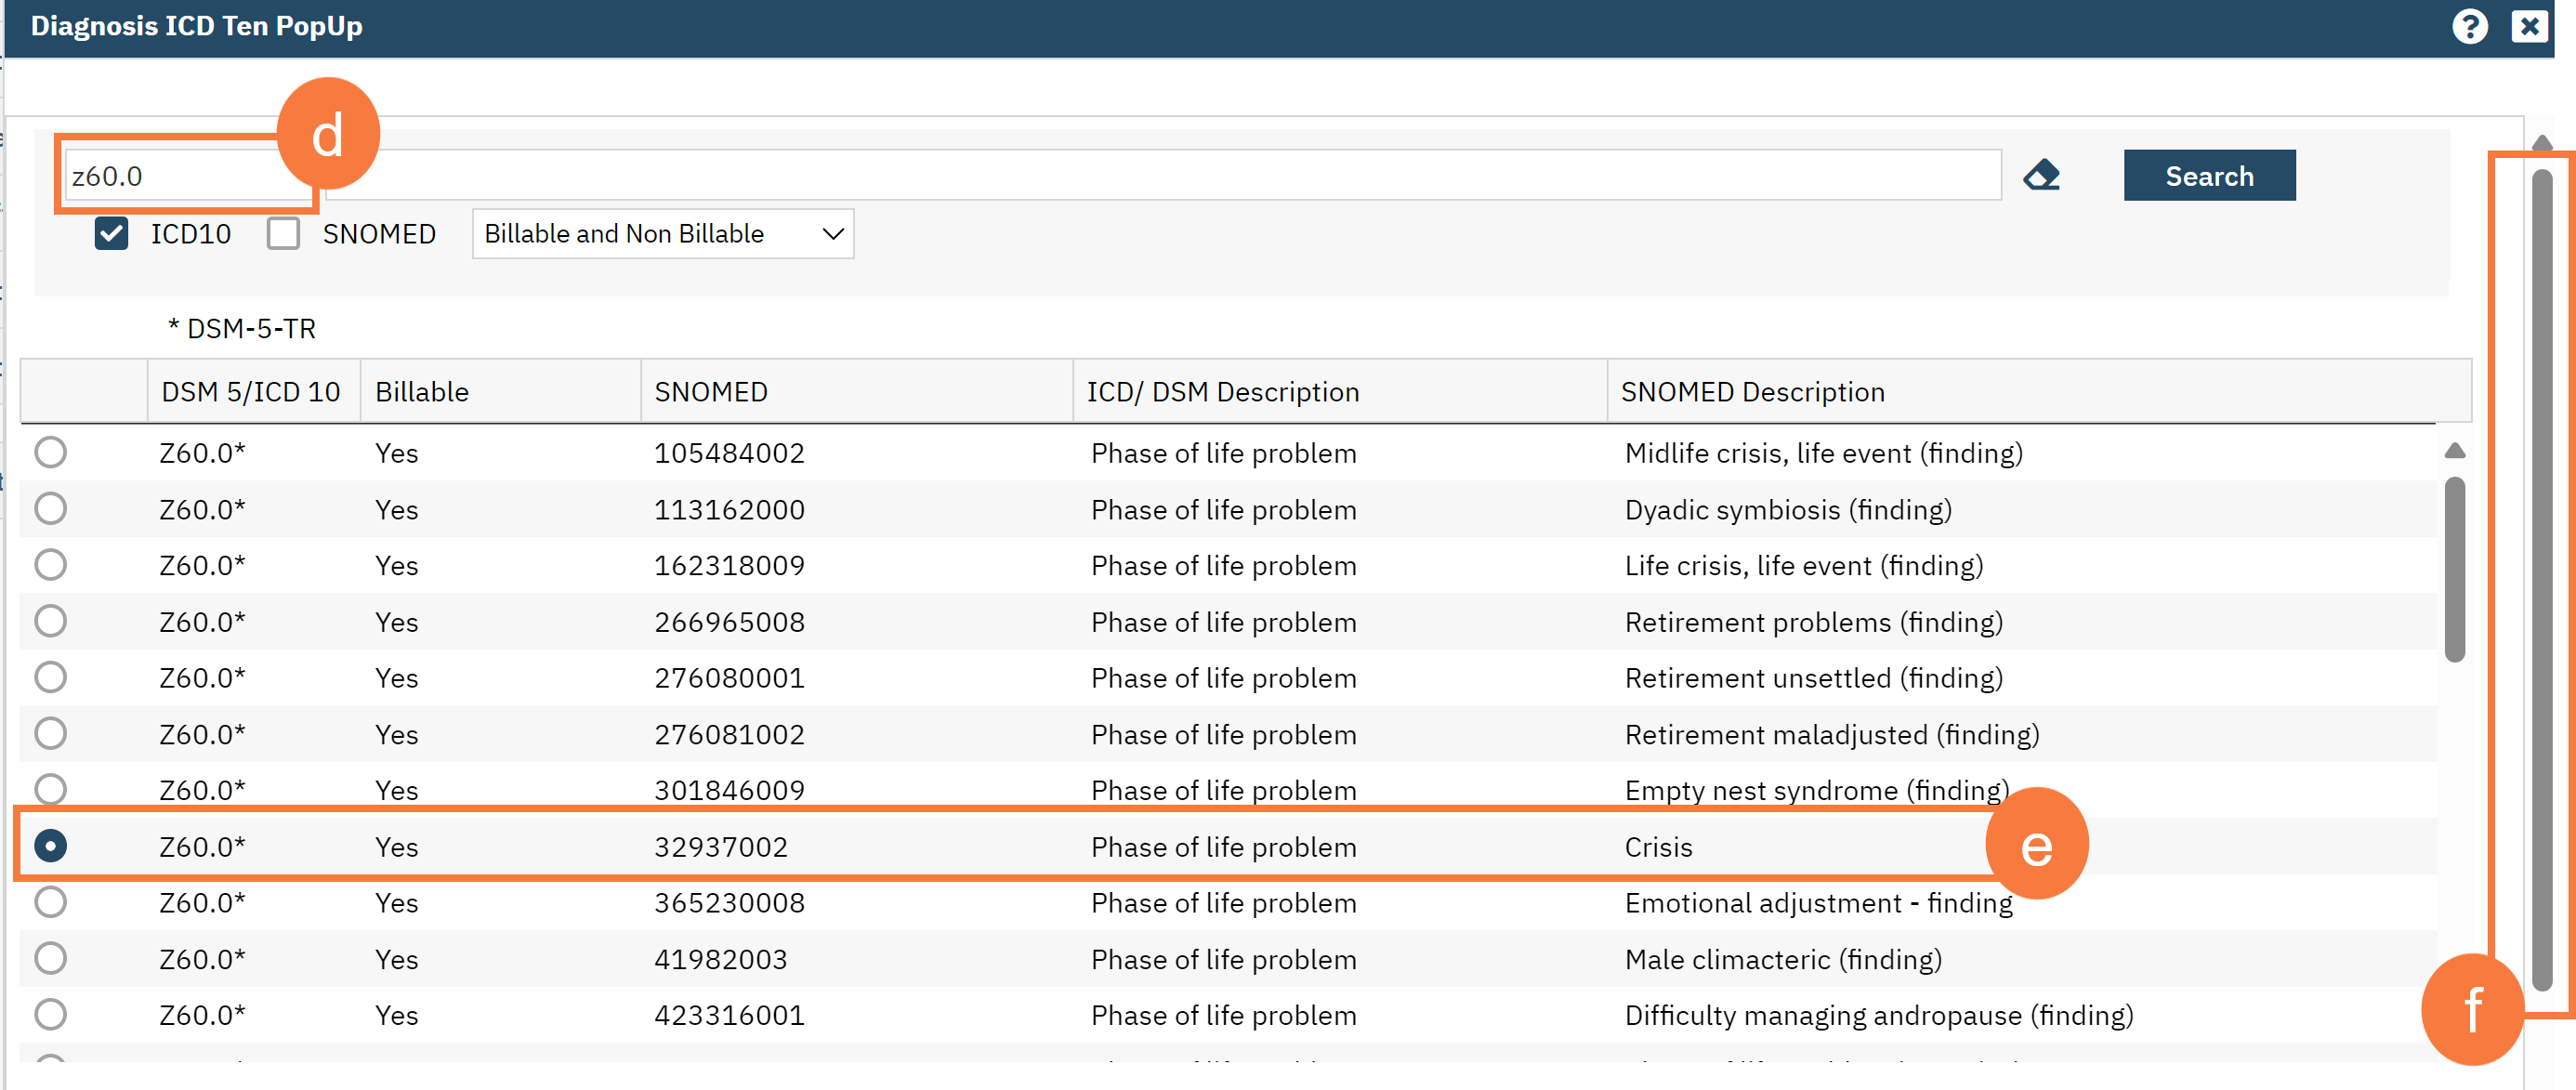
- This brings up a Diagnosis pop-up window. Search for a diagnosis using the code field or description field. If you are an LPHA, you may use “Z03.89 Encounter for observation for other suspected diseases and conditions ruled out”. If you are not an LPHA, you can select an appropriate Social Determinant of Health, such as “Z60.0 Phase of life problem – Crisis”.
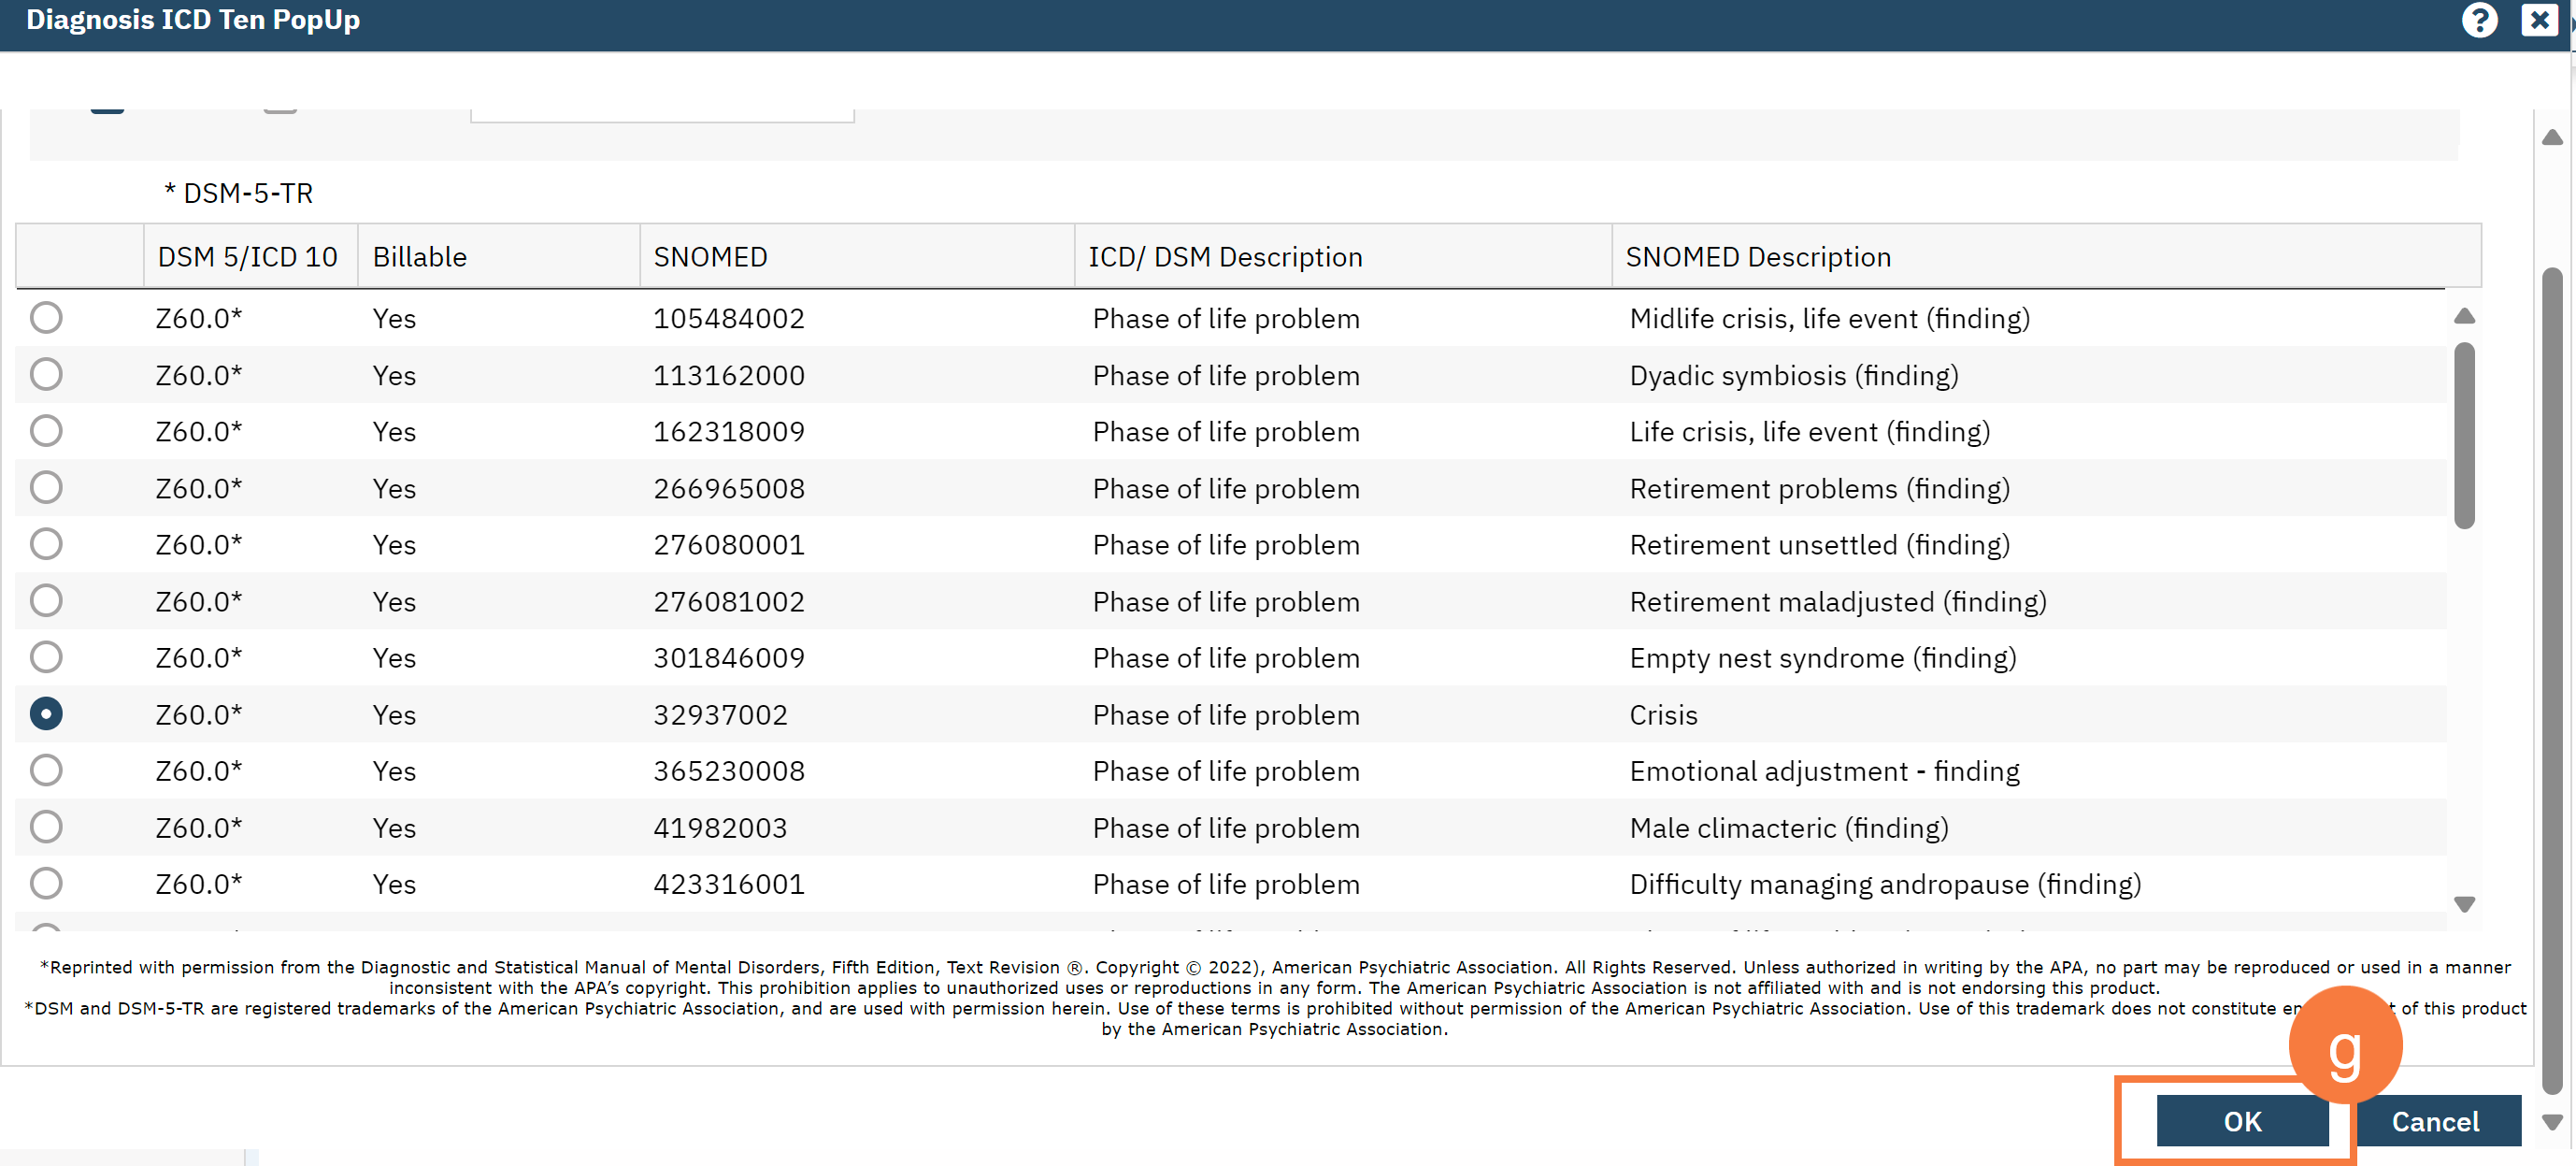
- Select the code you want to use.
- Scroll to the bottom of the screen.
- Click OK.
-
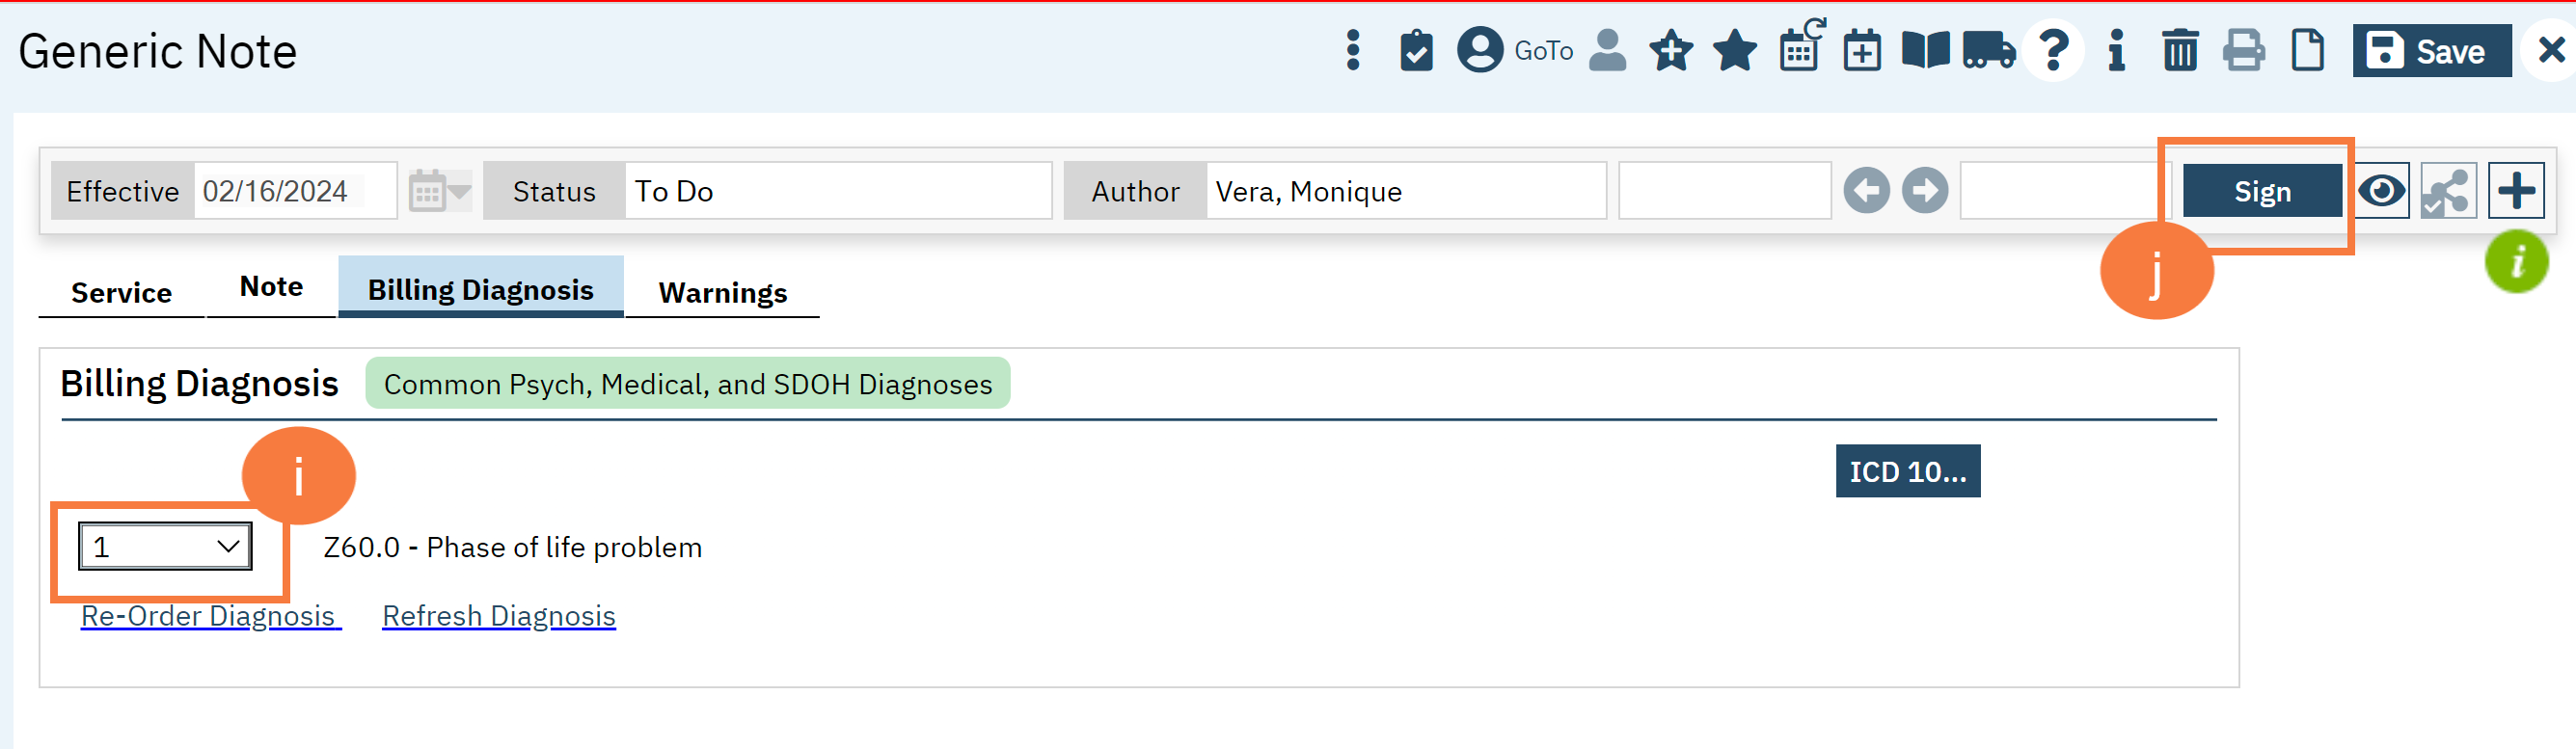
- This brings you back to the Billing Diagnosis tab on the note. Select “1” from the drop down next to the newly added ICD-10 code.
- Once you’ve completed all pieces of the service note, click Sign. You are now finished and may close any open screens.
Updated 02/16/24