How to Sign a Document
- In the document header, select the Sign button.

- Selecting the sign will automatically save the document and check for validations.
- If validations are not met, you will see a pop-up window indicating what needs to be completed before signing.
- The document will now change to Signed status.

- There are some exceptions based on workflow. For example, if you’re in a document as a proxy that status will change to To-Sign or if you need a reviewer the status will be To Be Reviewed.
How to Add a Co-Signer
- To add a co-signer the document can be in any status except New.
- However, a co-signer cannot sign until the document status is Signed.
- See How To Sign a Document for details.
- However, a co-signer cannot sign until the document status is Signed.
- Click the plus symbol to expand the document header.

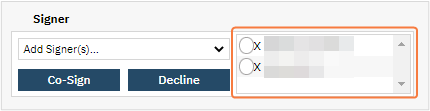
- Select a co-signer from the ‘Add Signer(s)’ dropdown.

- The selected username will appear in the window to the right.
- User can see what they need to co-sign through their Dashboard (Documents or Assigned Documents widget).
- The selected username will appear in the window to the right.
- You can also add individuals that are not users in SmartCare as a co-signer.
- The client’s name in the Add Signer(s) dropdown. Select the client and they will be added as a co-signer.
- Non-clients and non-users can be added by selecting Other Signer(s).

- Once selected you will see a pop-up window. Enter the name of the individual, select the relationship, and click the OK button.
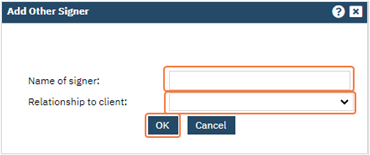
- Once selected you will see a pop-up window. Enter the name of the individual, select the relationship, and click the OK button.
- Based on the set up of the document, the client, guardian or healthcare decision maker will automatically be added as a co-signer
- To remove a co-signer click the X next to the name.
How to Co-Sign a Document
- Note: A document can only be co-signed when it is in Signed status.
- Click the plus symbol to expand the document header.
- Screenshot displays the minus icon, which is what shows once it is expended.
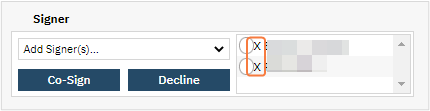
- Select the co-signer radio button from the co-signer list.
- Click the Co-Sign button.

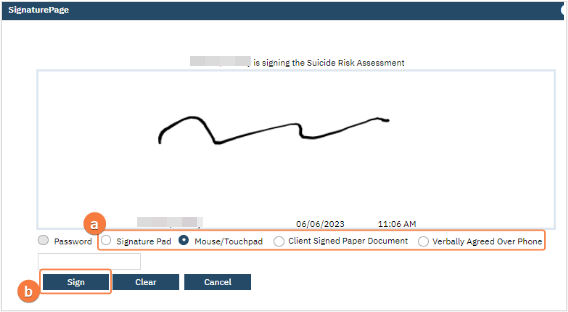
- When a client or other non-users co-sign a Signature window will appear.
- Sign using your preferred method.
- Select the Sign button.
- All signers (author of document and co-signers) will appear in the Signed By window.
- Co-signers signatures (users and non-users) will appear in the Signature Page of the PDF.

Prescriber: How to Batch Sign Documents
Batch Signature is a SmartCare feature that allows users to sign multiple documents at once. This is typically used by prescribers due to amount of documents they have to co-sign.
Note: Some documents may not be present if the document has been set up to not display in Batch Signature.
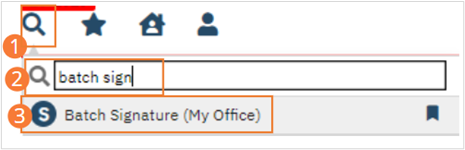
- Click the Search icon.
- Type “Batch Signature” into the search bar.
- Click to select Batch Signature (My Office). The Batch Signature page will display.
- Set filters to display desired documents. You can filter for documents you have permission to sign, to co-sign, to acknowledge, or by documents in progress or to be reviewed. You can also filter to include only Errors or only documents Approved for Signature. Click Apply Filters.
- You can review displayed documents before signing them. Document information is displayed in the fields above the display window. Use the blue arrows to page between documents.
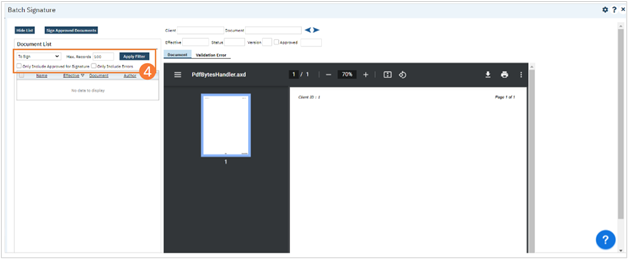
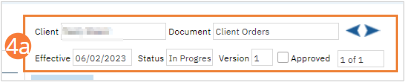
- You can review displayed documents before signing them. Document information is displayed in the fields above the display window. Use the blue arrows to page between documents.
- Next to each document you wish to sign, click the checkbox to select it.
- Click the Sign Approved Documents button. A processing message will appear. When signatures are complete, a success message will display.