Sometimes, positions change. New positions are added, some are ended, and some move from one department to another. This article will take you through how to modify the hierarchy itself. For information on how to change staff member placements, see Documenting Staff Changes.
Adding a New Position (Node)
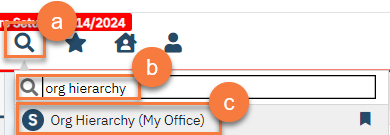
- Open the Org Hierarchy screen.
- Click on the Search icon.
- Type in “Org Hierarchy” in the search bar.
- Select “Org Hierarchy” from the search results.
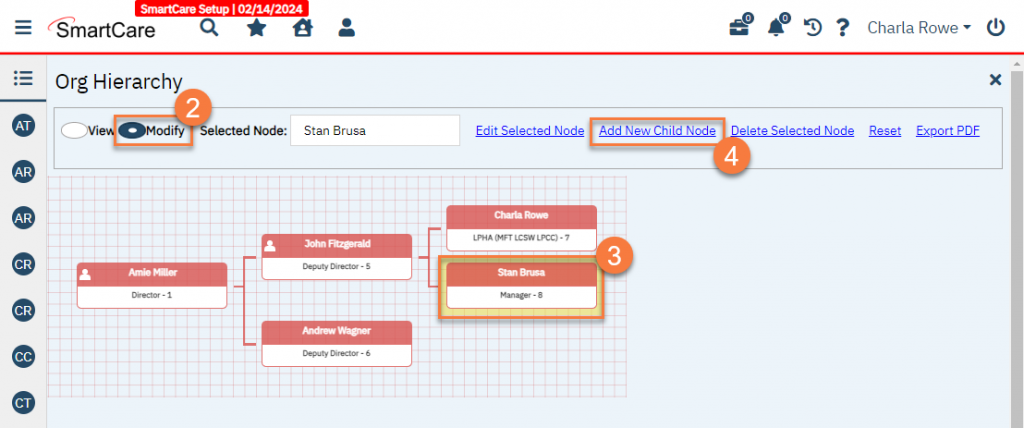
- Click on Modify to change the mode from View to Modify.
- Click on the node that will be the parent to the position you’re adding. The node will be highlighted yellow when you’ve selected it.
- Click on “Add New Child Node” in the screen ribbon.
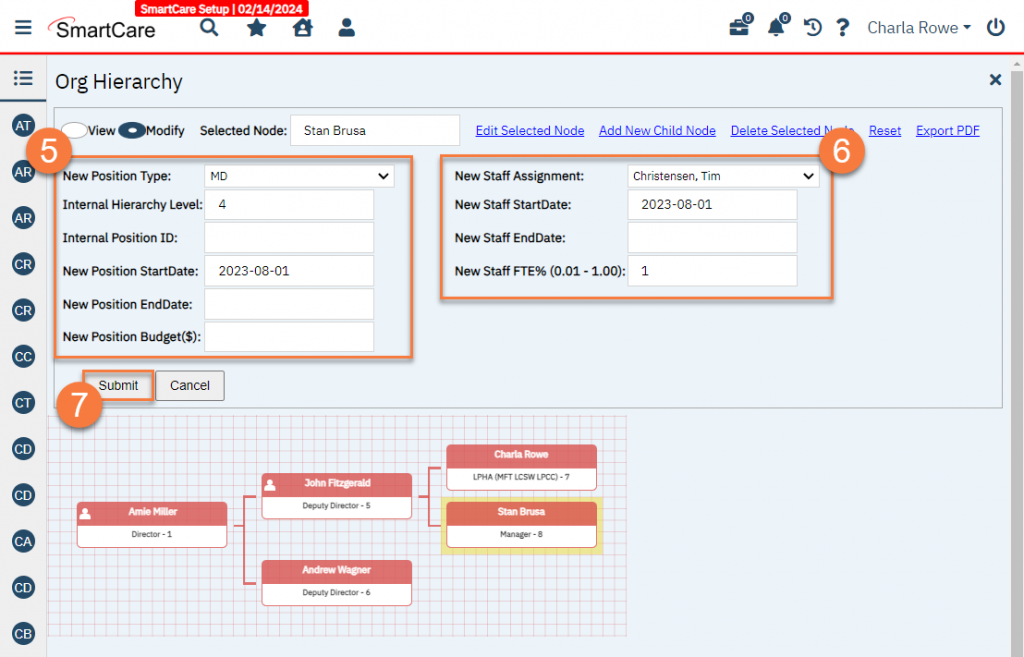
- This will expand the ribbon to include the attributes of the position. Enter the position’s information. This information is related to the position itself and is separate from any staff who fills this position.
- Position Type: This is drop down list of available position types. You can select any one position type in the drop down to be associated with this position node. This is a required
- Internal Hierarchy Level (Number): This is an integer number to depict the hierarchy level of the current position to be used/helpful in reporting. This is an optional integer only field provided for counties who would like to view their reports on this data field.
- Internal Position ID: This is an optional text field. You can enter your internal county position ID for better tracking, if needed.
- Position Start Date: This has the date picker to depict the start date for the position (the day position becomes active). This field is optional, to be used as needed.
- Position End Date: This has the date picker to depict the end date for the position (the day position becomes inactive). This field is optional, to be used as needed.
- Position Budget: This optional field is used for documenting the position budget in USD.
- Enter the staff’s information, if applicable. This information is related to the person who’s currently filling that position. It is dependent on the position information but is separate from it. A staff member can only fill 1 position at a time. If the position is currently vacant, leave the staff information blank.
- Staff Assignment: This is an available drop down list of the staff member taking up/associated with this position node. This is an optional Note: Only 1 unique Staff can be assigned to 1 position.
- Staff Start Date: This is a date picker depicting the date the particular staff started in this position. This is an optional field
- Staff End Date: This is a date picker depicting the date the particular staff ended their role in this position. This is an optional
- Staff FTE%: This is a field denoting the %FTE for a staff assignment. The valid values are from 0.01 to 1.00. For example, a 50% staff FTE assignment would be denoted as 0.5. This is an optional If you leave the field blank, or enter “0”, the system will automatically populate the value to be 1.00 (100%).
- Click “Submit” to make the changes.
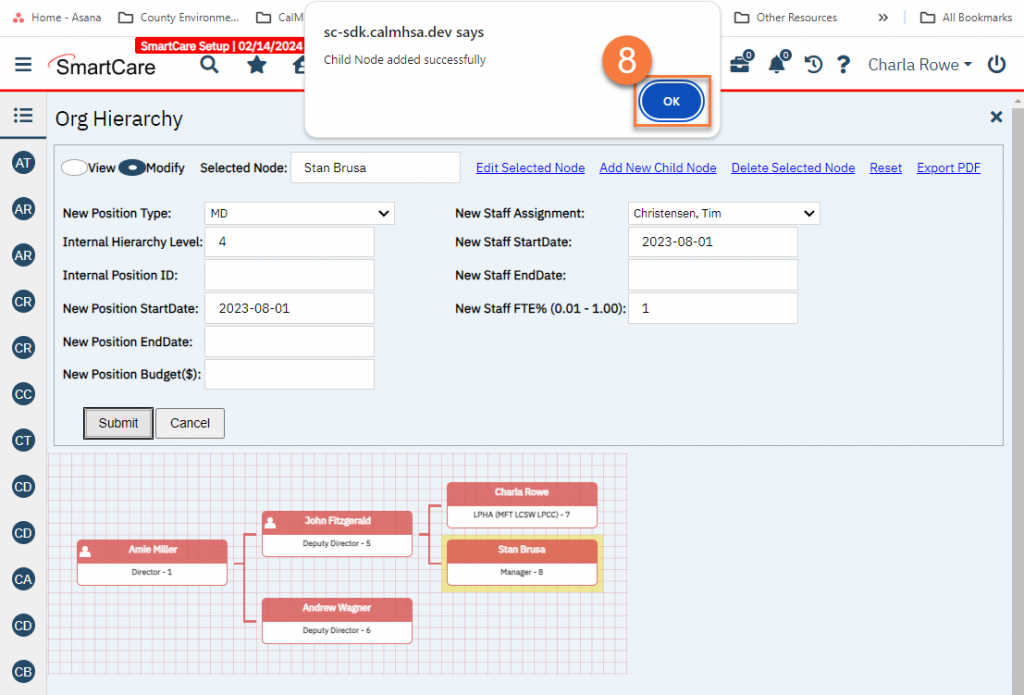
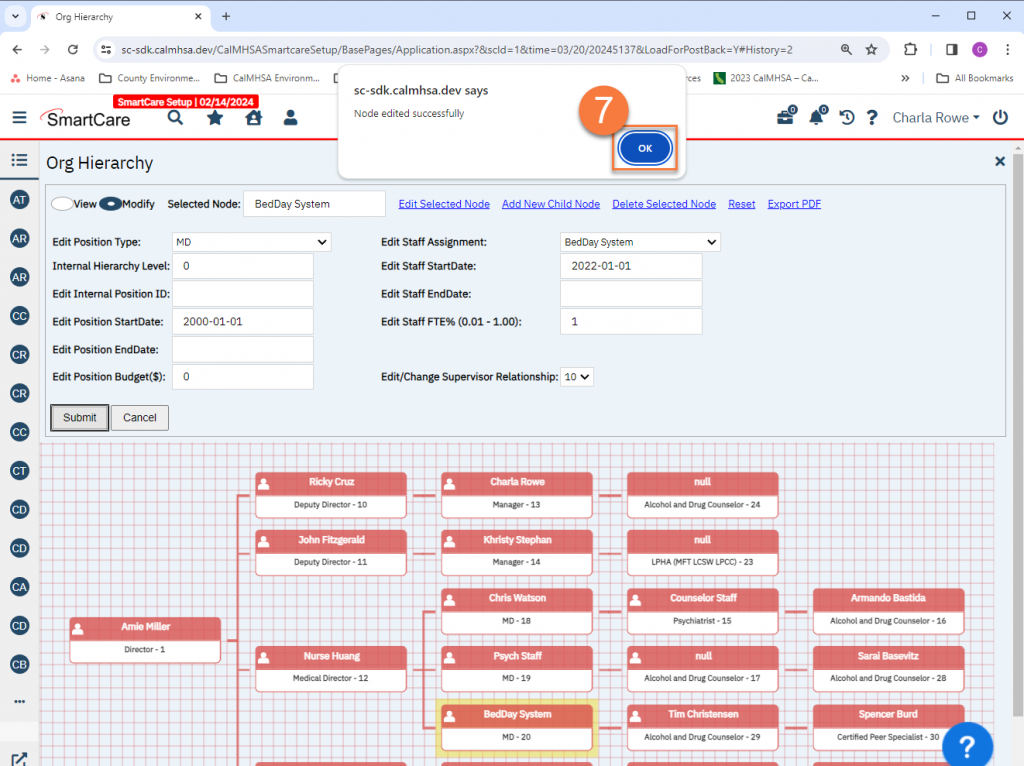
- A pop-up window will appear letting you know changes were made. Click “OK” to reload the Org Hierarchy and see your changes.
Editing a Position (Node)
- Open the Org Hierarchy screen.
- Click on the Search icon.
- Type in “Org Hierarchy” in the search bar.
- Select “Org Hierarchy” from the search results.
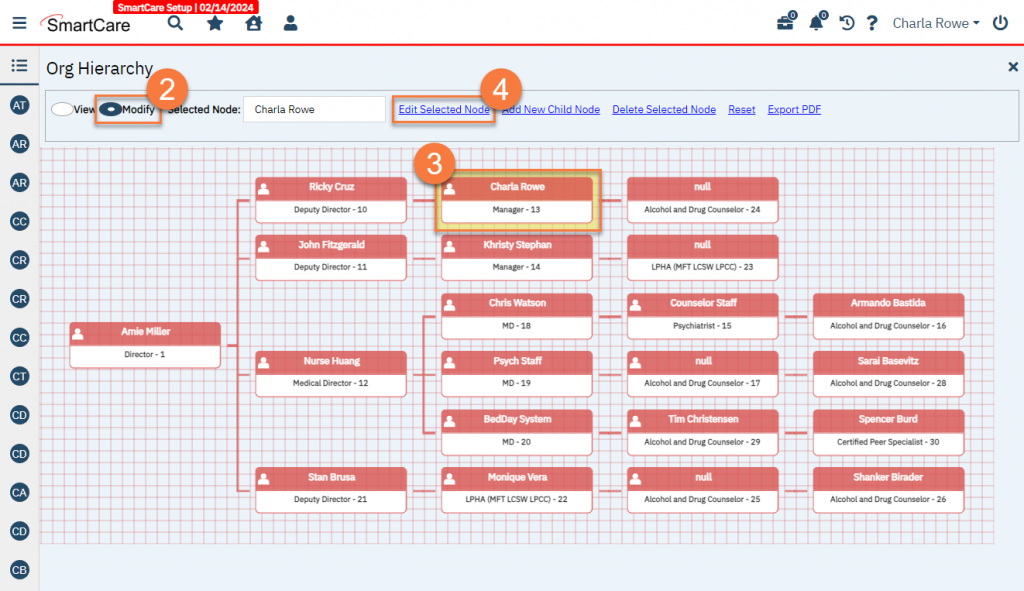
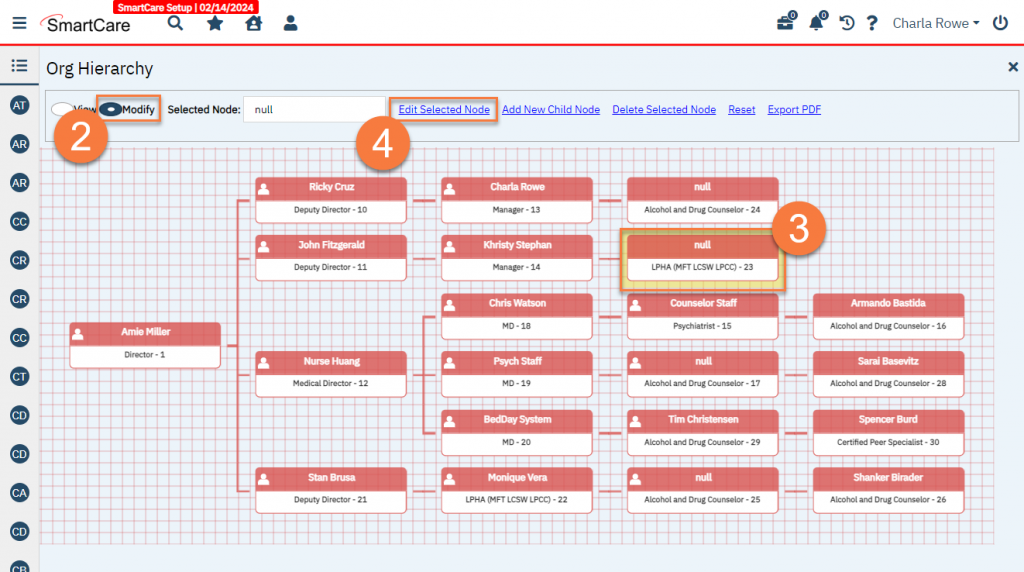
- Click on Modify to change the mode from View to Modify.
- Click on the node for the position you want to modify.
- Click on “Edit Selected Node” in the screen ribbon.
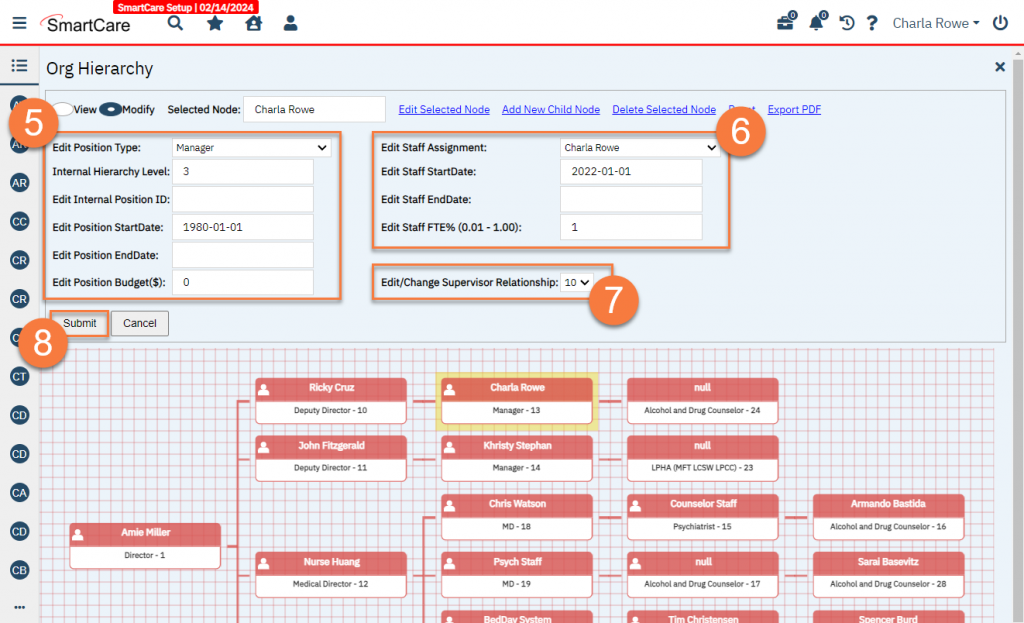
- This will expand the ribbon to include the attributes of the position. Modify the position’s information as needed. This information is related to the position itself and is separate from any staff who fills this position.
- Position Type: This is drop down list of available position types. You can select any one position type in the drop down to be associated with this position node. This is a required
- Internal Hierarchy Level (Number): This is an integer number to depict the hierarchy level of the current position to be used/helpful in reporting. This is an optional integer only field provided for counties who would like to view their reports on this data field.
- Internal Position ID: This is an optional text field. You can enter your internal county position ID for better tracking, if needed.
- Position Start Date: This has the date picker to depict the start date for the position (the day position becomes active). This field is optional, to be used as needed.
- Position End Date: This has the date picker to depict the end date for the position (the day position becomes inactive). This field is optional, to be used as needed.
- Position Budget: This optional field is used for documenting the position budget in USD.
- Modify the staff’s information, if applicable. This information is related to the person who’s currently filling that position. It is dependent on the position information but is separate from it. A staff member can only fill 1 position at a time. If the position is currently vacant, leave the staff information blank.
- Staff Assignment: This is an available drop down list of the staff member taking up/associated with this position node. This is an optional Note: Only 1 unique Staff can be assigned to 1 position.
- Staff Start Date: This is a date picker depicting the date the particular staff started in this position. This is an optional field
- Staff End Date: This is a date picker depicting the date the particular staff ended their role in this position. This is an optional
- Staff FTE%: This is a field denoting the %FTE for a staff assignment. The valid values are from 0.01 to 1.00. For example, a 50% staff FTE assignment would be denoted as 0.5. This is an optional If you leave the field blank, or enter “0”, the system will automatically populate the value to be 1.00 (100%).
- Modify the location of the position in the hierarchy, if applicable. The “Edit/Change Supervisor Relationship” field will populate with the identifier of the current position’s parent node ID.
- Click “Submit” to make the changes.
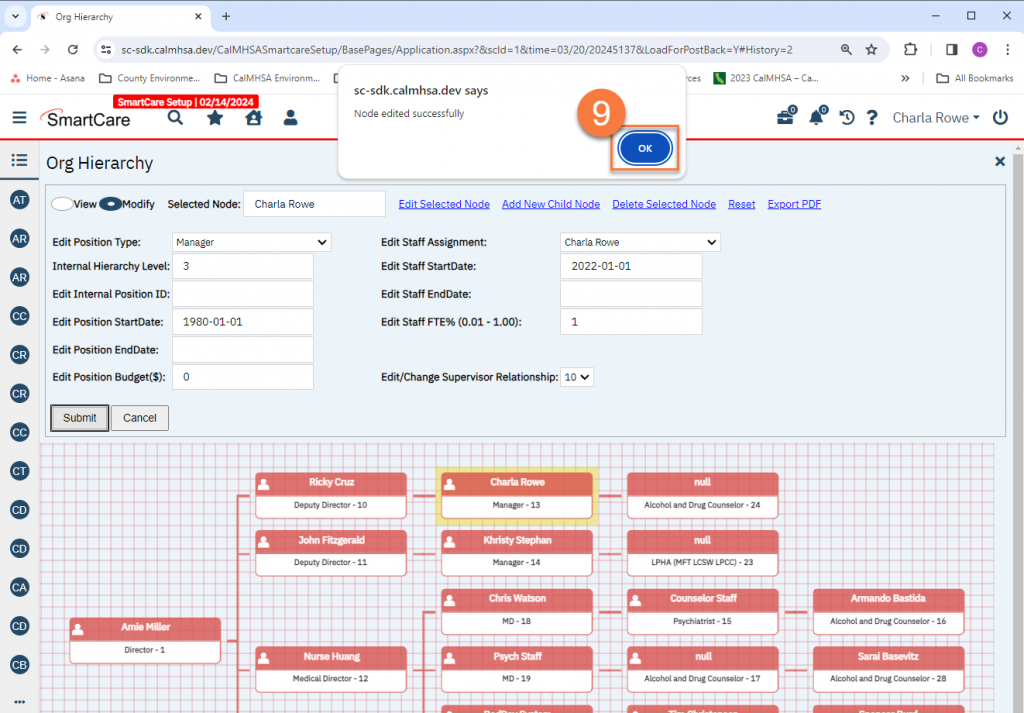
- A pop-up window will appear letting you know changes were made. Click “OK” to reload the Org Hierarchy and see your changes.
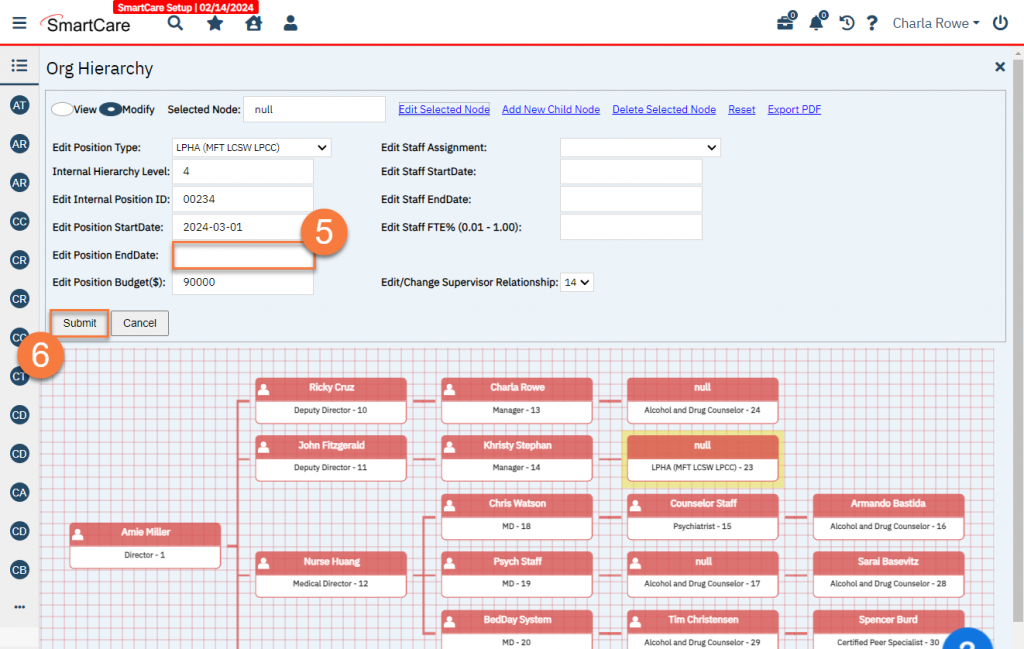
Ending a Position (Node)
- Open the Org Hierarchy screen.
- Click on the Search icon.
- Type in “Org Hierarchy” in the search bar.
- Select “Org Hierarchy” from the search results.
- Click on Modify to change the mode from View to Modify.
- Click on the node for the position you want to terminate.
- Click on “Edit Selected Node” in the screen ribbon.
- This will expand the ribbon to include the attributes of the position. Enter the Position End Date.
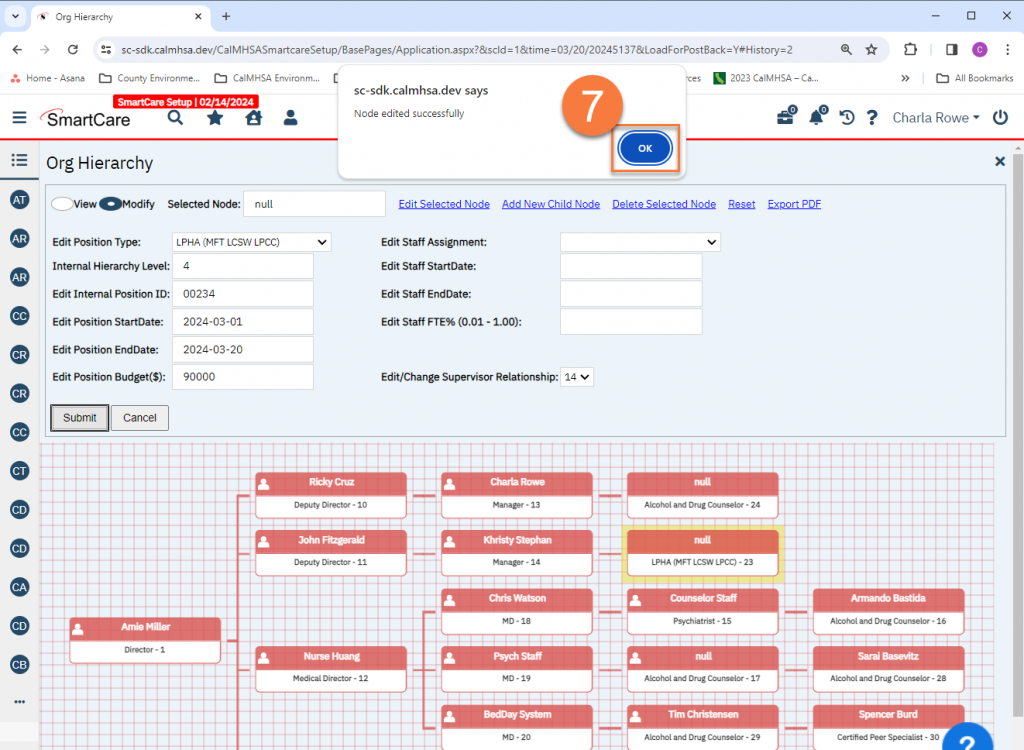
- Click “Submit” to make the changes.
- A pop-up window will appear letting you know changes were made. Click “OK” to reload the Org Hierarchy and see your changes.
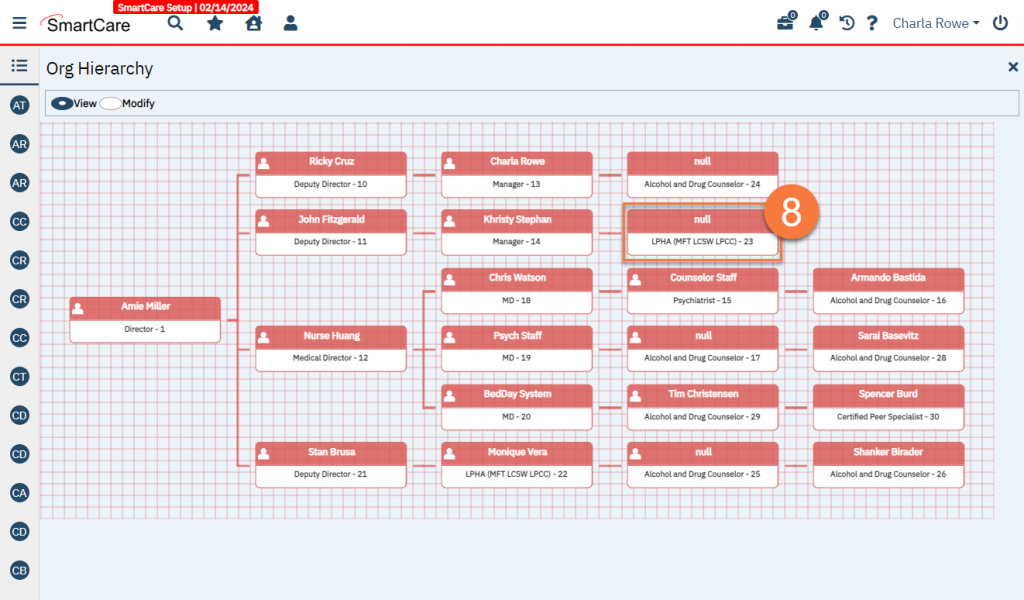
- Note that this position node will still be visible, so as to not orphan any child nodes.
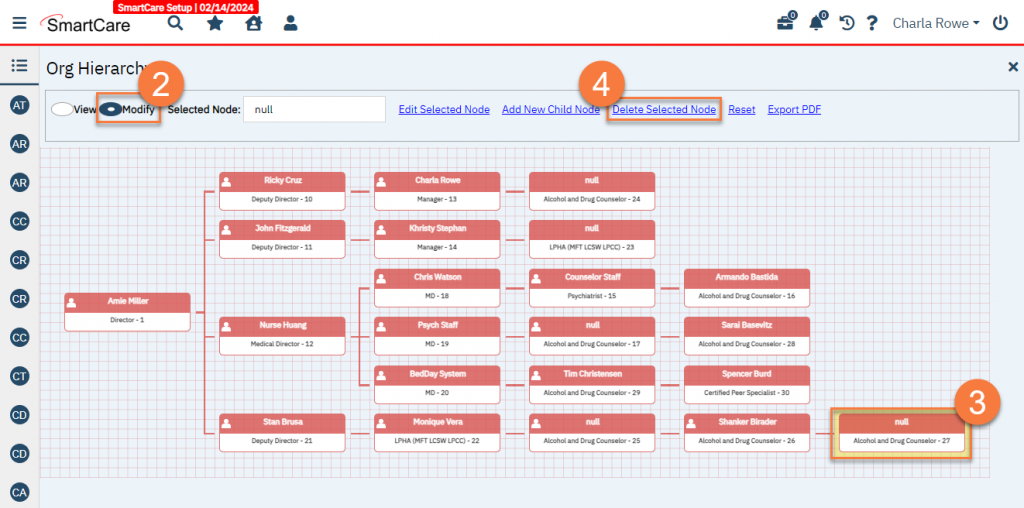
Deleting a Position (Node) Created in Error
- Open the Org Hierarchy screen.
- Click on the Search icon.
- Type in “Org Hierarchy” in the search bar.
- Select “Org Hierarchy” from the search results.
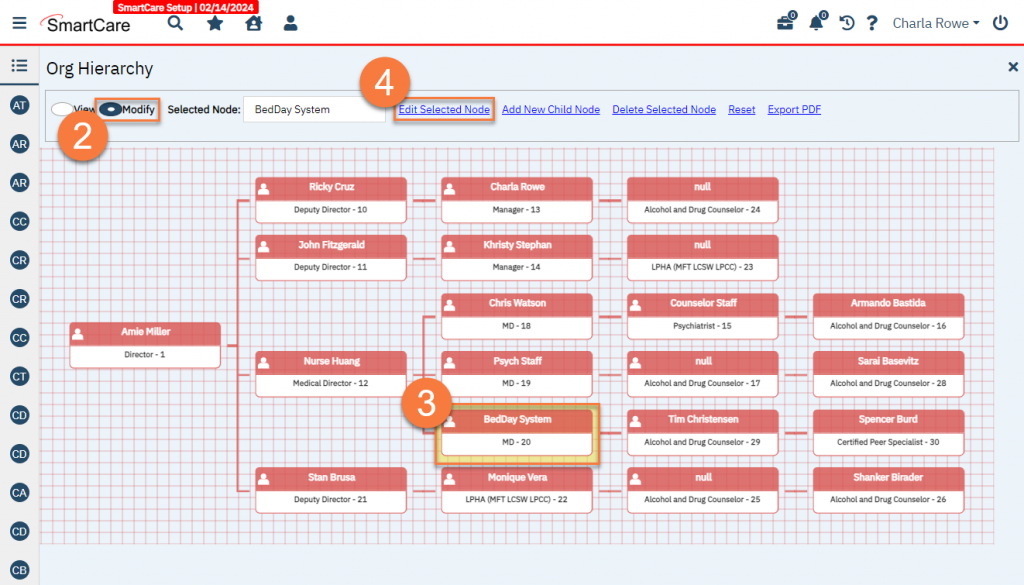
- Click on Modify to change the mode from View to Modify.
- Click on the node for the position you want to terminate.
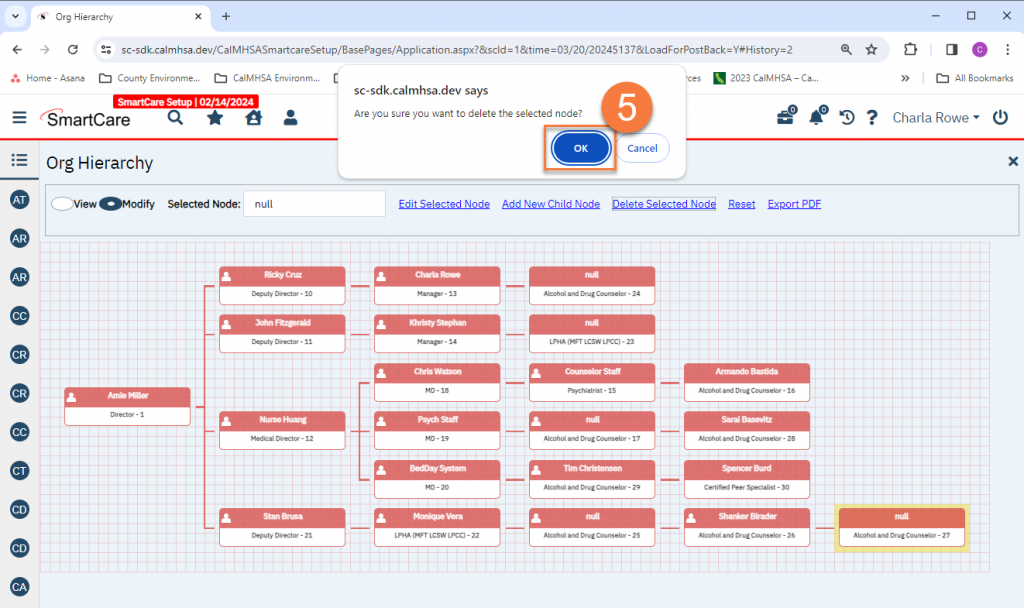
- Click on “Delete Selected Node” in the screen ribbon.
- A pop-up window will appear asking you to confirm you want to delete the selected node. Click “OK” to confirm.
- A pop-up window will appear letting you know changes were made. Click “OK” to reload the Org Hierarchy and see your changes.
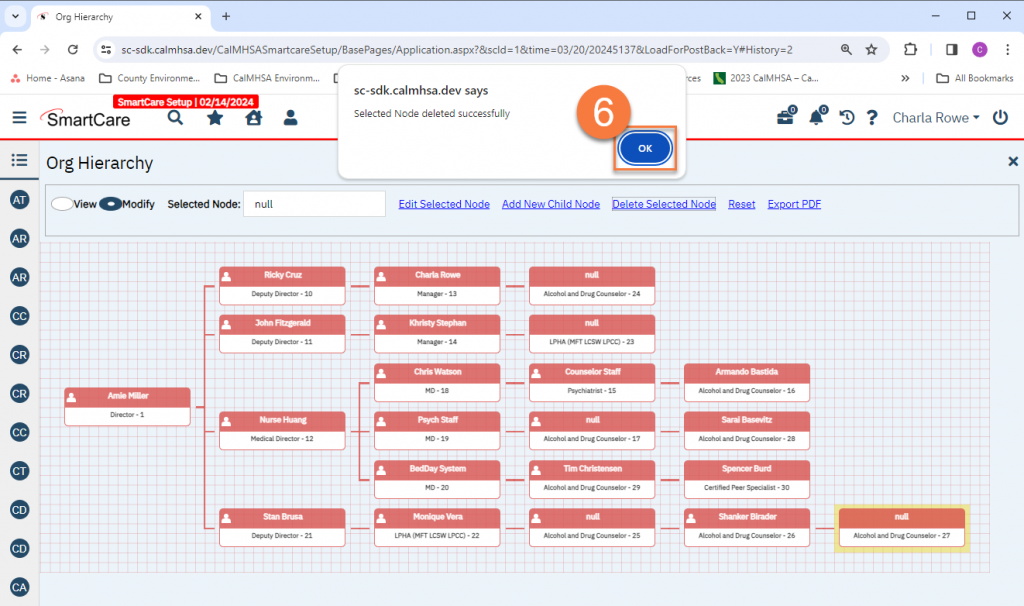
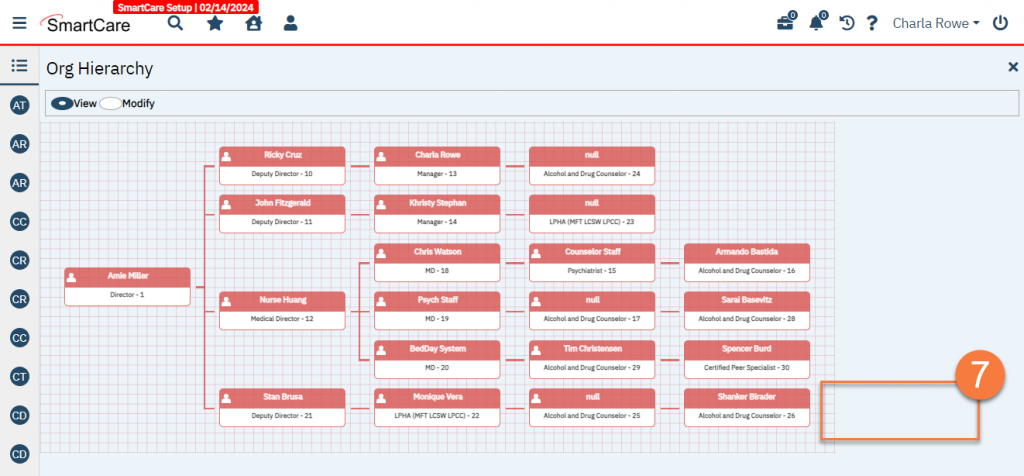
- Note that deleted items will be fully removed from the Org Hierarchy and will not show. Only delete items that were created in error. If a position was terminated, utilize the End Date rather than deleting the node entirely (see Ending a Position for details).
Moving a Position (Node)
Sometimes a position is moved from one team to another. Utilize the steps below to change the parent node for a position.
- Open the Org Hierarchy screen.
- Click on the Search icon.
- Type in “Org Hierarchy” in the search bar.
- Select “Org Hierarchy” from the search results.
- Click on Modify to change the mode from View to Modify.
- Click on the node for the position you want to terminate.
- Click on “Edit Selected Node” in the screen ribbon.
- This will expand the ribbon to include the attributes of the position. Enter the Position End Date.
- Click “Submit” to make the changes.

- A pop-up window will appear letting you know changes were made. Click “OK” to reload the Org Hierarchy and see your changes.
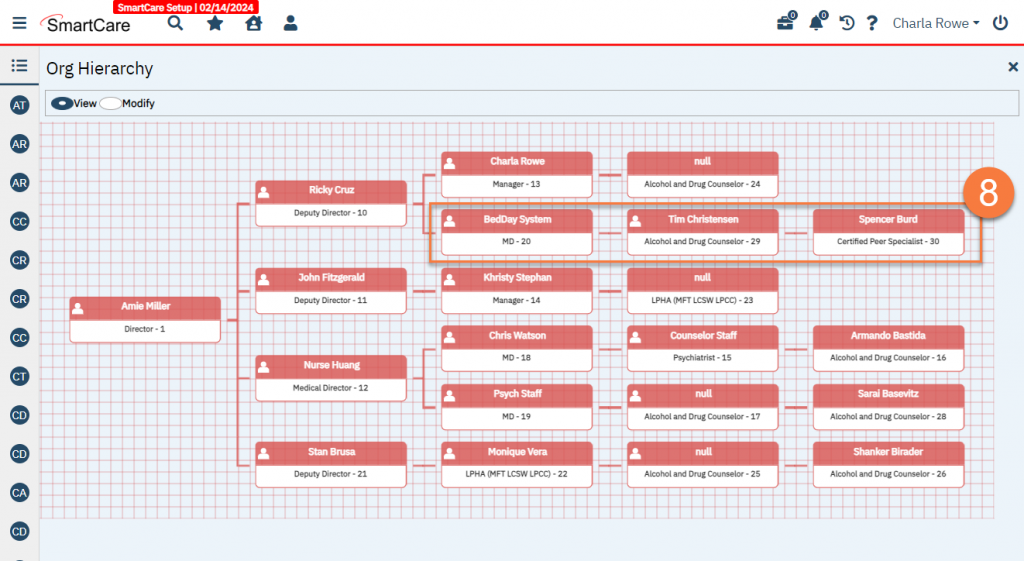
- Note that changing the parent of this position did not change the parent-child relationship it had with its children nodes. The entire team (all child nodes) moved with the node that was changed.
Updated 3/20/24