Tracking Protocols are a group of flags. Tracking Protocols allow you to assign a group of flags at once.
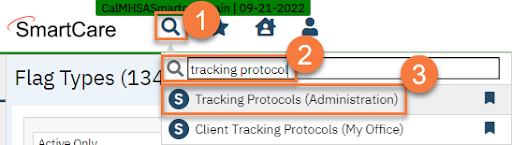
- Click the Search icon.
- Type in “Tracking Protocols” in the search bar.
- Select “Tracking Protocols (Administration)” from the search results.
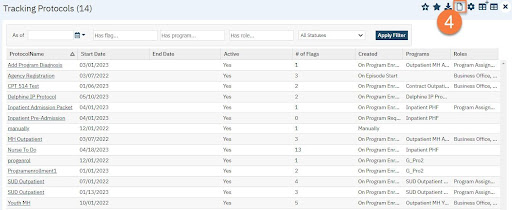
- This takes you to the Tracking Protocols list page. Click the New icon.
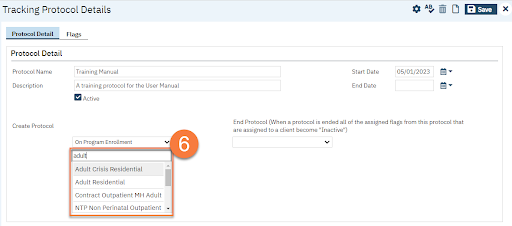
- This takes you to the Tracking Protocol Details screen. Enter a name and description for your Tracking Protocol.
- Enter a start date. If desired, you can also enter an end date.
- Make sure the Active checkbox is checked.
- Denote what condition will trigger the addition of this Tracking Protocol to a client’s chart. The options are:
- Manually – The Tracking Protocol will never automatically be added to a client’s chart and must be added manually.
- On Program Enrollment – The Tracking Protocol will be added to a client’s chart upon enrollment in selected programs. (Triggers when an enrollment date is added in Client Programs)
- On Program Requested – The Tracking Protocol will be added to a client’s chart upon enrollment request in selected programs. (Triggers when a requested date is added in Client Programs)
- On Program Discharge – The Tracking Protocol will be added to a client’s chart upon discharge from selected programs. (Triggers when a discharge date is added in Client Programs)
- You can leave the End Protocol field empty. CalMHSA is not using episodes in SmartCare, so “On Episode Discharge” would never be appropriate. You can select Manually if desired.

- If you selected a condition that triggers upon program change, add the programs you want this Tracking Protocol to correlate with. Enter the program name in the search bar and select the appropriate program from the search results. The list of programs currently associated with this Tracking Protocol will show below this field. You may enter as many programs as you want.
- If you accidentally added a program and want to remove it from this Tracking Protocol, click the Delete (X) icon next to the program that was added in error.

- If you accidentally added a program and want to remove it from this Tracking Protocol, click the Delete (X) icon next to the program that was added in error.
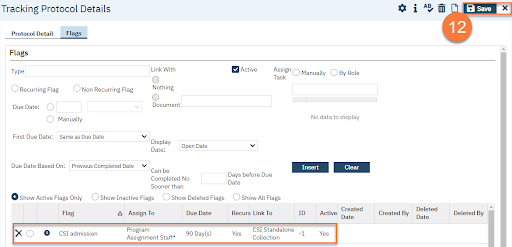
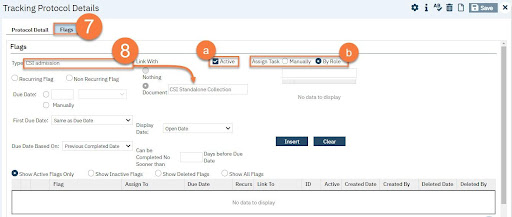
- Click on the Flags tab.
- Enter the name of your flag in the Type field. This will search for the flag. Select the desired flag from the search results. If you’ve selected a flag that’s associated with a document, it will show under the Link With: Document field.
- Make sure the Active box is checked.
- Choose whether to assign this flag manually or by role.
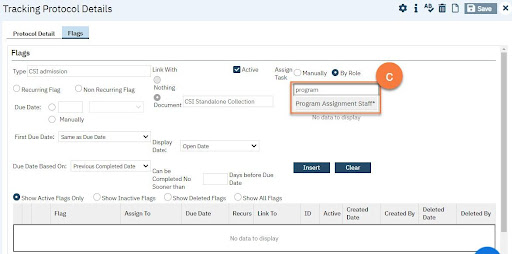
- If you select a role, add the role(s) you want this flag to be assigned to. Enter the role name in the search bar and select the appropriate role from the search results. The list of roles currently associated with this flag will show below this field. You may enter as many roles as you want. Reminder: CalMHSA is NOT using Primary Clinician nor Primary Physician, as these are client-level roles and cannot be hidden behind a CDAG.
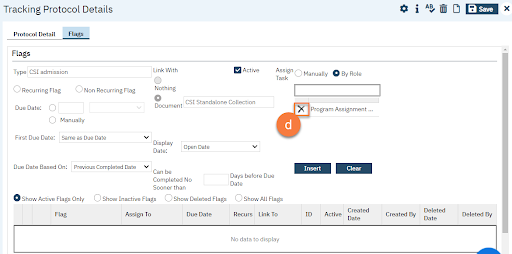
- If you accidentally added a role and want to remove it from this flag, click the Delete (X) icon next to the role that was added in error.
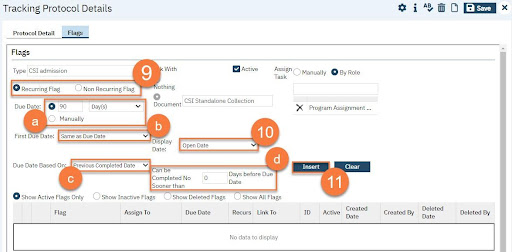
- Denote whether this flag should occur once or be recurring within this Tracking Protocol.
- Enter the due date of the flag. This is a number of either days, months, or years the flag will be due, in relation to when the flag is assigned to the client, per the Tracking Protocol being assigned. (Example: If a tracking protocol is assigned upon Program Enrollment, this will be X number of Days from the program enrollment date.)
- If this is a recurring flag, enter whether the 1st due date is the same or different from the above due date. This can be helpful when a flag is due immediately and then every X number of days/months/years thereafter.
- If this is a recurring flag, enter when the next due date will be due. The options are:
- Previous Completed Date – This will set the next due date based on when the task was last completed. (Example: If the task was due on 4/15/23 and was completed on 4/22/23 and is due every 1 month, the next due date will be 5/22/23.)
- Previous Due Date – This will set the next due date based on the previous due date, regardless of when the last task was actually completed. (Example: If the task was due on 4/15/23 and was completed on 4/22/23 and is due every 1 month, the next due date will be 5/15/23.)
- If this is a recurring flag, enter the number of days from the due date that the next occurrence of the flag can be completed within. If there is no limit to this, enter “0” (zero). (Example: If the task is due on 4/15/23 and “Can be Completed No Sooner than” 15 days, the flag will not be available or be able to be marked “complete” until 4/1/23.)
- Enter the Display Date. The options are:
- Open Date – Will show the flag as soon as it’s open (meaning assigned and not completed). This is the default option.
- # of Days Before Due Date – Will only show the flag when it is within the designated number of days before it’s due.
- Click Insert.
- This will add the flag to the list of flags included in this Tracking Protocol. Repeat steps 8-9 until you’ve added all of your desired flags. Click Save and close.