Before orders can be created for clients in the EHR, they need to be set up in SmartCare. While CalMHSA has created some orders, it is likely that you will need to modify these or create new ones. This guide provides details on the things to consider when setting up orders. The Supplemental References section includes additional resources, such as user manuals and training materials, that may be helpful in the order setup process.
Note: Orders is a separate SmartCare subscription and may not be available in your county. Reach out to your Implementation Coordinator if you have any questions.
This section will cover items that are common for the majority of order types. Sections/fields that are unique to specific orders will be covered in the Order Set Up for Different Types section.
Creating and Saving a New Order
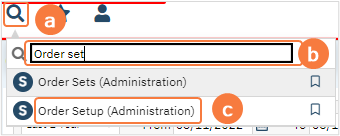
- Navigate to Order Setup (Administration).
- Click on the Search icon.
- Type Order Setup.
- Only three characters are required before options display.
- Select Order Setup (Administration) from the options.
- Ensure you go to Setup and not Sets
- You will be in the Order Setup screen. Click the new icon in the tool bar.
- This will open the Order Details screen.
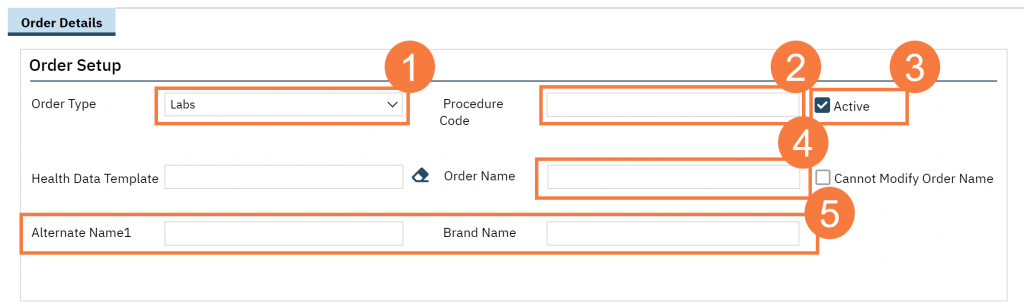
Order Setup
- Order Type is your first selection.
- Fields and sections below will differ by order types.
- See sections below for specific changes related to order types.
- Note: Activity would not be used in IP, CSU, and Residential settings.
- Fields and sections below will differ by order types.
- Procedure Code will create a service when order is entered.
- This feature will be available in the future.
- Active will default to checked.
- Checkbox should be blank if at any point the order is no longer active.
- Order Name is the name the user would search for to enter the order.
- If Cannot Modify Order Name is selected, this name cannot be changed.
- Alternate Name and Brand Name will also display in search and should be used if applicable.
- For example, if you are renaming orders from your legacy system but still want users to be able to find the order using the old name, you can enter the old name in the Alternate Name field. When users search for the order using the legacy name, the system will display the relevant order based on the entry in the Alternate Name field
Priorities
Priorities identify the rank of the order in proportion to other orders for end users.
- To add priority select an option from the dropdown and click Add button.
- Repeat this step as needed.
- You can select one of the options as default by selecting a radio button next to the option. This will default this option for users when creating an order.
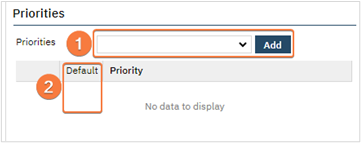
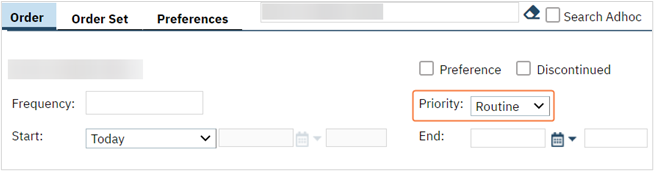
- Options associated will display when the user is creating the order and are present in orders list pages
Note: Priority is meant to document and does not have any logic.
Schedule
Schedule defines the start date and time and end date/time that can be utilized with the order. Options that are entered in this set up are options the user will see when creating a client order.
- To add a schedule select an option from the dropdown and click Add button.
- Repeat this step as needed.
- You can select one of the options as default by selecting a radio button next to the option. This will default this option for users when creating an order.
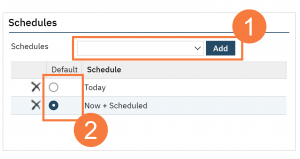
- Based on schedule options the Start and End fields will change or have carry over logic.
- Today: Start date and time are inactive for the user.
- Start date and time will default to date and time the order is created after it is signed.
- Today: Start date and time are inactive for the user.
-
- Now and Scheduled: Start date and time are inactive for the user.
- This option is used for orders that will appear on the MAR (Medication Administration Record).
- When selected it will queue an administration at the current time before reverting to set up of the frequency.
- See Frequency section for details.
- For example, TID medication is scheduled for administration at 8:00 am, 1:00 pm, and 8:00 pm. If the order is entered at 9:00 pm and Now + Scheduled is selected, the MAR will show administration for 9:00 pm and will then revert to regular TID frequency.
- Now and Scheduled: Start date and time are inactive for the user.
-
- Standing Administered Once: Start date and time are inactive for the user.
- Start date and time will default to date and time the order is created after it is signed.
- This is used for orders that need to have action taken once and apply through the admission.
- For example, providing a walker. The walker is provided to the client and remains with the client until discharge.
- Standing Administered Once: Start date and time are inactive for the user.
-
- Other: Start and End date and time are active and can be entered by the user.
- When equipment is received: Start and End date and time are active and can be entered by the user.
- This should be used if order is dependent on equipment. There is no logic associated to this but used to identify this dependency.
- When equipment is received: Start and End date and time are active and can be entered by the user.
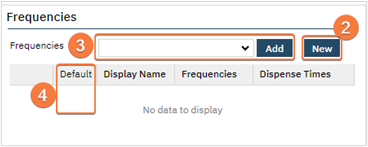
Frequencies
Frequencies define the frequency (directions) that can be utilized with the order. Options that are entered in this set up are options the user will see when creating a client order.
- Frequencies are dependent on Order Template Frequencies.
- Please review the Order Template Frequencies Set Up section before continuing with this section.
- Frequencies can be created from this section by clicking New. They can also be edited by clicking the hyperlink of the Display Name.
- However, it is recommended that all frequencies get established in Order Template Frequencies.
- To add frequencies that have been created, select an option from the dropdown and click Add button.
- Repeat this step as needed.
- You can select one of the options as default by selecting a radio button next to the option. This will default this option for users when creating an order.
Options
Options are additional functionality that can be added to an order. The options that display will vary by order type; see Appendix A for a table of all options and corresponding order types. Below will list all options for the majority of orders. For options to specific orders see Order Set Up for Different Types section.
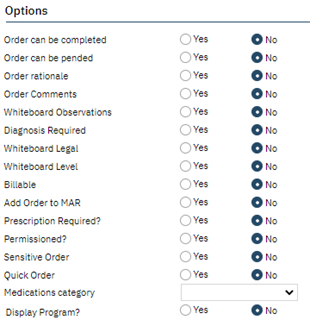
- Order can be completed: This allows an order to have an option of complete status.
- Order can be pended: This will allow an order to be pended.
- When marked as Yes a role will be required to release the pending order.
-
- Pend Order will display for the user when order is created.
- Order that the user has marked as Pend Order will appear with Status of Action Required and in Unauthorized Order column in the whiteboard.
- The selected role(s), in step 2.a. will be able to release the pending order.
- Order that the user has marked as Pend Order will appear with Status of Action Required and in Unauthorized Order column in the whiteboard.
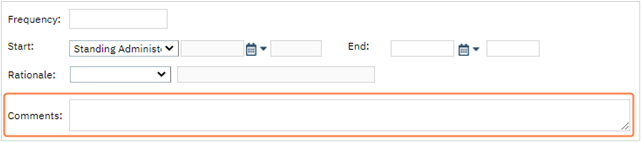
- Order rationale: When Yes, Rational field will display in order entry.

- Order Comments: When Yes, the Comment field will display in order entry.
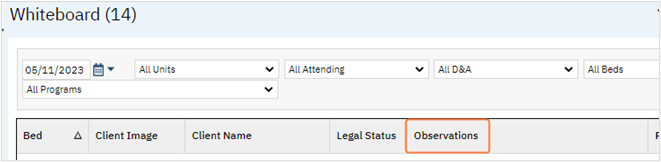
- Whiteboard Observations: Order will display in the Observation column of the Whiteboard
- Billable: This feature is currently in design and not available at the moment.
- Add Order to MAR: Selecting Yes will display the order in the MAR.
- Whenever an order will show on the MAR, ensure Frequencies and associated templates are set up as needed.
- As a reminder, orders have to be set up to show in the MAR in Program Details in addition to selecting Yes.
- See Programs Set Up section for details.
- See Appendix B for decision tree if order should be added to the MAR or not.
- Prescription Required?: This is currently not in use and does not have any logic.
- Permissioned? When order is marked as Yes, order will appear in Role Definition and can be permissioned to specific role(s).

- Only roles that have the order permission granted can create and see the order.
- Sensitive Order: Yes indicates the order is a sensitive order. Sensitive orders cannot be added to an Order Set.
- When a sensitive order is generated with a non-sensitive order it will generate its own order.
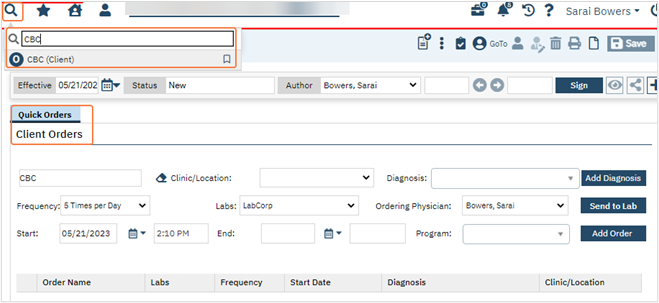
- Quick Order: Yes will allow the order to be created through Quick Orders. Quick Orders can still be created through regular order entry.
- Quick Orders can be found in the Search icon.
-
- Quick Orders can be created through the Psychiatric Note.
- Quick Orders cannot be added to Order Sets.
- Medications category: A dropdown will display category options. This is only to group type of orders into a category.
- Display Program: When Yes is selected a dropdown will appear to indicate if program selection can be single-select or multi-select.

- On order entry, users will see a Program option.

Questions
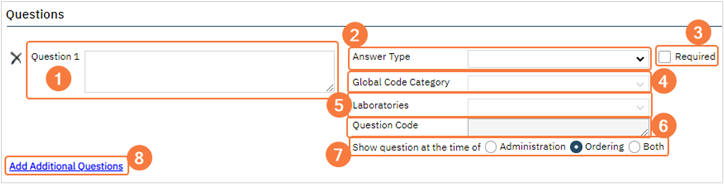
Question section allows questions to be associated with an order. This is not required but available when applicable. Multiple questions can be created as needed.
- Question # field would hold the question the end user would see.
- In Answer Type you select options for how the user would answer the questions.
- Add Flowsheet: when selected Global Code Category will display Health Data Elements that are used in flow sheets.
- Users would see the entry as set up in the element.
- Note: when a user answers the question it will not push the response to the corresponding flow sheet.
- If you would like the order to show on the flow sheet, the user should go directly to the flow sheet and complete it.
- Radio Button: when selected, you will need to select Global Code Category.
- Global code options will display as radio buttons.
- Note: Radio buttons are single-select options.
- Check Box: when selected, you will need to select Global Code Category.
- Global code options will display as checkboxes.
- Note: checkboxes are multi-select options.
- Text Box: will display a character text box for the user to type into.
- Drop Down: will display a dropdown when answering the question.
- You will need to select a Global Code Category.
- Multi Line Text Box: similar to above, this will display a textbox. However, this will be multi-lines versus single-line.
- Date: will display a date field.
- Date & Time: will display a date and time field.
- Add Flowsheet: when selected Global Code Category will display Health Data Elements that are used in flow sheets.
- Required: select checkbox if answer has to be answered.
- Global Code Category should be completed based on Answer Type.
- Required for Add Flowsheet, Radio Button, Check Box, and Drop Down Answer Types.
- Laboratories: Field is only active with Order Type is Labs and is set up by Streamline when there is an interface.
- Question Code: Field is only active with Order Type is Labs and is set up by Streamline when there is an interface.
- This would indicate if the lab is providing the question.
- Show question at the time of: need to select between Administration, Ordering, or Both.
- Administration means the question would show when the order is being administered through the MAR. This should only be selected if Add Order to MAR is Yes.
- Ordering would mean the question displays when the order is being created for the client.
- If you need to create additional questions click Add Additional Questions and repeat steps 1-7.
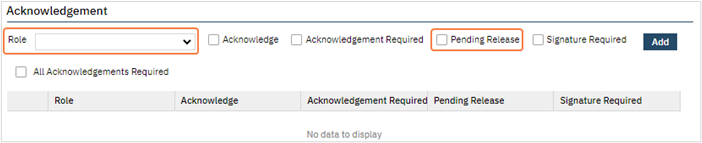
Acknowledgement
Acknowledgement should be set up if an order needs to be acknowledged. See Appendix B for a decision tree as to whether an order should be acknowledged or not. Follow steps below if an order needs to be set up to be acknowledged.
Note: Acknowledgement orders will appear under the Unauthorized Orders column in the Whiteboard.
- Role: Select the role that should acknowledge the order.
- Roles are user roles not Treatment Team roles.
- Checkboxes indicate what type(s) of acknowledgement should occur for the role.
- Acknowledge checkbox indicates the role needs to acknowledge the order
- Acknowledge Required checkbox indicates the order cannot proceed until it is acknowledged.
- Pending Release checkbox should be used when Order can be pended is yes.
- See Options section, #2.
- Signature Required indicates a signature from the role is needed before proceeding.
- All Acknowledgement Required should be selected all indicated roles completed acknowledgement.
- For example, if you indicate a medical role and prescriber role as acknowledgement. When this checkbox is not selected either of these roles acknowledging will meet acknowledgement criteria. However, if checkbox is selected, acknowledgement will not be completed until both roles acknowledge the order.
- Click Add to add the acknowledgement.

Repeat steps 1-4 for additional roles as needed.