The Client Orders list page can be used to show orders made for the client by physicians in the county. The types of orders include labs, medication, radiology, consults, adaptive equipment, safety checks, and more. The list page will show the name of the order, type of order, frequency, start and end dates, status, ordering physician, clinic location, date received, and a few other items. This page is also where staff can start a new client order, open a current order, and see results and review. This page is very useful for clinicians, prescribers, and clinical supervisors.
- Click on the Search icon, with the client open.
- Type “Client Orders” in the search bar.
- Select “Client Orders (Client)” from the search results.
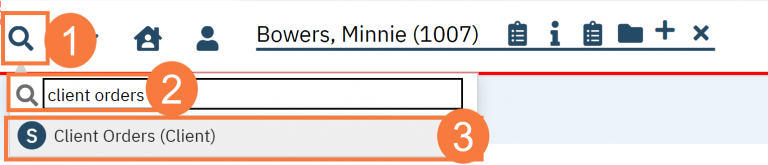
- This will bring up the Client Orders list page.
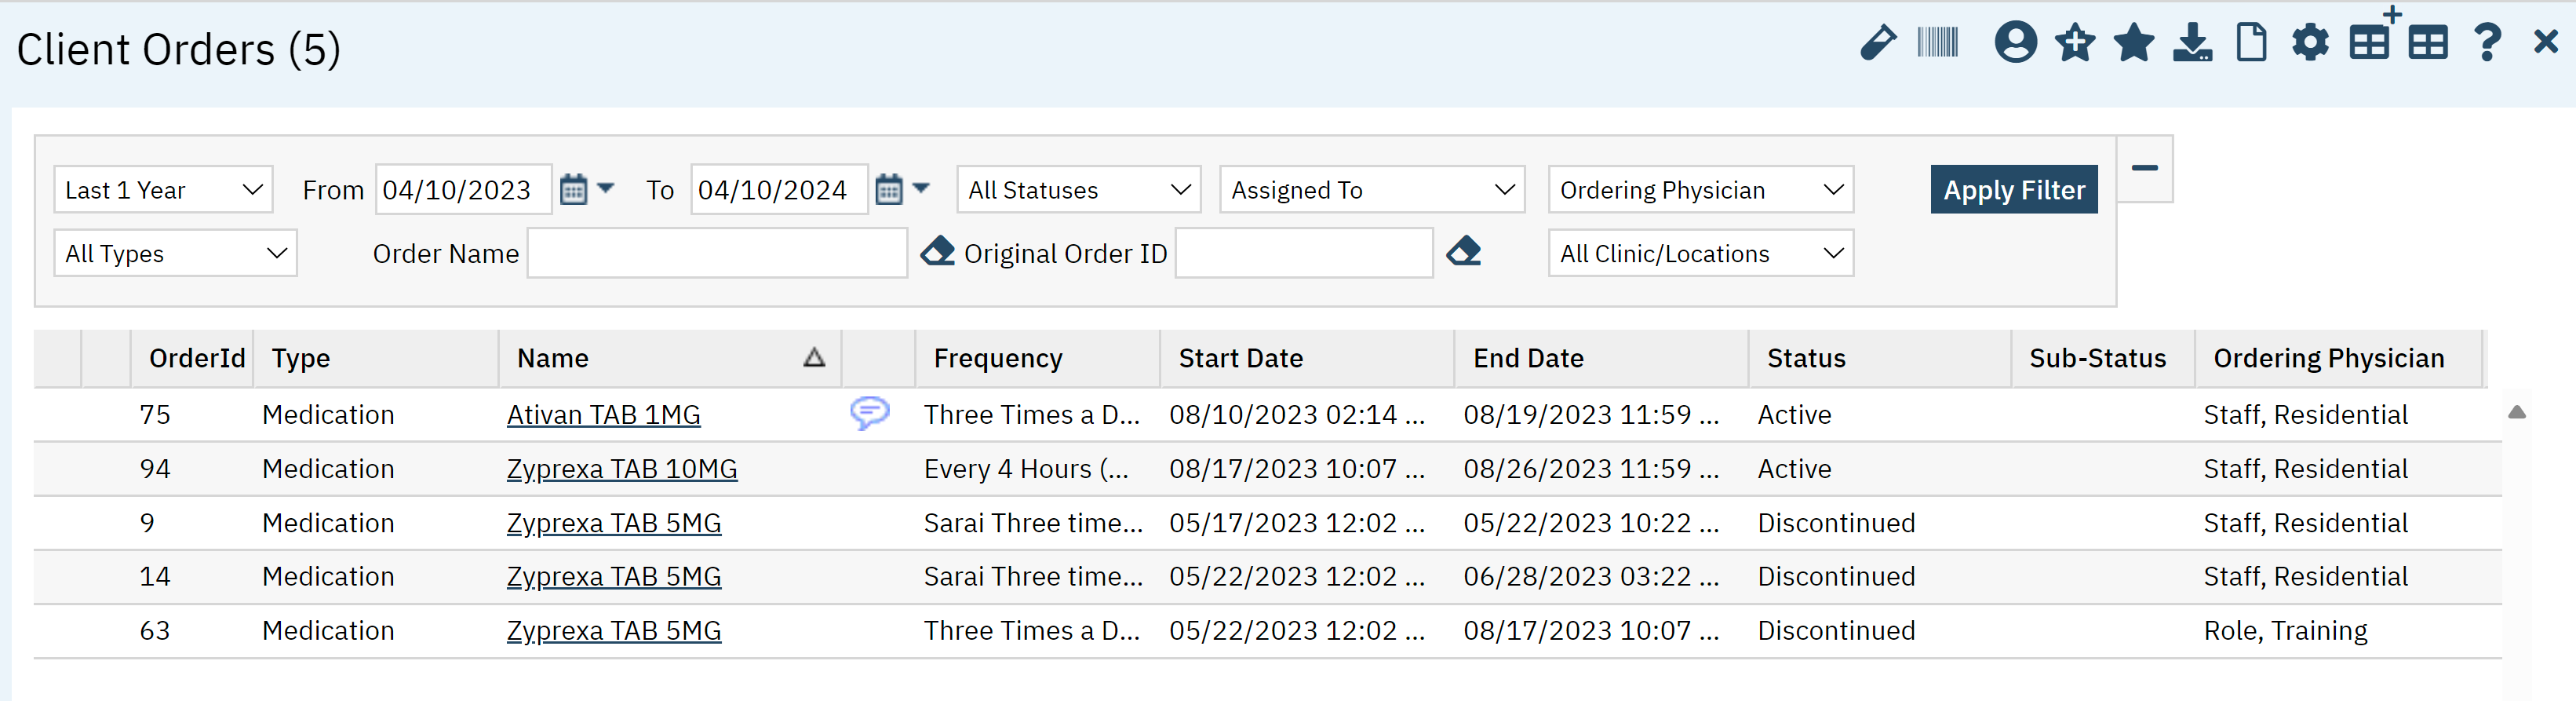
Filters
- Custom Date: Allows you to select a specific date range such as Last 1 Year.
- From and To Date: Date range orders were placed.
- All Statuses: Includes
- Active
- Complete
- Discontinued
- Nurse Reviewed
- Results Obtained
- Reviewed
- Sent to Lab
- Action Required
- Assigned To: Staff that have been assigned the order.
- Ordering Physician: All physicians or specific physician.
- All Types:
- Activity
- Medication
- Labs
- Radiology
- Consults
- Nursing
- Additional
- Procedures
- Adaptive Equipment
- Safety Check
- Order Name: Field to search for order name such as CBC.
- Original Order ID: If Order ID is known it can be used to filter by it.
- All Clinic/Locations: Filter by all clinic locations or a specific location.
- Click Apply Filter when appropriate options selected.

Columns
Note: If you have any orders with the status action required, you will see a blue hyperlink with the text: “Unacknowledged Orders”, clicking on this will take you directly to the orders/ rounding screen.
- OrderId: Unique identifier assigned to each order at the time of creation. You can enter this number into the *Original Order ID filter when attempting to locate specific orders.
- Type: This is referring to the category the order was created under. For example, all safety check orders are done under the *Safety Check type. This is decided by either CalMHSA or the county at the time of order setup.
- Name: This is referring to the name of the order (Medication name, lab name etc.)
- Frequency: How frequently is the order being administered.
- Start Date: Displays start date of order.
- End Date: Displays end date of order.
- Status: Displays status of order. This can be changed by clicking into the order name, using the drop-down menu of *status, then saving. The list of status’s includes:
- Active
- Complete
- Discontinued
- Nurse Reviewed
- This can be selected by either selecting the status drop down menu within the client order details screen or by selecting the review tab within the client order details, then clicking on the button Nurse Reviewed.
- Results Obtained
- This can be selected by either selecting the status drop menu within the client order details screen or you will see this automatically change if you have the lab module and the results are available.
- Reviewed
- Sent to Lab
- Action Required
- This status will take you to the orders / rounding screen. This means for this order, it either needs to be acknowledged or released.
- Sub-Status: Displays sub- status of order.
- Changed: this displays if your order has been modified
- Ordering Physician: Displays the name of the ordering physician that was selected at the time of creating the client order.
- Clinic/Location: If your client order had a clinic / location that was selected when creating the order, this information will populate here. (not pictured)
- Assigned Staff: The assigned staff can be selected by clicking into the client order details, clicking into the Review tab and choosing a name under the *Assigned to field. (not pictured)
- Parent OrderId: Displays Parent OrderID (not pictured)
- Date Received: Displays the Date the order was received – this will be displayed for Labs. (not pictured)
- Original Order Id: Displays the original Order ID – (In the event the status or program is modified, a new order ID will be assigned) (not pictured)
- Original Order Id: Displays the original Order ID – (In the event the status or program is modified, a new order ID will be assigned) (not pictured)

Upper Right Icons
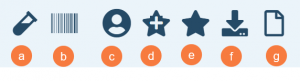
- Accudraw Report
- BarCode Scan: This is important for any counties with the Lab module. Next to your Order ID, you will see a checkbox, clicking into the checkbox and clicking on the BarCode Scan icon will display a results and requisitions Popup. This will display the Client’s lab label sent over from the lab.
- New Order creation: This will allow you to create a new order. If your client already has active orders, you will receive a popup that allows to either modify or discontinue existing active orders
- SmartView: This icon is an overview of the patient’s medical profile. You can quickly view the patients’ vitals, medications, documents that need to be done, and much more.
- New Favorites Icon: Clicking on the “new favorites” icon will allow you to add this screen to your favorites for quick access.
- Favorites Icon: If you have this listed as your favorite already, when you hover over this icon, it will tell you the favorite name.
- Export Icon: This icon is available to admins. You will be able to export the data from this screen into an excel spreadsheet. Columns included in the export include the following: OrderId, Type, Name, Order Comments, Frequency, Start Date, End Date, Status, Sub-Status, Ordering Physician, Clinic/Location, Assigned Staff, Parent OrderId, Date Received, Original Order Id.