The following list page is used by all staff treating patients directly, management and front desk Management to track patient activity easily. This data pulls in from the Census Management / Inpatient Activity / Client Information / Client Orders / Flags screens. This document does not go through specific whiteboard workflows. This document will only be through navigating the Whiteboard (My Office) list page.
- Click on the Search icon.
- Type “Whiteboard (My Office)” in the search bar.
- Select “Whiteboard (My Office)” from the search results.
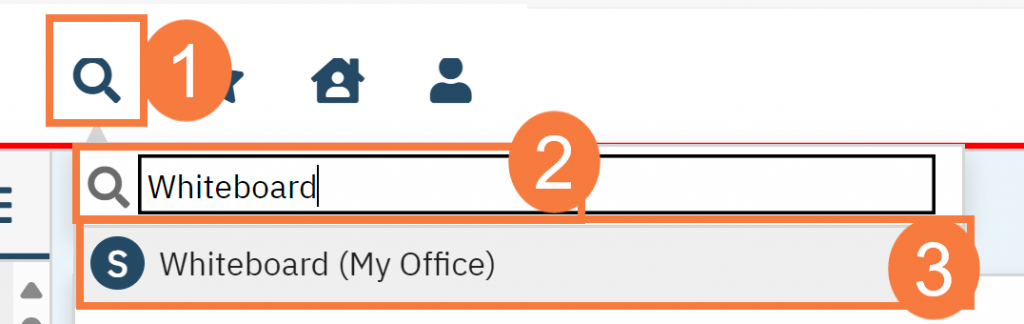
- The Whiteboard screen opens.

Filters
- Date: When you click into the Date filter a calendar will populate. This will allow you to see what Clients and tasks occurred that day. This list page will not show you a range of days. To edit most columns, you MUST have the CURRENT date selected.
- Unit: This filter will show you empty beds and clients from that unit only. The units are created by sys admins in the unit / room / bed screen. You must have permission to the selected unit to view any beds. Any changes to this must be placed with your sys admins.
- Attending: Choose All Attending Physicians or Choose an attending physician from the list of all attending physicians set up in the system
- All D&A: Drugs & Alcohol, select from the drop-down list to filter records to display in the list area of the page. Options are:
- All D&A
- No– does not have a history of drugs and alcohol use.
- Yes – does have a history of drug and alcohol use
- Yes-C – does have a history of drug and alcohol use with a current CIWA order.
- All Beds: Select an option from the drop – down list to view beds available in the whiteboard. The below options are:
- All Bed
- Open
- Occupied
- Program: Select a program from the drop-down list to view Clients in the selected program. *Note: you will NOT see any empty beds in this filtered list. To see empty beds, you must have the Program filter set to *All Programs.
- Client: Allows you to filter by client.

Columns
The following columns will display depending on the column view you choose in the upper right hand corner.

- Bed: Identifies the bed number. Click the hyperlinked bed number to display the Inpatient Activity Details page – Activity Details tab.
- Client Image: This column displays an icon of a person. To display the client’s picture, click on the icon. This pulls from the image they take in the Client Information Screen.
- Client Name: Identifies the client’s name: Last name, First name. Click the hyperlinked name to display the Client Summary page. After clicking into the client’s name, if there are flag alerts set for the client, the Flag Alert window appears as well. Click the OK button in the Flag Alert window to close it.
- Alias (Chosen Name): Client Alias. This data pulls from Client Information in the Alias field.
- Legal Status (1): Identifies the client’s legal status when the legal status order is placed. You can add multiple legal status’s at a time to this column through the Client Order that’s placed. To remove a legal status, the client order must be at it’s end date.
- Legal Status (2): Click the hyperlinked word Select to display the Legal Status window where you can choose Involuntary or Voluntary to indicate the client’s legal status as an inpatient.
- UO: Unacknowledged Orders. Identifies the number of orders for the client. Click the hyperlinked number to view the Orders/Rounding page where you can view the unacknowledged orders.
- MAR: Medication Administration Records. Identifies the medication prescribed for the client. Click the blue Flag icon to display the Client Order page. The red Flag icon to display the Client MAR page. The green flag icon indicates an order is due now. Clicking on this will display the Client MAR page.
- Observations: Identifies the observation(s) that are required for the client. This information comes from an Observation order created in the Orders module. You can mark any order types outside of safety checks to appear in the observation column.
- Precautions: Identifies any precautions set for the client. Click the icon to view the Precautions window with an explanation. Hover the cursor over a flag to view the definition of the flag and the information entered for the precaution.
- Therapist: Click on the select button to display a drop-down list of Therapist. Select the Therapist assigned to the client. This will display the selected staff in the Therapist Column.
- Attending: Click on the select button to display a drop-down list of Attendings. Select the Attending assigned to the client. This will display the selected staff in the Attending Column.
- DOA: Date of admission. Identifies the date the client was admitted to the bed.
- EDD: Estimated date of discharge. Identifies the date the client is estimated to be discharged. This information pulls from the inpatient activity details screen. Fields that populate this are Scheduled Discharged Date, Scheduled End Date, End Date, Firm End Date, Transfer Date, Scheduled Transfer Date.
- Discharge Coordination: Click on the select icon to receive a pop-up box that allows you to choose from Taxi / Ride Share, Public Transportation, Caretaker Pick Up and Other. This will display the icon of what you selected in the Discharge Coordination Column. Hover over this to see any comments.
- LOS: Length of stay. Identifies the number of days between the admissions date and the current date.
- Med/Misc: Identifies a place for a note. Click the icon to enter or read the note. You can enter an unlimited number of characters. A blank icon indicates there is no note. This icon indicates a note has been entered.
- D&A: Drugs & Alcohol. Select indicates no D & A has been entered. Entry options are: • No – does not have a history of drug and alcohol use. • Yes – does have a history of drug and alcohol use. • Yes-C – does have a history of drug and alcohol use with a current CIWA order. Note: CIWA is the The Clinical Institute Withdrawal Assessment for Alcohol ten item scale.
- Unit: Identifies the name of the Unit where the bed is located.
- Age: Identifies the client’s age as shown in the Client Information module for the client
- Gender: Identifies the client’s gender as specified in the Client Information module for the client. Options are: • Male – displayed as M • Female – displayed as F • Unknown – displayed as U • Intersex – displayed as I
- Flags: Identifies flags applied to the client for additional information to be aware of.
- PTC: Paper to Court, using this filter will allow you to select a paper to court date
- Competency: Identifies the client’s competency status. Select indicates no competency status has been entered. Entry options are: • Competent – displays as C • Incompetent – displays as I • New Admissions – displays as NA
- Next Check: Next time to complete a safety check.
- Last Check: Last Safety Check that was done.
- Shift Notes: Time stamped notes on whiteboard.

Upper Right-Hand Icons
- New Favorites Icon: Clicking on the “new favorites” icon will allow you to add this screen to your favorites for quick access.
- Favorites Icon: If you have this listed as your favorite already, when you hover over this icon, it will tell you the favorite name.
- Export Icon: This icon is available to admins. You will be able to export the data from this screen into an excel spreadsheet.
- Column Configuration
- Column Views