CalMHSA has created an organizational hierarchy within SmartCare to help track clinical positions for managerial and supervisory reporting and analysis.
If needed, multiple different hierarchies can be created in a single instance of SmartCare to segregate the contract organizations from the county’s own employees. All data is still maintained in the same county instance for effective analysis. Please reach out to CalMHSA if this is a need in your organization, as there will be some additional configurations needed to enable this.
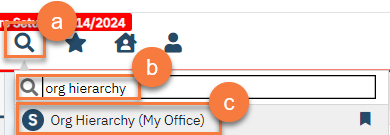
- Open the Org Hierarchy screen.
- Click on the Search icon.
- Type in “Org Hierarchy” in the search bar.
- Select “Org Hierarchy” from the search results.

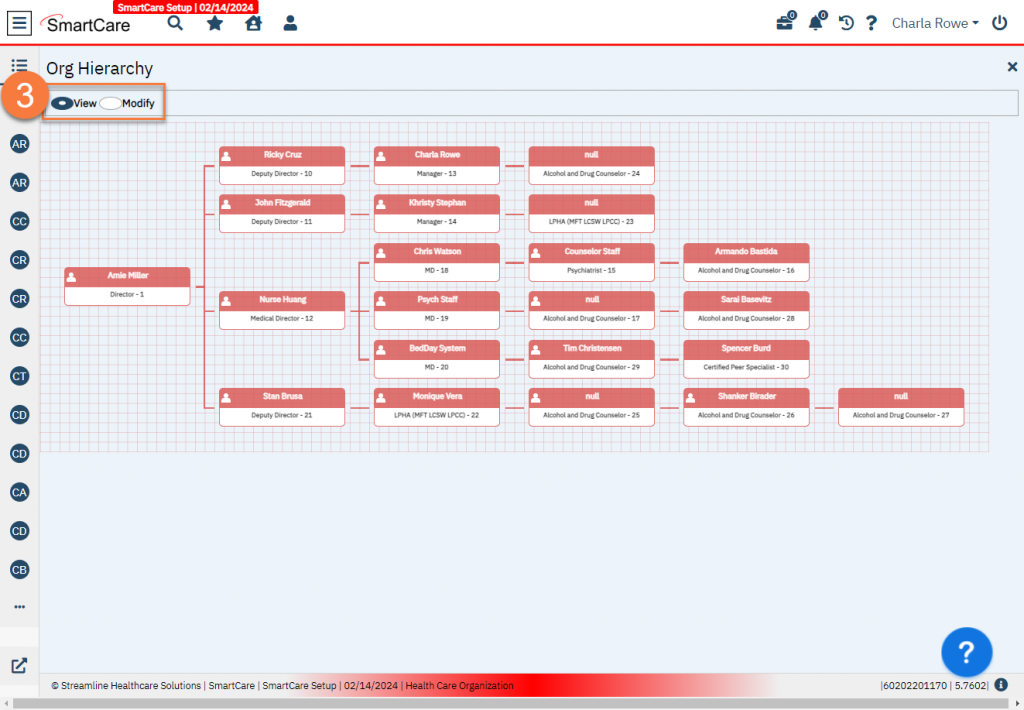
- This will take you to the Org Hierarchy screen. SmartCare will automatically load the entire current organizational hierarchy on the screen.
- There are two modes for the Org Hierarchy screen. When opening the Org Hierarchy screen, the system will default to View mode.
- View – allows you to see the hierarchy, including expanding and collapsing as desired
- Modify – allows you to make edits to the hierarchy

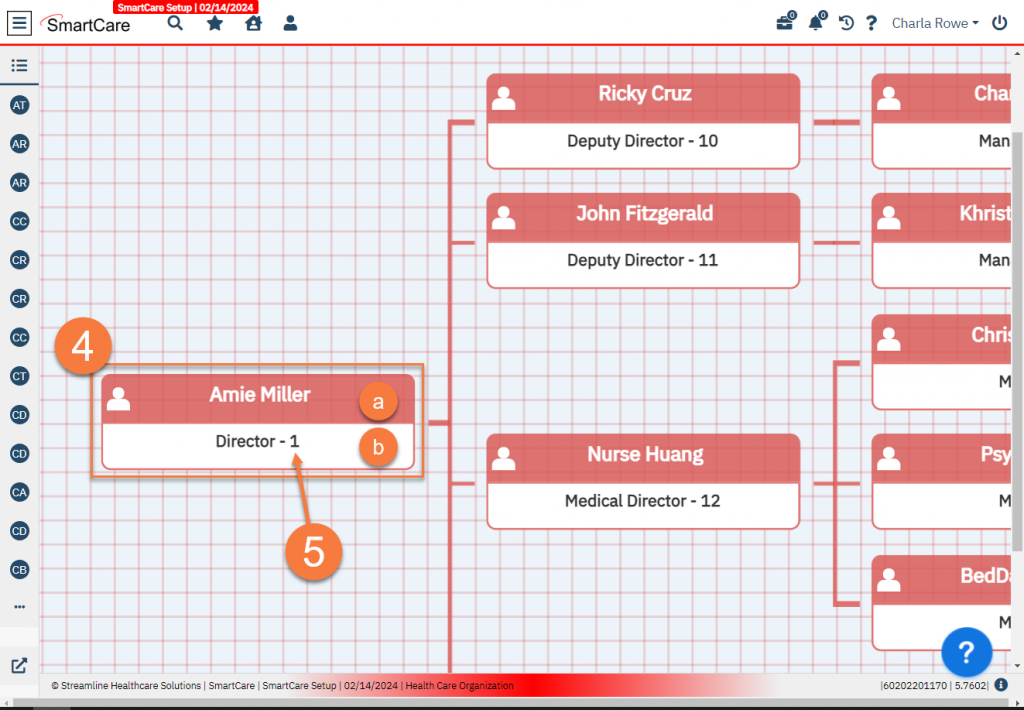
- Each rectangle, or “node” represents a position in your hierarchy. There are two parts to a node:
- Position – The position (aka “role” or “job”) in a hierarchy. When viewing the hierarchy, this is represented by the bottom half of the node, which is white. The text in the white section of the node indicates the position type.
- Staff – The staff member who is filling the position. When viewing the hierarchy, this is represented by the top half of the node, which is red. The text in the red section of the node indicates the current person occupying that position. If a position is vacant, the red section will read “null”.
- Each node has an identifying number. This can be found in the white section of the node and is the number following the position type.

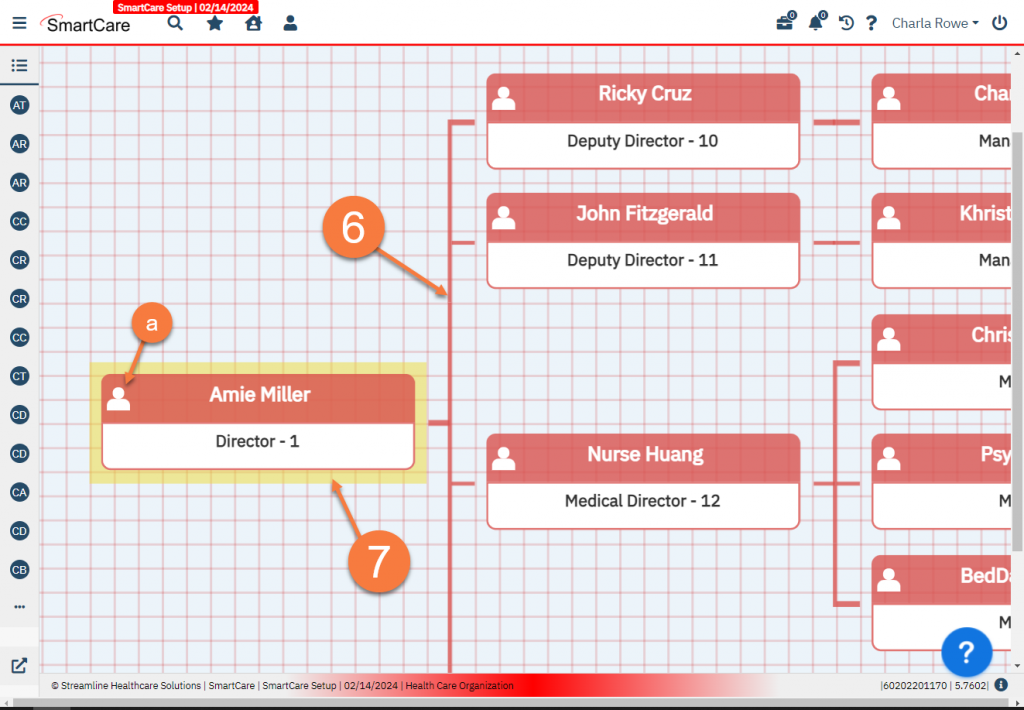
- Each node is connected to other nodes. These connections represent the hierarchical nature of an organization. The hierarchy is visualized left to right, with the left-most node being the director. If two nodes are connected, then the left node is the supervisor and the right node is the supervisee. This is often referred to as a parent/child node relationship. Nodes that share a common parent node are often referred to as siblings.
- Any nodes that have children will have a ‘Manager’ icon on top-left portion of the node. This will show even if the child nodes are collapsed and not visible.
- When hovering over any node, SmartCare will highlight this node in yellow. You can also see green arrows on the sides of the node. These arrows allow you to expand or collapse the view of the hierarchy. Arrows that point inward toward the node indicate that you can collapse the view in this direction. Arrows that point outward away from the node indicate that you can expand the view in this direction. This allows you to create a custom view of the hierarchy. Note that changing the mode between View and Modify will reset the view back to the entire hierarchy.
- Users can zoom-in/zoom-out on any section of the Org Hierarchy by using the mouse scroll wheel. Users can also pan (move) the Org Hierarchy by clicking and holding the left mouse button and dragging the mouse around. You can use this feature along with the zoom-in/zoom-out & collapse/expand feature to focus on any part of the Org Hierarchy.

Node Details
Each node has additional details that can be seen while editing a node in the Modify mode of the Org Hierarchy screen. To see these details, you’ll need to select the Modify mode, select the node you want more information on, and click on “Edit Selected Node”. There are step-by-step instructions on how to modify a node HERE.
- Position Information:
- Position Type: This is drop down list of available position types. You can select any one position type in the drop down to be associated with this position node. This is a required Please note that there is a limited list of positions available. This is based on billing categories and focuses on direct-service staff and their supervisors/managers.
- Internal Hierarchy Level (Number): This is an integer number to depict the hierarchy level of the current position to be used/helpful in reporting. This is an optional integer only field provided for counties who would like to view their reports on this data field.
- Internal Position ID: This is an optional text field. You can enter your internal county position ID for better tracking, if needed.
- Position Start Date: This has the date picker to depict the start date for the position (the day position becomes active). This field is optional, to be used as needed.
- Position End Date: This has the date picker to depict the end date for the position (the day position becomes inactive). This field is optional, to be used as needed.
- Position Budget: This optional field is used for documenting the position budget in USD.
- Staff Information:
- Staff Assignment: This is an available drop down list of the staff member taking up/associated with this position node. This is an optional Note: Only 1 unique Staff can be assigned to 1 position.
- Staff Start Date: This is a date picker depicting the date the particular staff started in this position. This is an optional field
- Staff End Date: This is a date picker depicting the date the particular staff ended their role in this position. This is an optional
- Staff FTE%: This is a field denoting the %FTE for a staff assignment. The valid values are from 0.01 to 1.00. For example, a 50% staff FTE assignment would be denoted as 0.5. This is an optional If you leave the field blank, or enter “0”, the system will automatically populate the value to be 1.00 (100%).
- Hierarchical Location:
- Edit/Change Supervisor Relationship: This is a field that will only show when editing a node. This shows the parent node of the currently selected node. This uses the Node Identifier discussed in 5 above. Changing this to another node’s identifier will move the selected node to the new parent node. Any child nodes associated with the currently selected node will remain under the currently selected node, and will therefore follow this node to the new parent node.
Video Walkthrough
Updated 3/20/24
