Messages (My Office) is a list page that allows users to view sent/received messages between themselves and other users. The list pages gives users the option to reply, forward, and delete selected messages. Users can also create new messages using the ‘New’ icon on the list page. This screen is recommended for all roles.
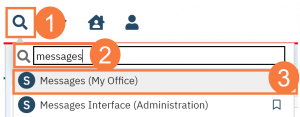
- Click on the Search icon.
- Type “Messages” in the search bar.
- Select “Messages (My Office)” from the search results.

This will open the Messages (My Office) List Page.

Filters
The following filters are available on this list page:
- Received/Sent: Toggle between the two filter radio buttons.
- From: The Staff member who sent the messages
- To: The Staff member whom the message was sent to
- This Week (Filter is not formally labeled, this shows the default option when first viewing the screen) This dropdown filter allows users to select some pre-set date ranges that will force “From Date” and “To Date” to use.
- From Date and To Date: Allows you to specify a specific date range.

Columns
The following data columns can be found on this list page:
- Icons: Multi Select, Deleted, Single Select (using single select will display the message below)
- Status: Read or Not Read
- From: Staff who sent the message
- Date Sent/Received: Date the message was sent or received.
- Client: This hyperlink will take you to the Client Information screen.
- Subject: Subject of the message.
- Priority: This could be normal, low, caution, high, etc.
- Reference: Message or Alert.
Note: There are also Delete, Reply and Forward buttons in this section.

Details
When a message is select you will be able to view the entire message and details in this section.

Upper Right Hand Icons
- New Favorites Icon: Clicking on the “new favorites” icon will allow you to add this screen to your favorites for quick access.
- Favorites Icon: If you have this listed as your favorite already, when you hover over this icon, it will tell you the favorite name.
- New Icon: Click this icon to create a new message.

