The Key Phrase functionality allows you to create pre-set templated text/phrases. This functionality allows for editable pre-set text/phrases to be placed in a textbox without losing existing text. It will place the pre-set text/phrase where the mouse cursor is located. You can copy and paste Key Phrases from one category to another. Once the Key Phrase is in the textbox it is fully editable.
Key Phrase Limitations:
- CalMHSA has permissioned the screens that Key Phrases can be used. If there is a particular screen that is desired, but you are currently unable to use the Key Phrases functionality, please contact your administrator so they can put in a request with CalMHSA.
- CalMHSA will provide a few standardized Key Phrases and categories, your county administrators can set up additional phrases if needed.
- SmartCare’s Key Phrases have no added functionality beyond text at this time, so cannot pull data (i.e. recent labs, medications)
- Do not edit any of the text that are within CalMHSA Key Phrases.
There are 7 defaulted categories that have been created by CalMHSA, but if desired to have alternative categories, please discuss with your County Admin:
Personal Key Phrases: County sys admin can edit this category name. Of note, any Key Phrase in here is defaulted, if selected a favorite.
Client History Key Phrases: County sys admin can edit this category name
MSE/PE Key Phrases: County sys admin can edit this category name
Consents Key Phrases: County sys admin can edit this category name
Supervisors/Attendings Key Phrases: County sys admin can edit this category name
County Key Phrases: County sys admin can edit this category name
CalMHSA Key Phrases (Do NOT edit) – CalMHSA will create these Key Phrases to push down to counties/end users.
How to Add a Key Phrase
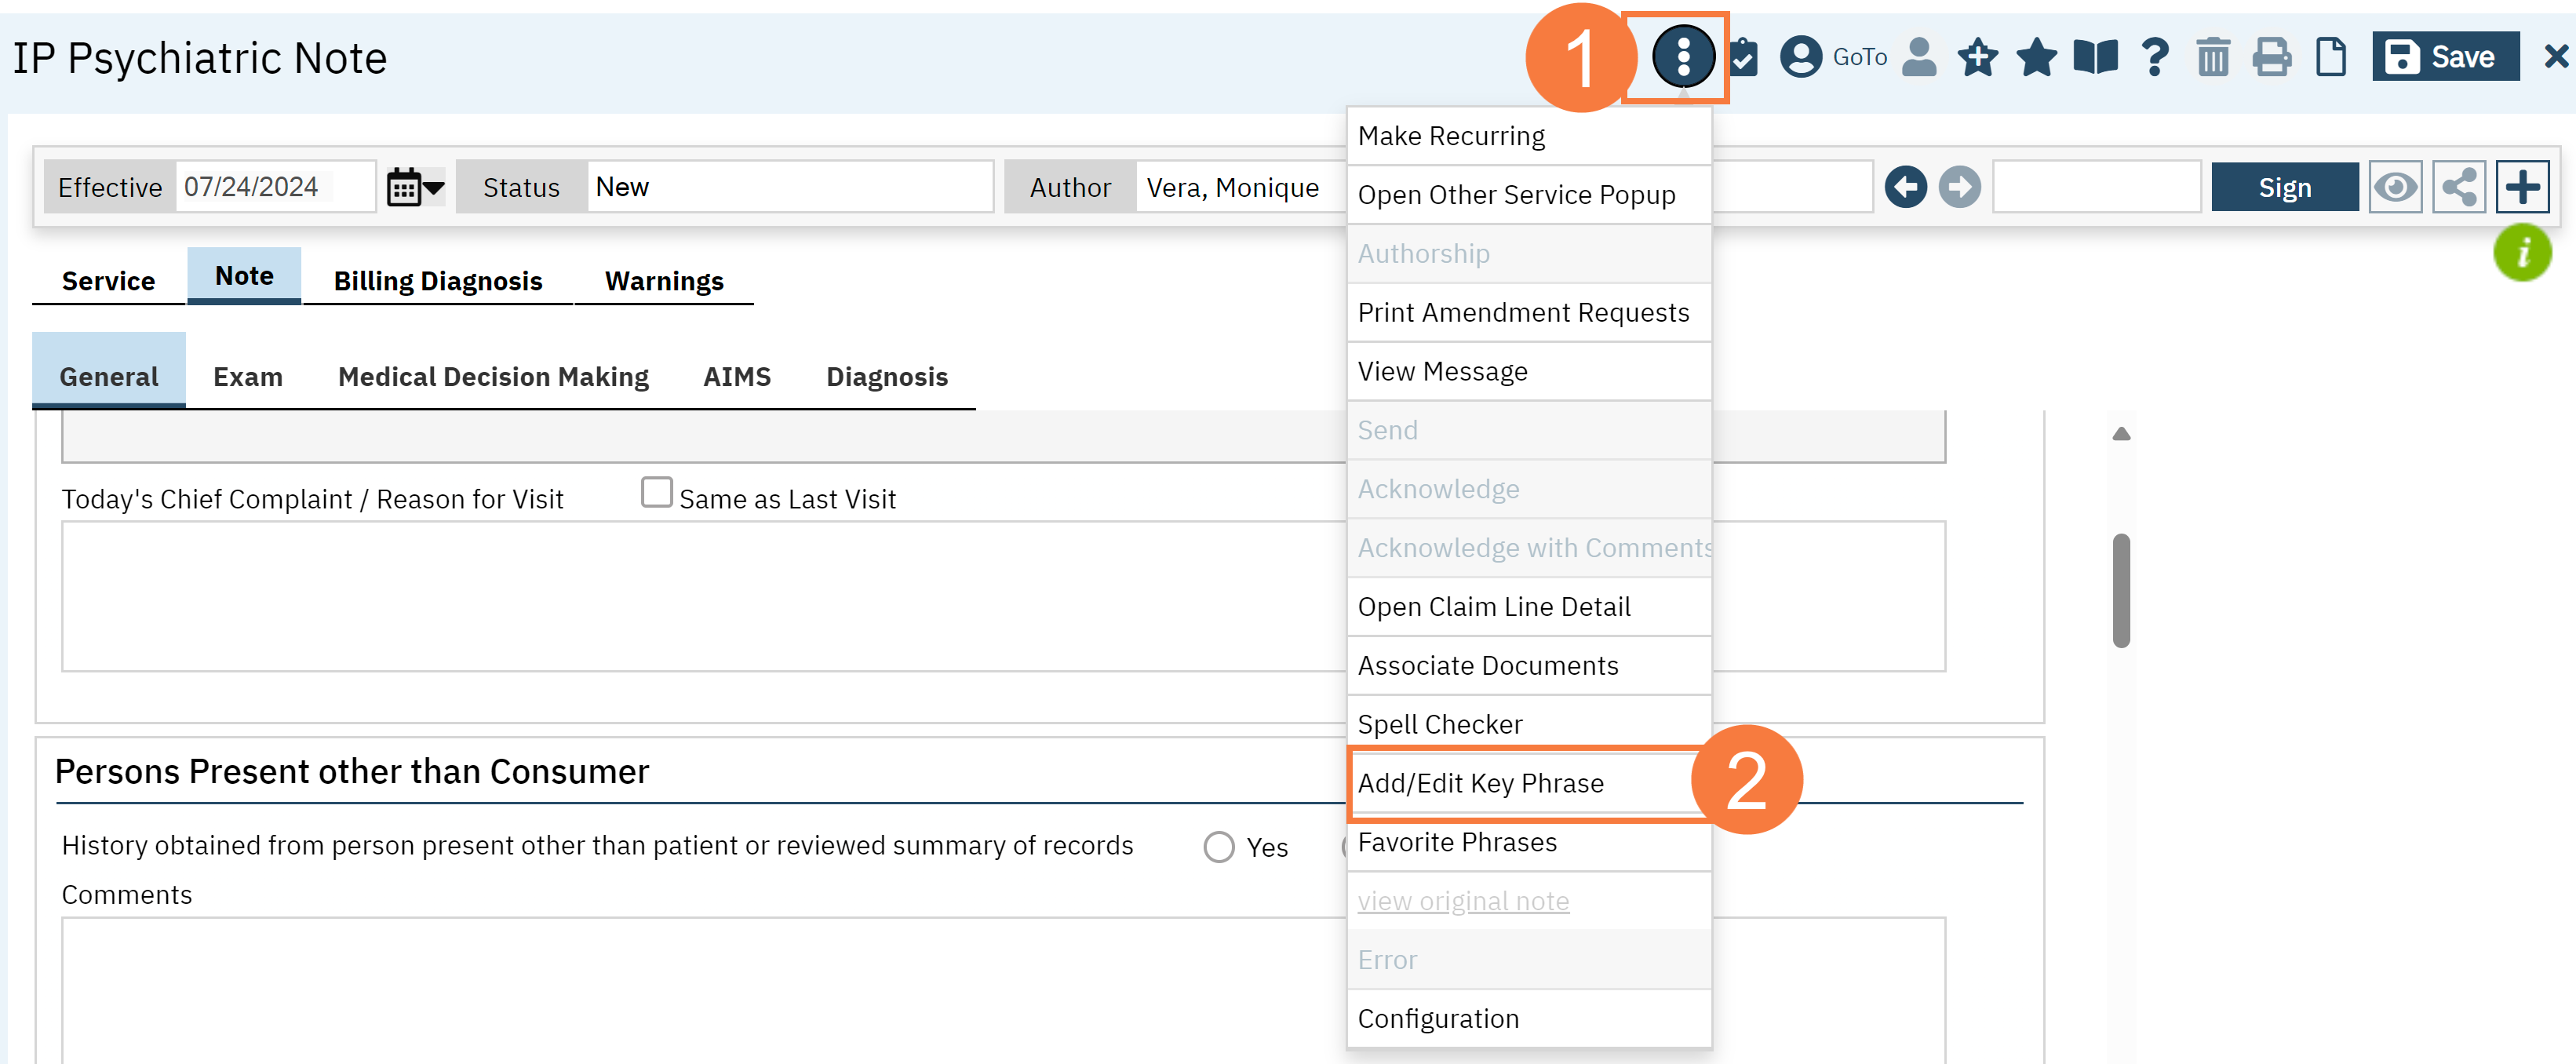
- Click to place your cursor in the appropriate textbox and click the 3 dot icon.
- When the menu opens, click Add/Edit Key Phrase.

- The Add/Edit Key Phrases will open. You will see two tabs:
- My phrases: personal key phrases created by you.

-
- Agency Phrases: These phrases are locked in standardized phrases that are available for use by everyone with access. However, once you have placed this phrase in your note, you may edit it. Only your system administrator can edit the standardized phrase.

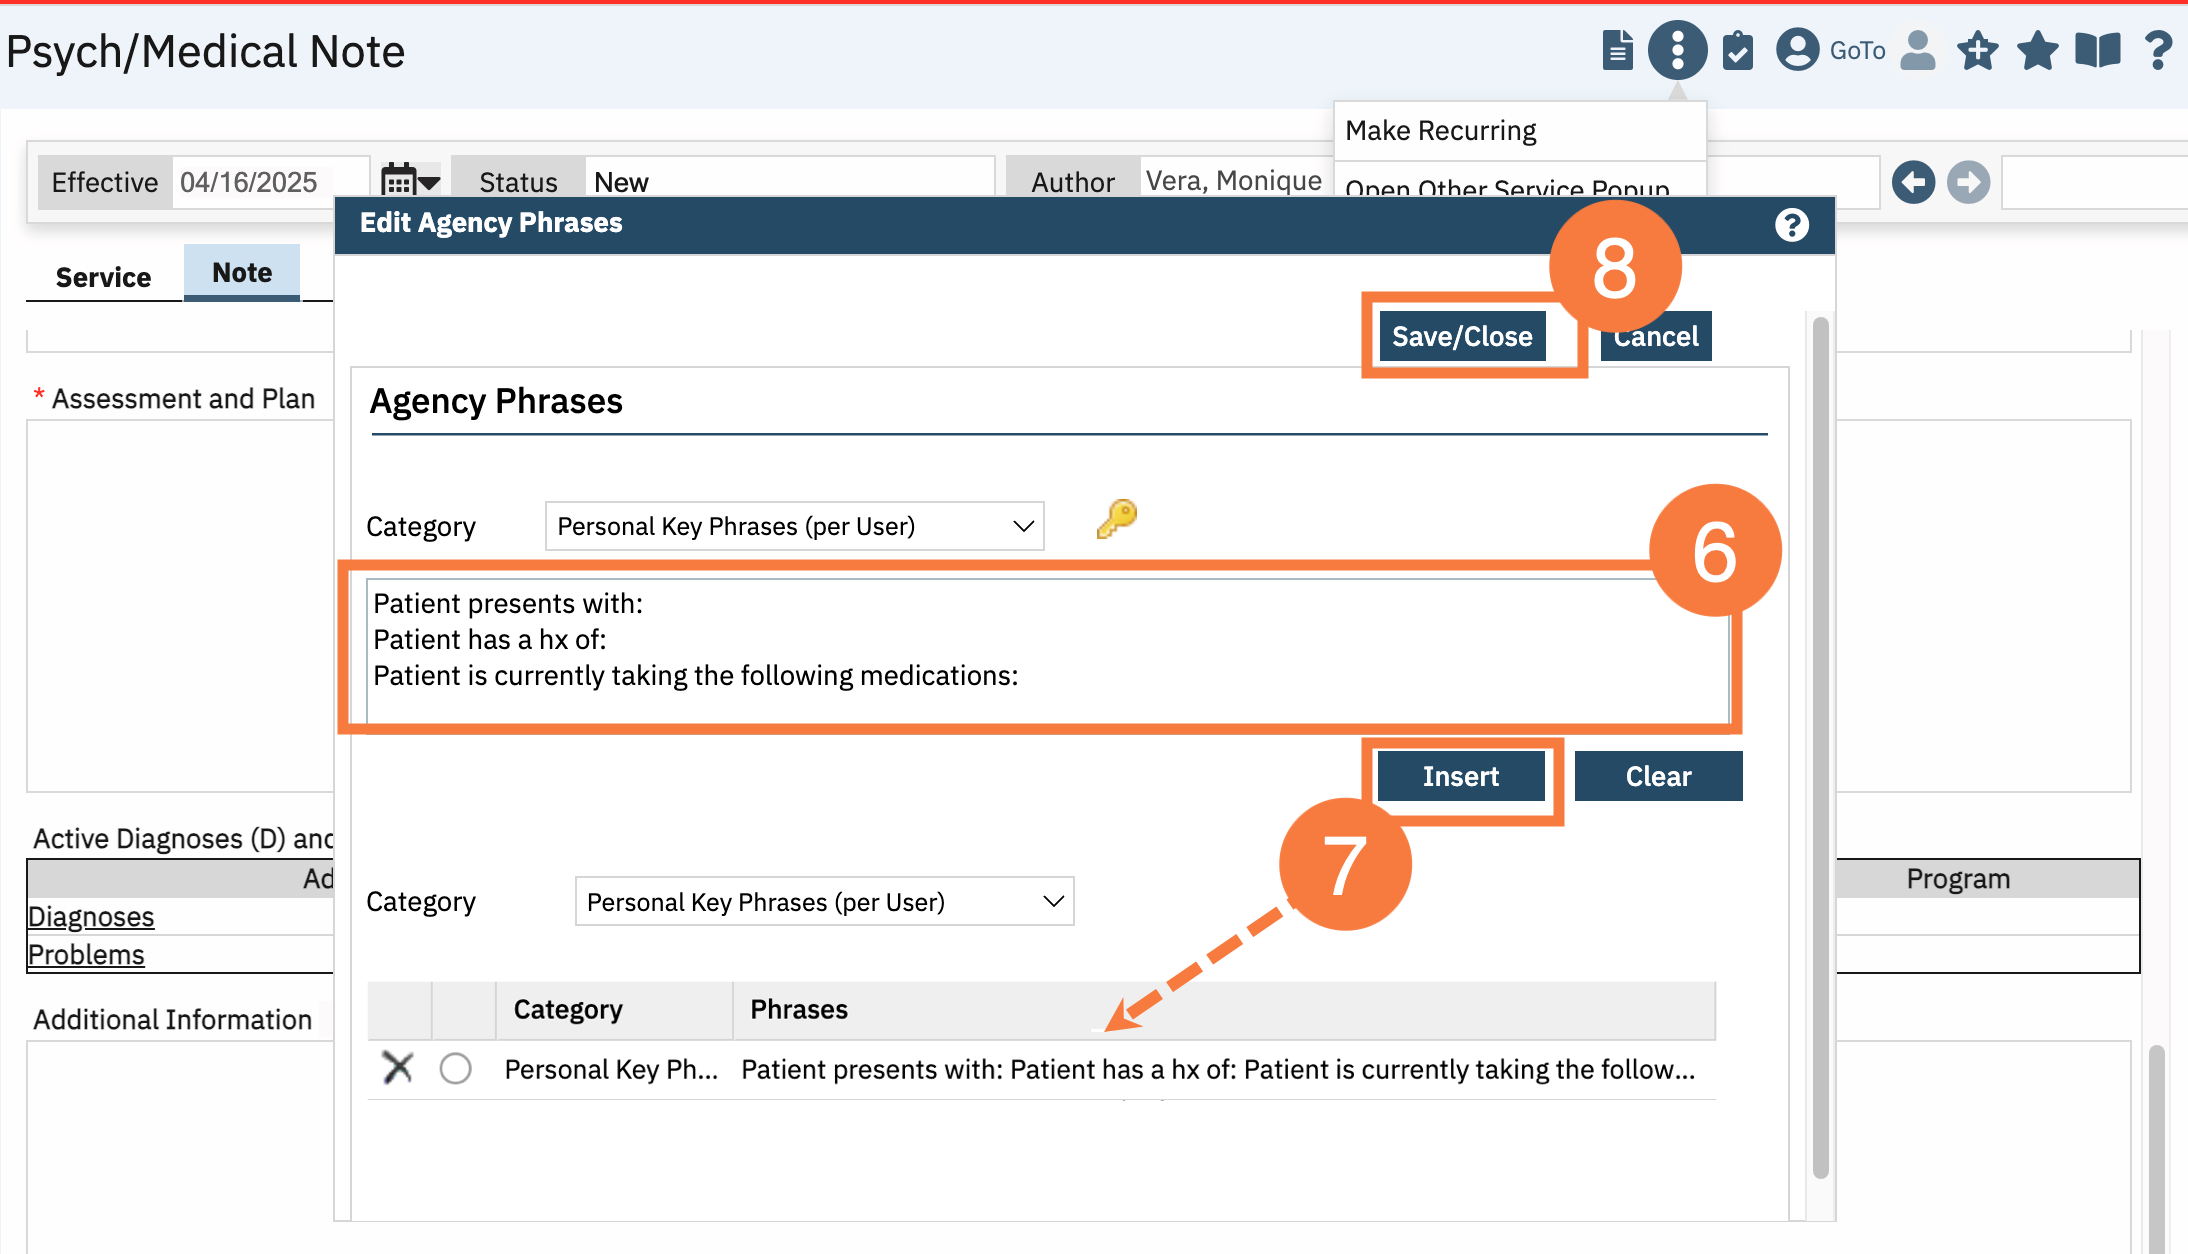
- Click Edit Agency Phrases.

- Click the category dropdown menu and select the category you want to save the phrase under.

- Click in the textbox and enter the phrase you want to save.
- Click Insert. The phrase will drop to the bottom and will be available to select in the future.
- Click Save/Close.

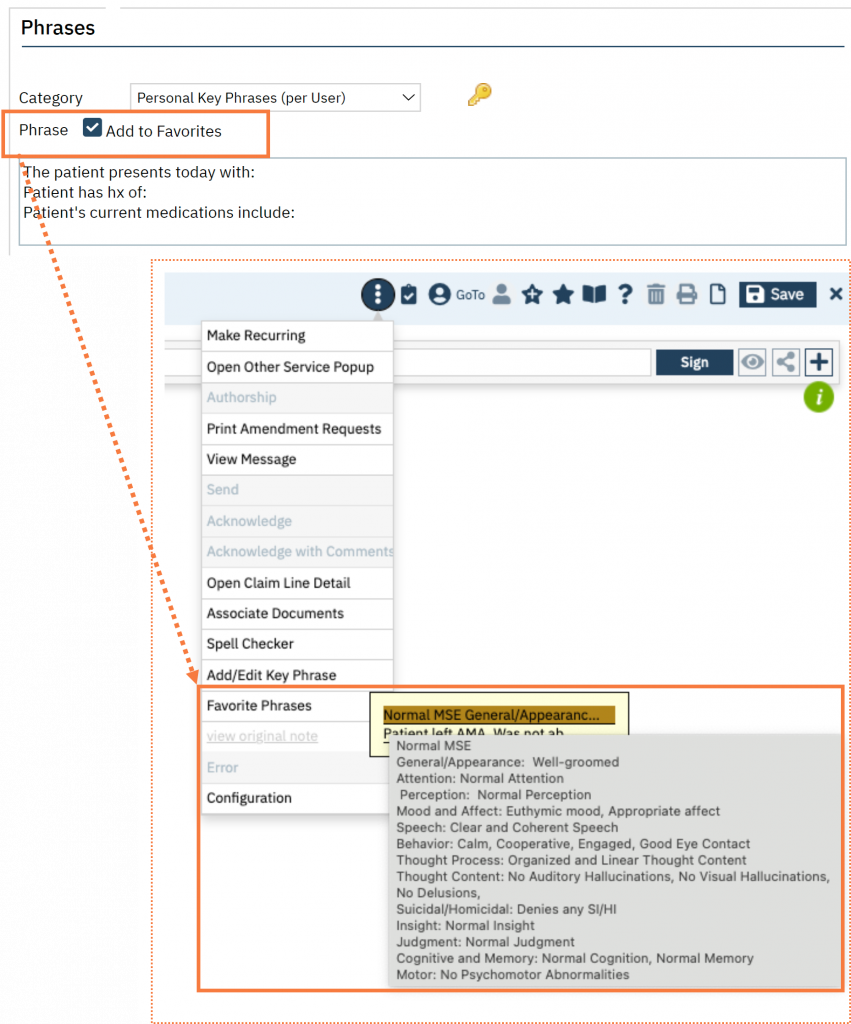
Note: Selecting the Add to Favorites checkbox will allow it to appear for quick use when hovering over the Favorite Phrase in the 3-dot menu icon.

How to Modify a Key Phrase
- When in the textbox you want to use the Key Phrase in, click the 3 dot icon.
- When the menu opens, click Add/Edit Key Phrase.

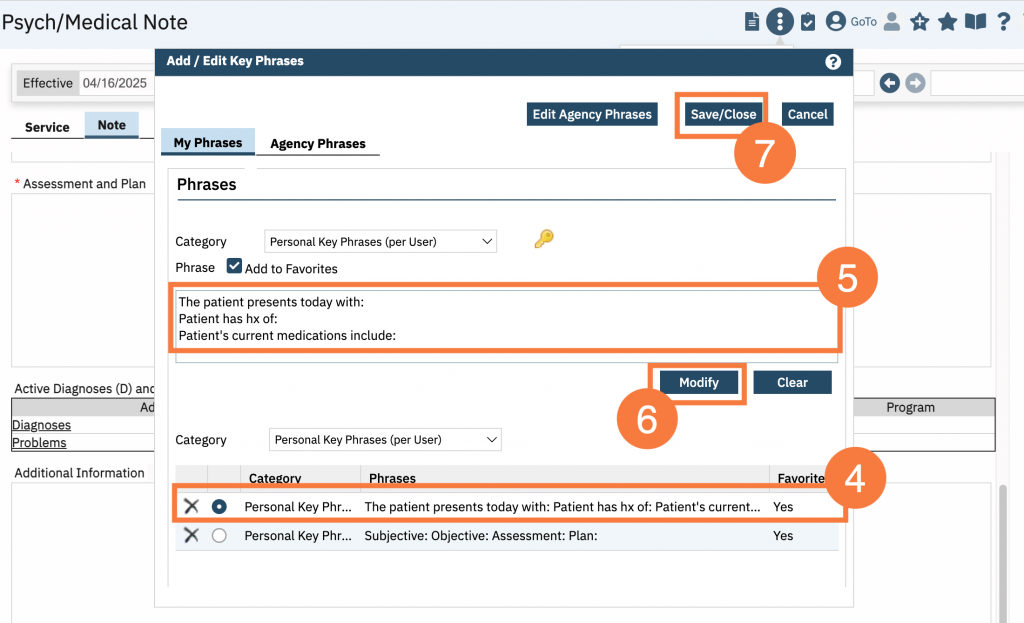
- Click to select the category from the drop-down menu.

- Click the radio button for the phrase you want to edit.
- Make the appropriate changes in the text box.
- Click Modify.
- Click Save/Close.

How to Use Key Phrases
- When in the textbox you want to use the Key Phrase in, click the 3 dot icon.
- When the menu opens, click Favorite Phrases.
- The Use Key Phrases window will open. Click the Category drop-down menu and select the appropriate category.

- Click the blue Use hyperlink.
- They Keyphrase will then appear in the textbox. Edit as necessary.

Functional Key Phrases
- CalMHSA has created several Functional Key Phrases which allow data to be pulled in that is specific to the author and/or client.
- These functional Keyphrases are denoted with the following angle brackets “< >” and allows the system to distinguish the code that between desired data to be pushed into Keyphrases and simple text.
- These Keyphrases can be found under the Agency’s category “CalMHSA Keyphrases (DO NOT EDIT)” and can be copy and pasted into other Key Phrases and/or categories.
|
Functional Keyphrases under CalMHSA Keyphrases (DO NOT EDIT) |
What type of data is pulled? |
|
<AuthorFirstName> |
The user’s first name. |
|
<AuthorLastName> |
The user’s last name. |
|
<AuthorLicense> |
The user’s license. If there are multiple licenses, then it will pull in all of licenses. |
|
<ClientFirstName> |
This will pull in the client’s first name that is listed in the Client Information screen. |
|
<ClientLastName> |
This will pull in the client’s last name that is listed in the Client Information screen. |
|
<ClientAgeDOB> |
This will pull Client DOB that is listed in the Client Information screen. |
|
<ClientSex> |
This will pull Client Sex that is listed in the Client Information screen. |
|
<CurrDate> |
The current date. |
|
<CurrTime> |
The current time |
|
<CDAG> |
This will pull in what CDAG the user is logged into currently. |
|
<CDAGProgramNames> |
This will pull in what Client Program(s) is assigned available to current CDAG. |
|
Medication Consent |
This will pull Medication Consent for medications data in <ClientCurrentMedications> |
|
<CalMHSARxPrescriptions> |
This is limited to medical licenses that already have access in SmartCare. **
|
|
<CalMHSARxHomeMeds> |
This is limited to medical licenses that already have access in SmartCare. **
|
|
<ClientOrderMeds> |
This is limited to medical licenses that already have access to Client Orders in SmartCare. ** Must be in a client’s chart. |
|
<SmartCareRxPrescriptions> |
This is limited to medical licenses that already have access to Medication Management Rx in SmartCare. ** Must be in a client’s chart. |
|
<SmartCareRxHomeMeds> |
This is limited to medical licenses that already have access to Medication Management Rx in SmartCare. ** Must be in a client’s chart. |
Example of Use:
This is an example for CalMHSA Rx Prescriptions and CalMHSA Rx Home Medications are used in the Note-

Access to Keyphrases is determined by access of screens based on roles and permissions according to medical licenses.
** Limited to following medical licenses:
- CNS Clinical Nurse Specialist
- CNS Clinical Nurse Specialist Clinical Trainee
- DO Doctor of Osteopathy
- Licensed Psychiatrist
- LVN Clinical Trainee
- LVN Licensed Vocational Nurse
- MD Medical Doctor
- Medical Assistant
- Medical Intern
- Medical Resident/ACGME Fellow
- Nurse Practitioner
- NP Nurse Practitioner Clinical Trainee
- NP Registered Associate
- OT Occupational Therapist
- OT Occupational Therapist Clinical Trainee
- PA Physician Assistant/Associate
- PA Physician Assistant/Associate Clinical Trainee
- PA Registered Associate
- Pharmacist Clinical Trainee
- Physician Clinical Trainee (Medical Student)
- PT Psychiatric Technician
- PT Psychiatric Technician Clinical Trainee
- Registered Pharmacist or Advanced Practice Pharmacist
- RN Registered Nurse
- RN Registered Nurse Clinical Trainee
Note: As long as the exact text within the angle brackets are used, then these functional Keyphrases will pull into the data. A user can string together several of them to pull in the data that they need along with any additional text outside of the brackets. For example, if a user wanted to create a signature with a timestamp, they could create the following keyphrase:

When this functionality is used. It will display as seen below:

