Skip to content
CalMHSA Learn (LMS System)
Help Desk Ticket (Admin)
Customer Ticket Portal
EHR Bulletin
MENU
Home
Accessing Data in SmartCare
Billing Documentation
CalMHSA Connex
CalMHSA Rx
Clinical Documentation
Contract Provider Data Entry Only
CSU Documentation
EHR LMS Dashboard
Eleos
Events
Frequently Asked Questions
Front Desk Documentation
Inpatient Documentation
Nursing Documentation
Patient Portal
Prescriber Documentation
Policy Playbooks
Protocols
QA/QI and State Reporting
RCM Counties
Reporting System Administration
Residential Documentation
SmartCare Downtime Forms
SmartCare EHR Go Live Migration
SmartCare Known Issues
Substance Use Documentation
Supervisor Workflows
System Administration Documentation
Manage Account
Manage Account
Search
Last updated: April 8, 2025
How to Transfer the Client from One Level of Care to Another
Click the Search icon
.
Type ‘Bedboard’
into the search bar. (Or, ‘Residential’.)
Click to select Bedboard (My Office).
[Or, Residential (My Office)].
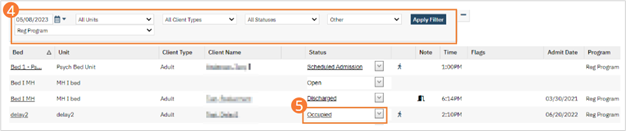
If desired,
filter the list
to determine the records that are shown.
Find the client on the Bedboard list page. Tip: Click on the Client Name heading in the column to arrange the clients’ names alphabetically.
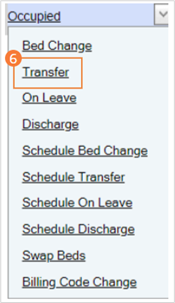
Click the drop-down arrow in the Status column and select Transfer
. The Census Management – Transfer screen opens.
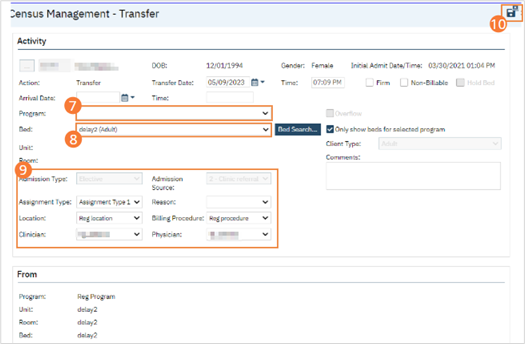
In the Program field,
select the new program to transfer the client to
.
Search for and select an open bed in the new program
if this is needed.
Complete the remaining fields
on the Census Management – Transfer page.
When the screen is complete,
click the Save and Close button
in the tool bar. The list page opens.
Last updated: April 8, 2025