The purpose of this document is to help guide the county/CalMHSA designated admin to support the prescriber in getting registered with SureScripts and EPCS in the EHR.
This is a four-step process that will require the prescriber to connect with the admin.
Step I: Navigating to Rx System
Step II: Register SureScripts
Step III: Set up electronic prescription of controlled substances.
Step IV: Enable EPCS and SmartCare Rx system.
NOTE: For SureScripts registration to be successful the License #, NPI #, DEA #, and the Signing Suffix need to be properly entered in the Staff Details of the user. The DEA, NPI, and License # can be entered in the ‘Licenses/Degrees’ tab in the Staff Details screen of the user. The Signing Suffix can be entered in the ‘Professional’ Section under the ‘Demographic/Professional’ tab in the Staff Details screen of the user’s profile. Once entered, all the information will display in that ‘Professional’ section seen below. Click Here for detailed instructions.
Step I: How to Manage Users in SmartCare Rx Module
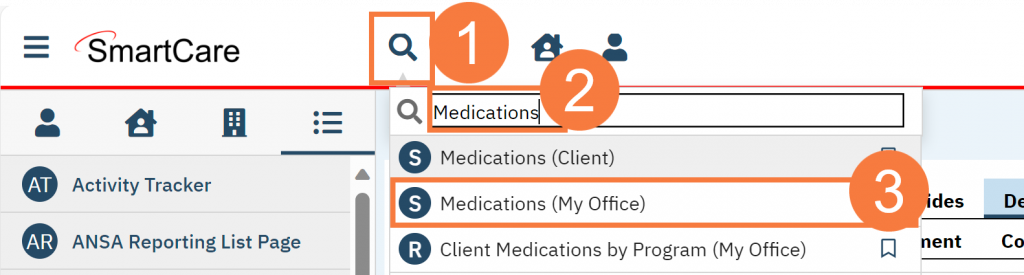
- Click the Search icon.
- Type Medications in the search bar.
- Click to select Medications (My Office).
- The Rx Module will open. Click Manage Users from the top navigation buttons.

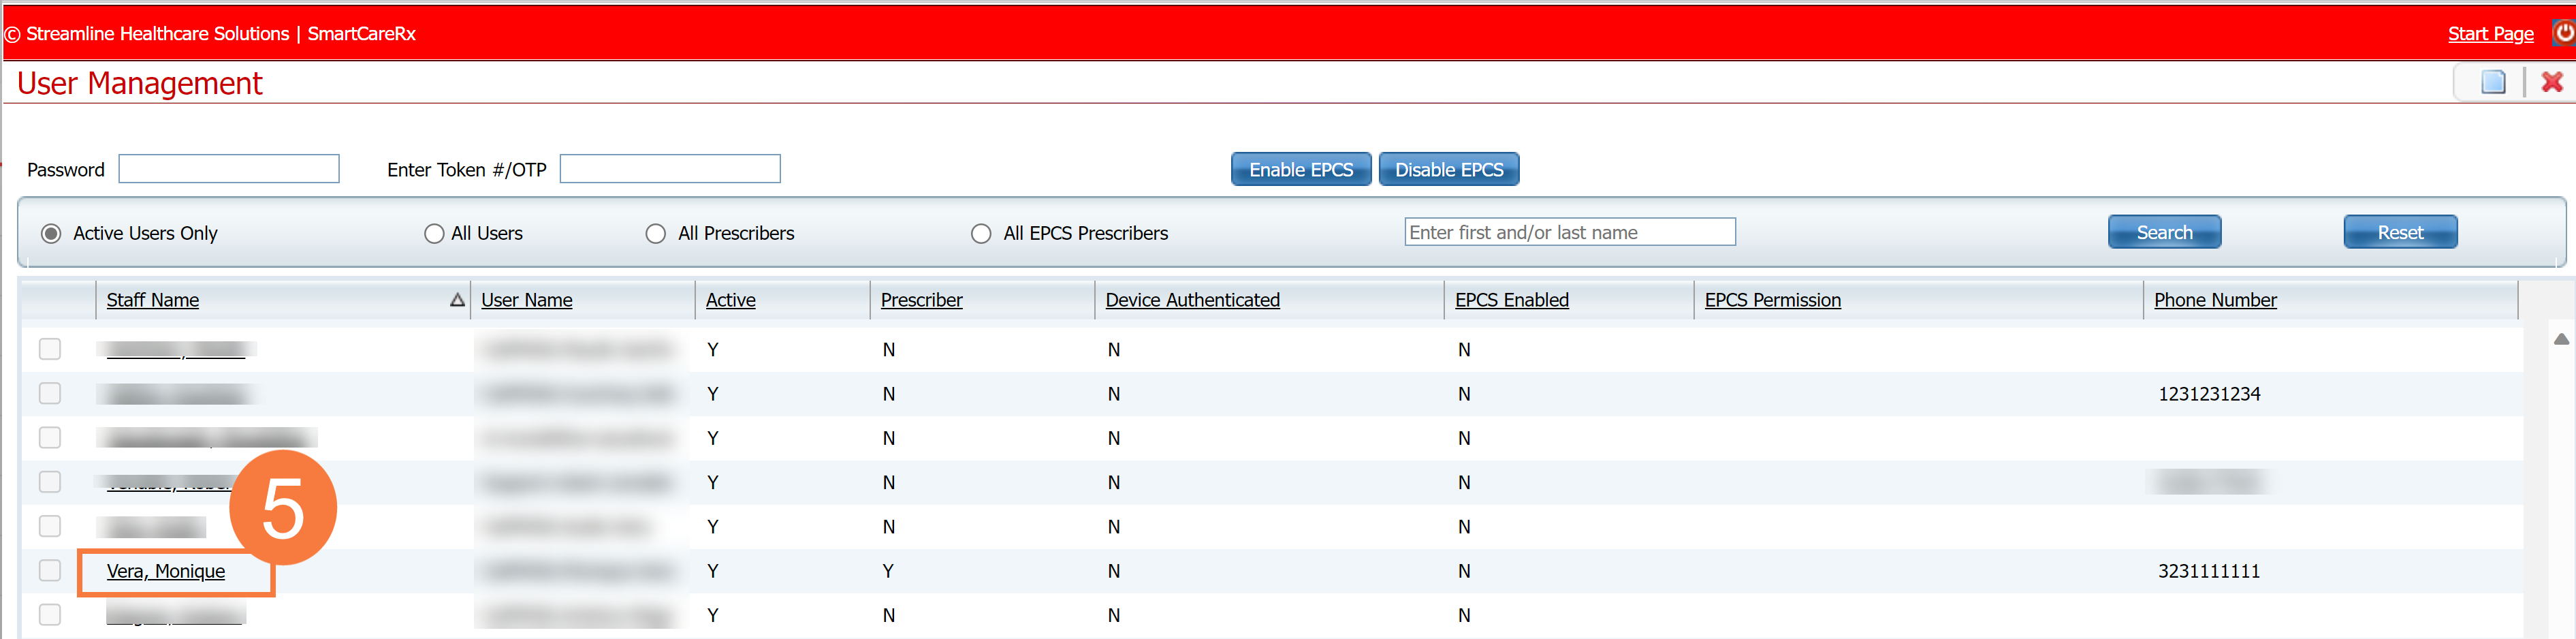
- A list of active users will display. Click the hyperlinked name of the prescriber. The User Preferences screen will open.
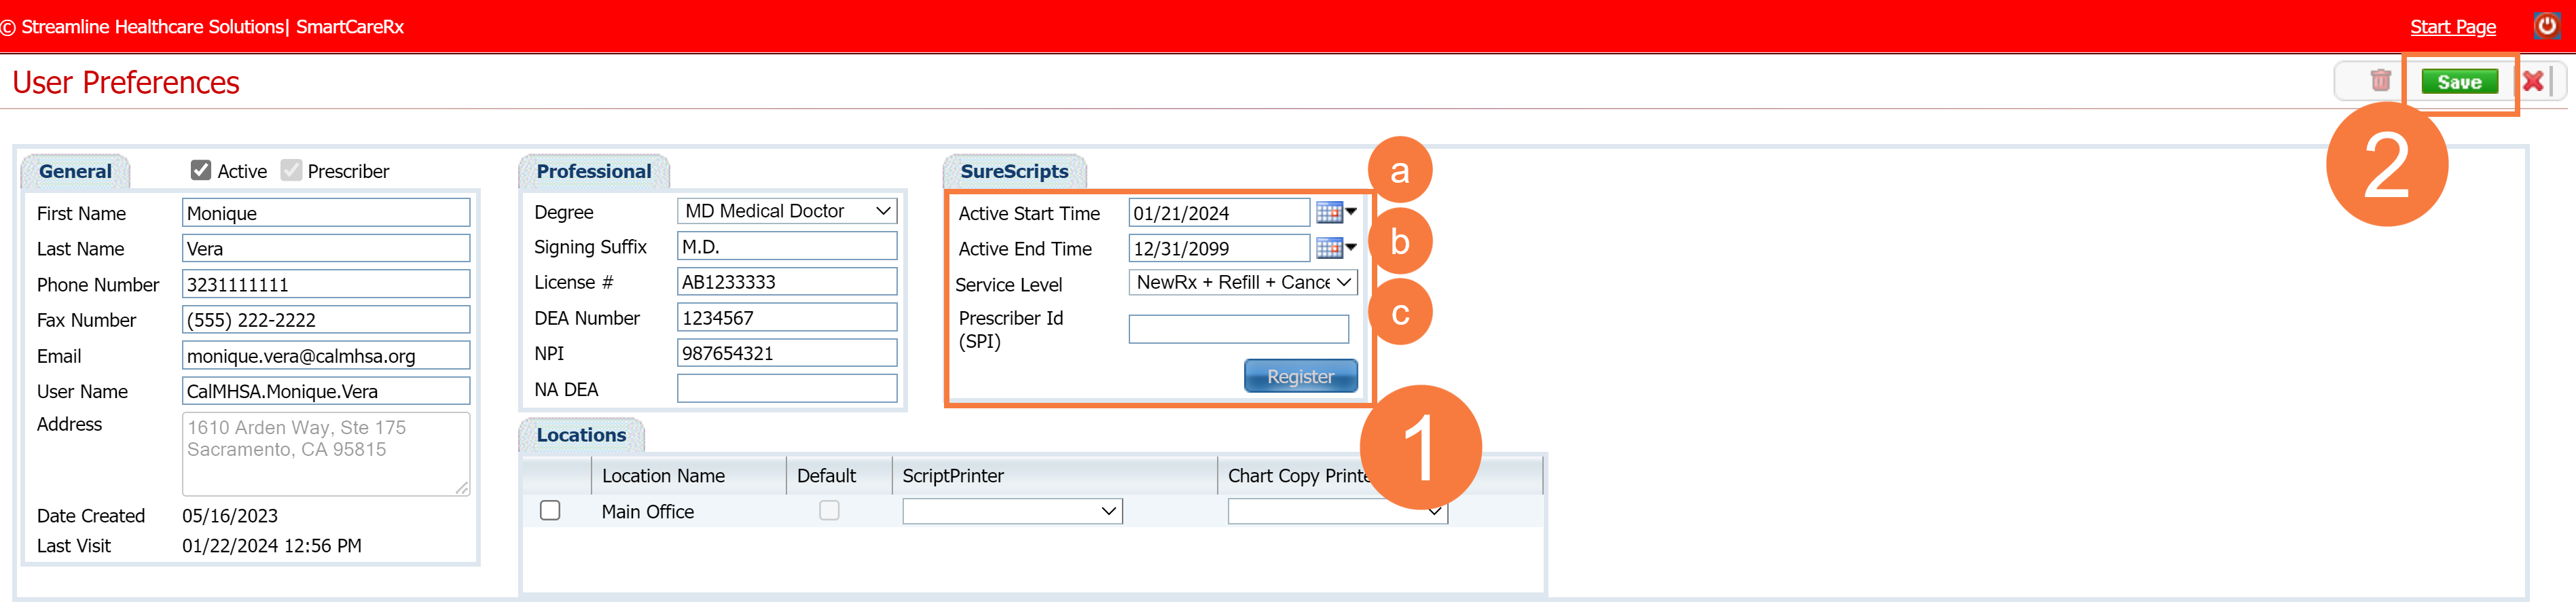
- In the User Preferences Screen, navigate to the General section. Ensure every field is completed.
- Make sure all information in the ‘Professional’ section is accurate.
- Degree, Signing Suffix, License # are required.
- NPI number required for general prescribing.
- DEA number needed if prescribing controlled substances.
- NA DEA number needed if prescribing controlled substances for addiction treatment.

Note: If any information needs to be updated please go back to the Staff/Users > Staff Details of the particular user and add or adjust the information. This information is found under the General Tab, Demographics Tab, and Licenses/Degrees Tab.
Step II: Surescripts
- Still on the User Preferences screen, navigate to the SureScripts section:
- Enter the Active Start Time.
- Enter the Active End Time
-
- Enter Service Level (you can contact CalMHSA if you need assistance with this.
- NewRx + CancelRx = New prescription, cancel prescription (No controlled substances, No Refill Requests)
- NewRx + CancelRx + EPCS = New Rx, Cancel Rx, Prescribe controlled substances (No Refill Requests)
- NewRx + CancelRx + Refill = New prescription, cancel prescription, receive refill request from pharmacy
- NewRx + CancelRx + Refill + EPCS = New Rx, Cancel Rx, Receive Refill Requests, Prescribe controlled substances
- Click Save.
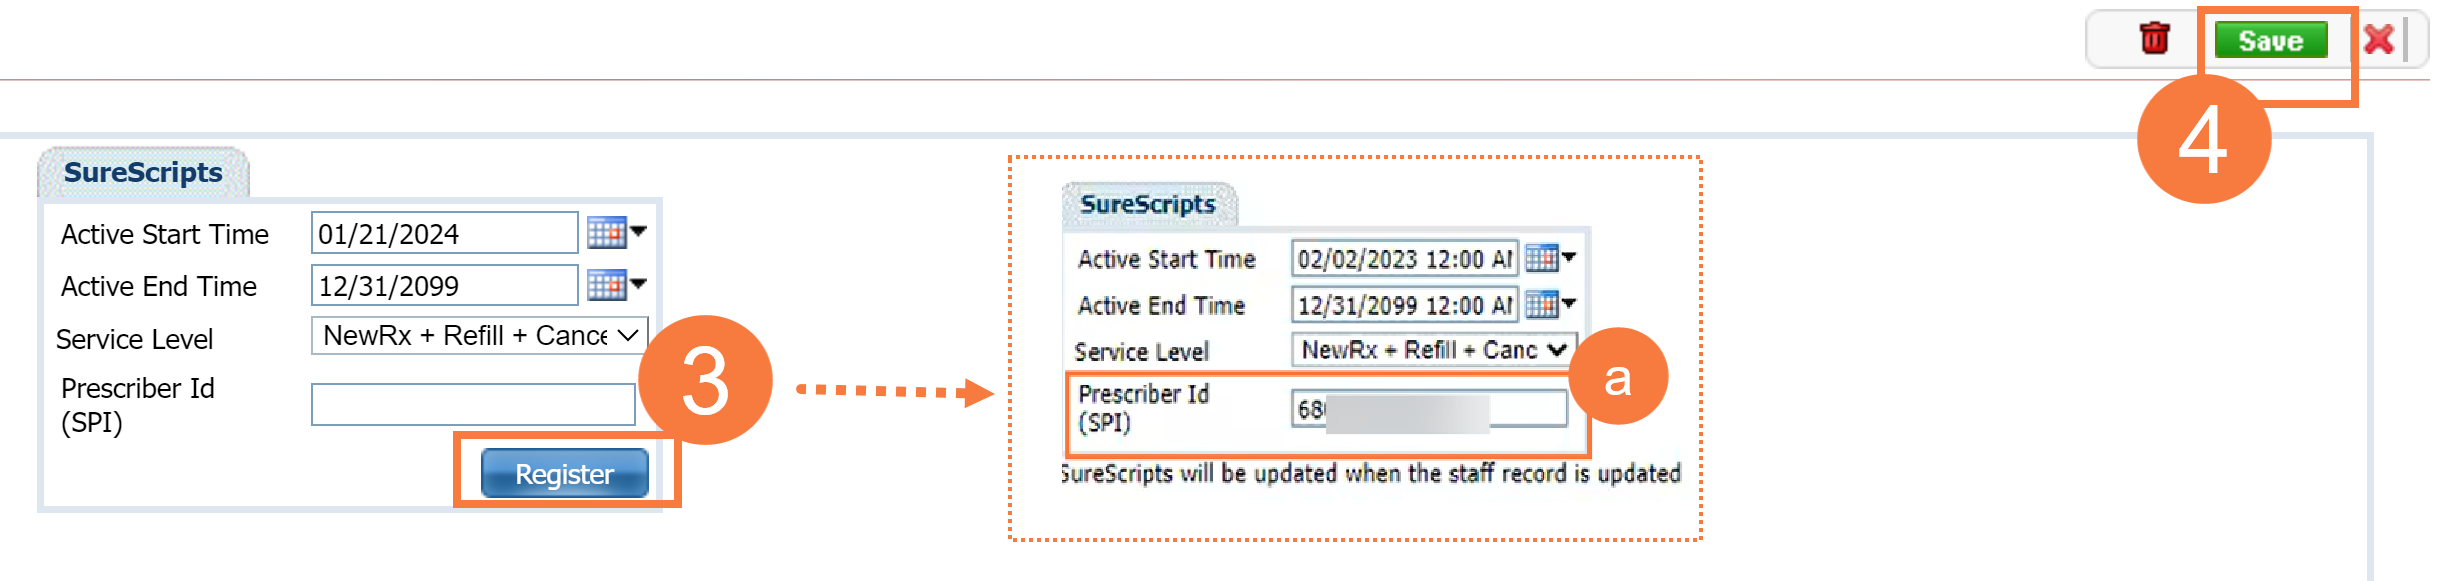
- Click Register.
- If successful, the system will automatically in put a Prescriber ID (SPI) number. It will also give the message that it was successful.
- Click Save.
Step III: EPCS Registration
Navigate down to the EPCS Device Registration section. Have the prescriber register their mobile device with IdenTrust. Click Here for instructions.
- Click the Soft Token radio button.
Soft Token Username should become available. Enter Username created during IdenTrust process. This is usually your county email address.
- Click Set Default Device.
- Note: a screen will open and shortly your mobile device name should appear. Select it and apply or save. Then go to top right of User Preferences screen and Select ‘Save.’ It will tell you it is pushing out approval to your mobile device. Check your device and approve and enter password. Once you see the green check mark your mobile device has been registered with SmartCare. You may need to log off and back on to see the green check mark.

NOTE: Anyone that has been granted ‘Administrator’ override access can complete this step for the prescribers. This can be someone in the IT/IS department. As long as the ‘Soft Token Username’ is known they can enter it in the field. This is why we recommend the prescribers use their work email when creating their username with IdenTrust. They can inform the administrator that they have completed the enrollment and used their email address as the username and the administrator can start. Once ‘Set Default Device’ is selected and the phone chosen, the push notification will go out to the prescriber and they open the app to approve.
Step IV: Enabling EPCS
Now that you have the mobile device registered, we can enable EPCS.
Note: It is recommended that one user or a few specific users be chosen as superuser(s) in the system in regard to enabling EPCS for other prescribers. To enable EPCS for a user in the system the individual must have a registered device within SmartCare and be granted administrator level access. If they have a registered device in SmartCare, and are granted admin level access, they then are able to select the check box next to the new prescribers name and select the ‘Enable EPCS’ icon. The first EPCS prescriber within the county will have to follow this process. From that point on, that prescriber can do it for others and grant them rights to do it for others.
It is not recommended that every prescriber have this capability.
It may be necessary at times to temporarily grant a prescriber admin level access so as to enable EPCS for themselves just as the first prescriber had to. Though, this is also not recommended. If granting temporarily, one must remember to remove admin level access after enabling EPCS.
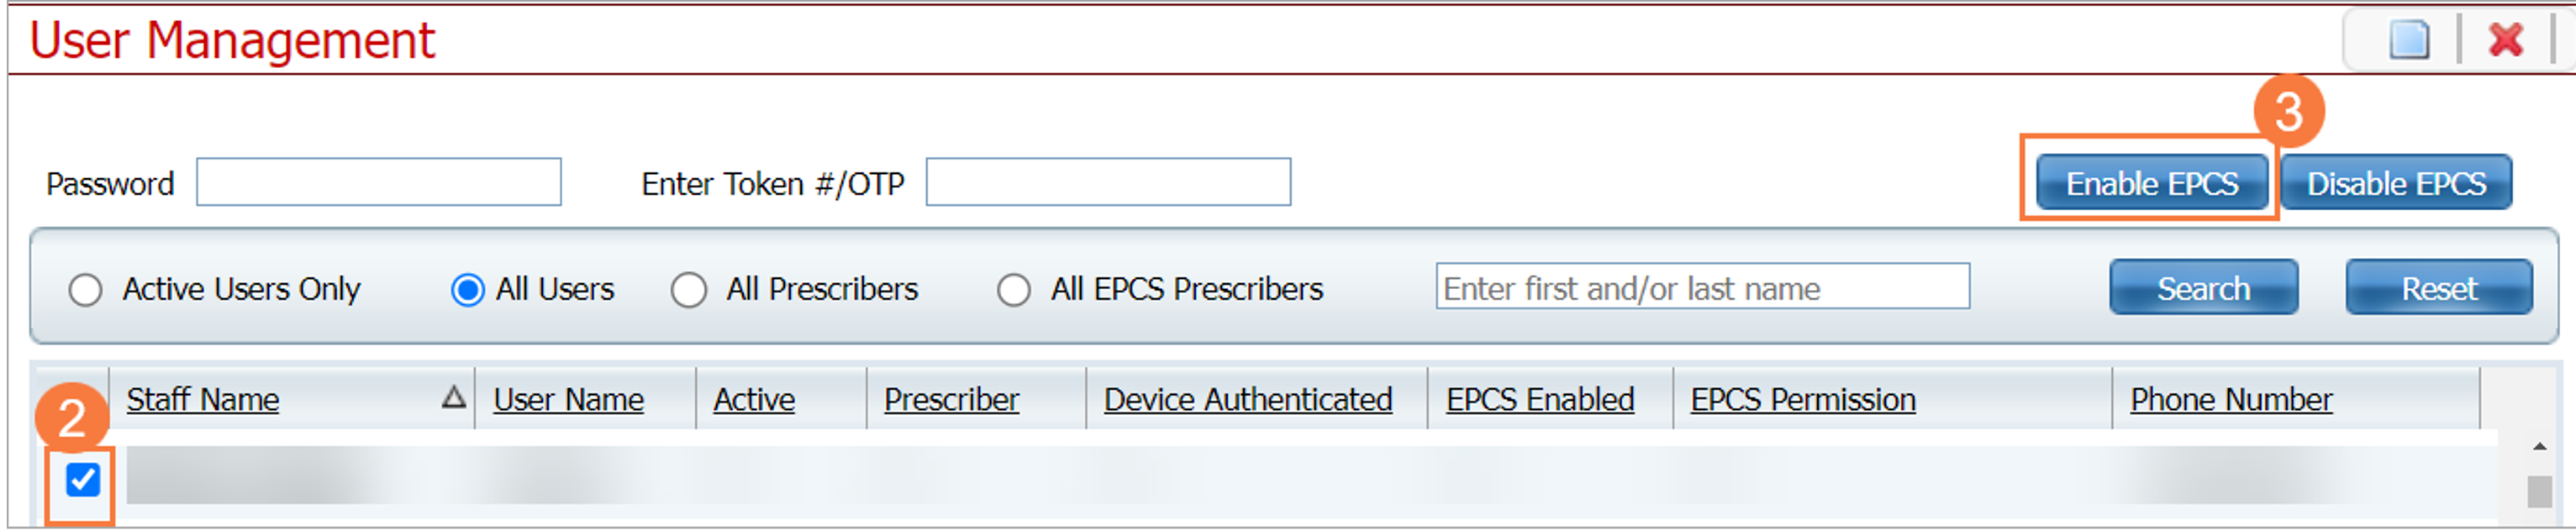
- Navigate back to the User Management screen.
- Click the checkbox to the left of the prescriber’s name.
- Click Enable EPCS.
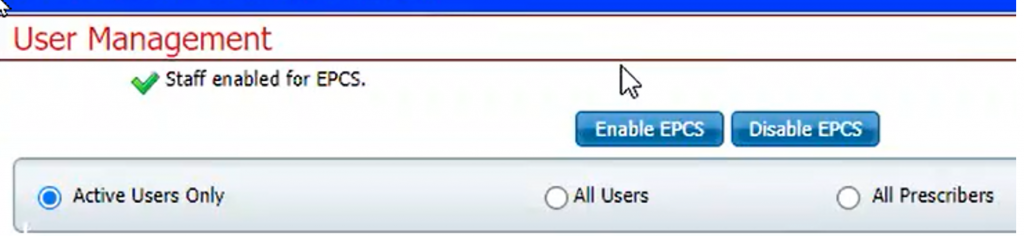
Note: This will send out a push notification to the person’s mobile device that is doing the enabling. It will come to the HID Approval App. Approve it. A green check mark should appear at top left indicating ‘Staff enabled for EPCS.’
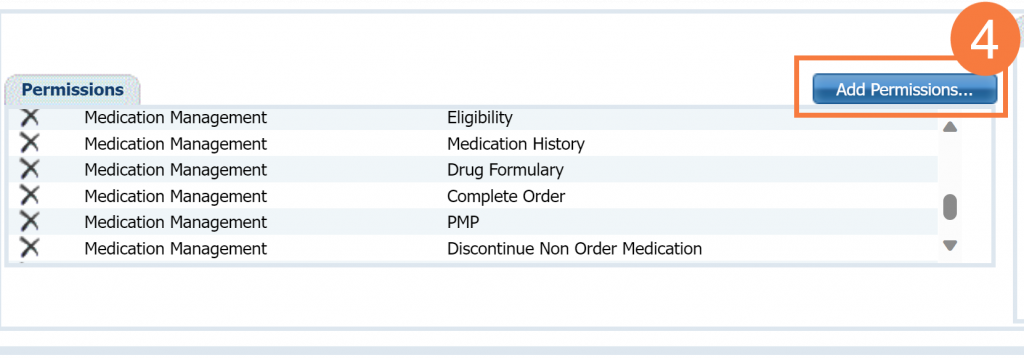
- Click the hyperlinked prescriber’s name.

- Back in the User Preferences page, navigate to the Permissions section. Click Add Permissions.
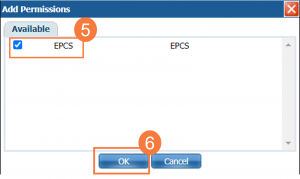
- Click the EPCS checkbox.
- Click OK.
- Click Save in the upper right-hand corner.