f your county has a lab interface, lab orders placed in SmartCare can automatically be sent to the lab.
- Lab orders have been set up as Quick Orders. This means they can be entered without having to go through the entire How to Create a New Order for a Client process.
- Note: Orders set up as Quick Orders cannot be added to Order Sets.
- Before completing a lab order you should ensure you have a client record open. See General Client Search section.
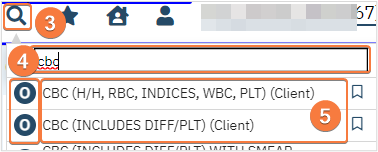
- Click the Search icon.
- In the Search bar enter the lab order name.
- Quick Orders can be accessed directly through Search and have an “O” to the left of the order name.
- For my example I am using CBC
- Select the lab order from the list, this will open the Quick Order document.
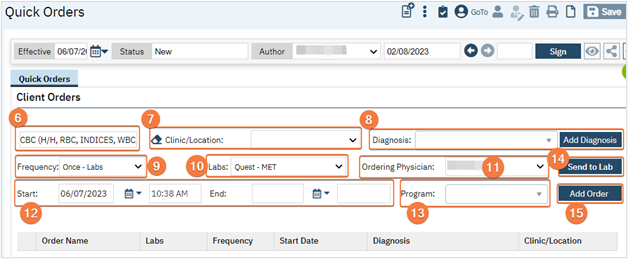
- The selected order will populate to the Order field.
- You may select the Clinic/Location from the dropdown as needed.
- Select diagnosis from the dropdown.
- If you need to add a diagnosis click the Add Diagnosis button and search for diagnosis within the pop-up window.
- This will add the diagnosis to the order, not the client’s record.
- If you need to add a diagnosis click the Add Diagnosis button and search for diagnosis within the pop-up window.
- Frequency will default to Once.
- Future Functionality: if order has other frequency options (e.g. weekly) select the option from the dropdown. You must enter a Start and End date; see step 12 and 12.a below. The order will automatically generate new lab orders based on the frequency.
- Labs will display the Lab this order will be sent to. If you have multiple interfaces to different labs, ensure this has the correct option.
- Select the Ordering Physician from the dropdown.
- Start date and time will default to the current time. Make changes if needed.
- Future Functionality: End date and time are required if frequency is more than once. See step 9.a above for details.
- Select Program from the dropdown; this is a multi-select field.
- Clicking the Send to Lab button will send the order to the lab. However, this is not regularly used as labs get sent to the lab once the document is signed, step 18 below.
- Click Add Order to add the order to the list.
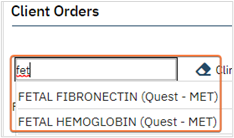
- You can add additional lab orders by entering the name in the order field. This field is a typable-search field, as you type options will appear.
- Select the correct order
- Repeat steps 7-15.
- Sign the Order using the steps found under How to Sign a Document. As soon as the document is signed, the order will be sent to the pharmacy.
- When documenting an order on behalf of a Prescriber, the Prescriber must be added as a co-signer and must complete their co-signature. For more information, see How to Co-sign a Document.
- Order will have a status of Sent to Lab.
