This process will show you how to create a prescription and send it electronically to the pharmacy on behalf of a prescriber with the prescriber still being required to sign off on the prescription. The staff member doing this needs to be granted Provider Agent permission for the prescriber.
Please click here for Instructional Video
CalMHSA Rx
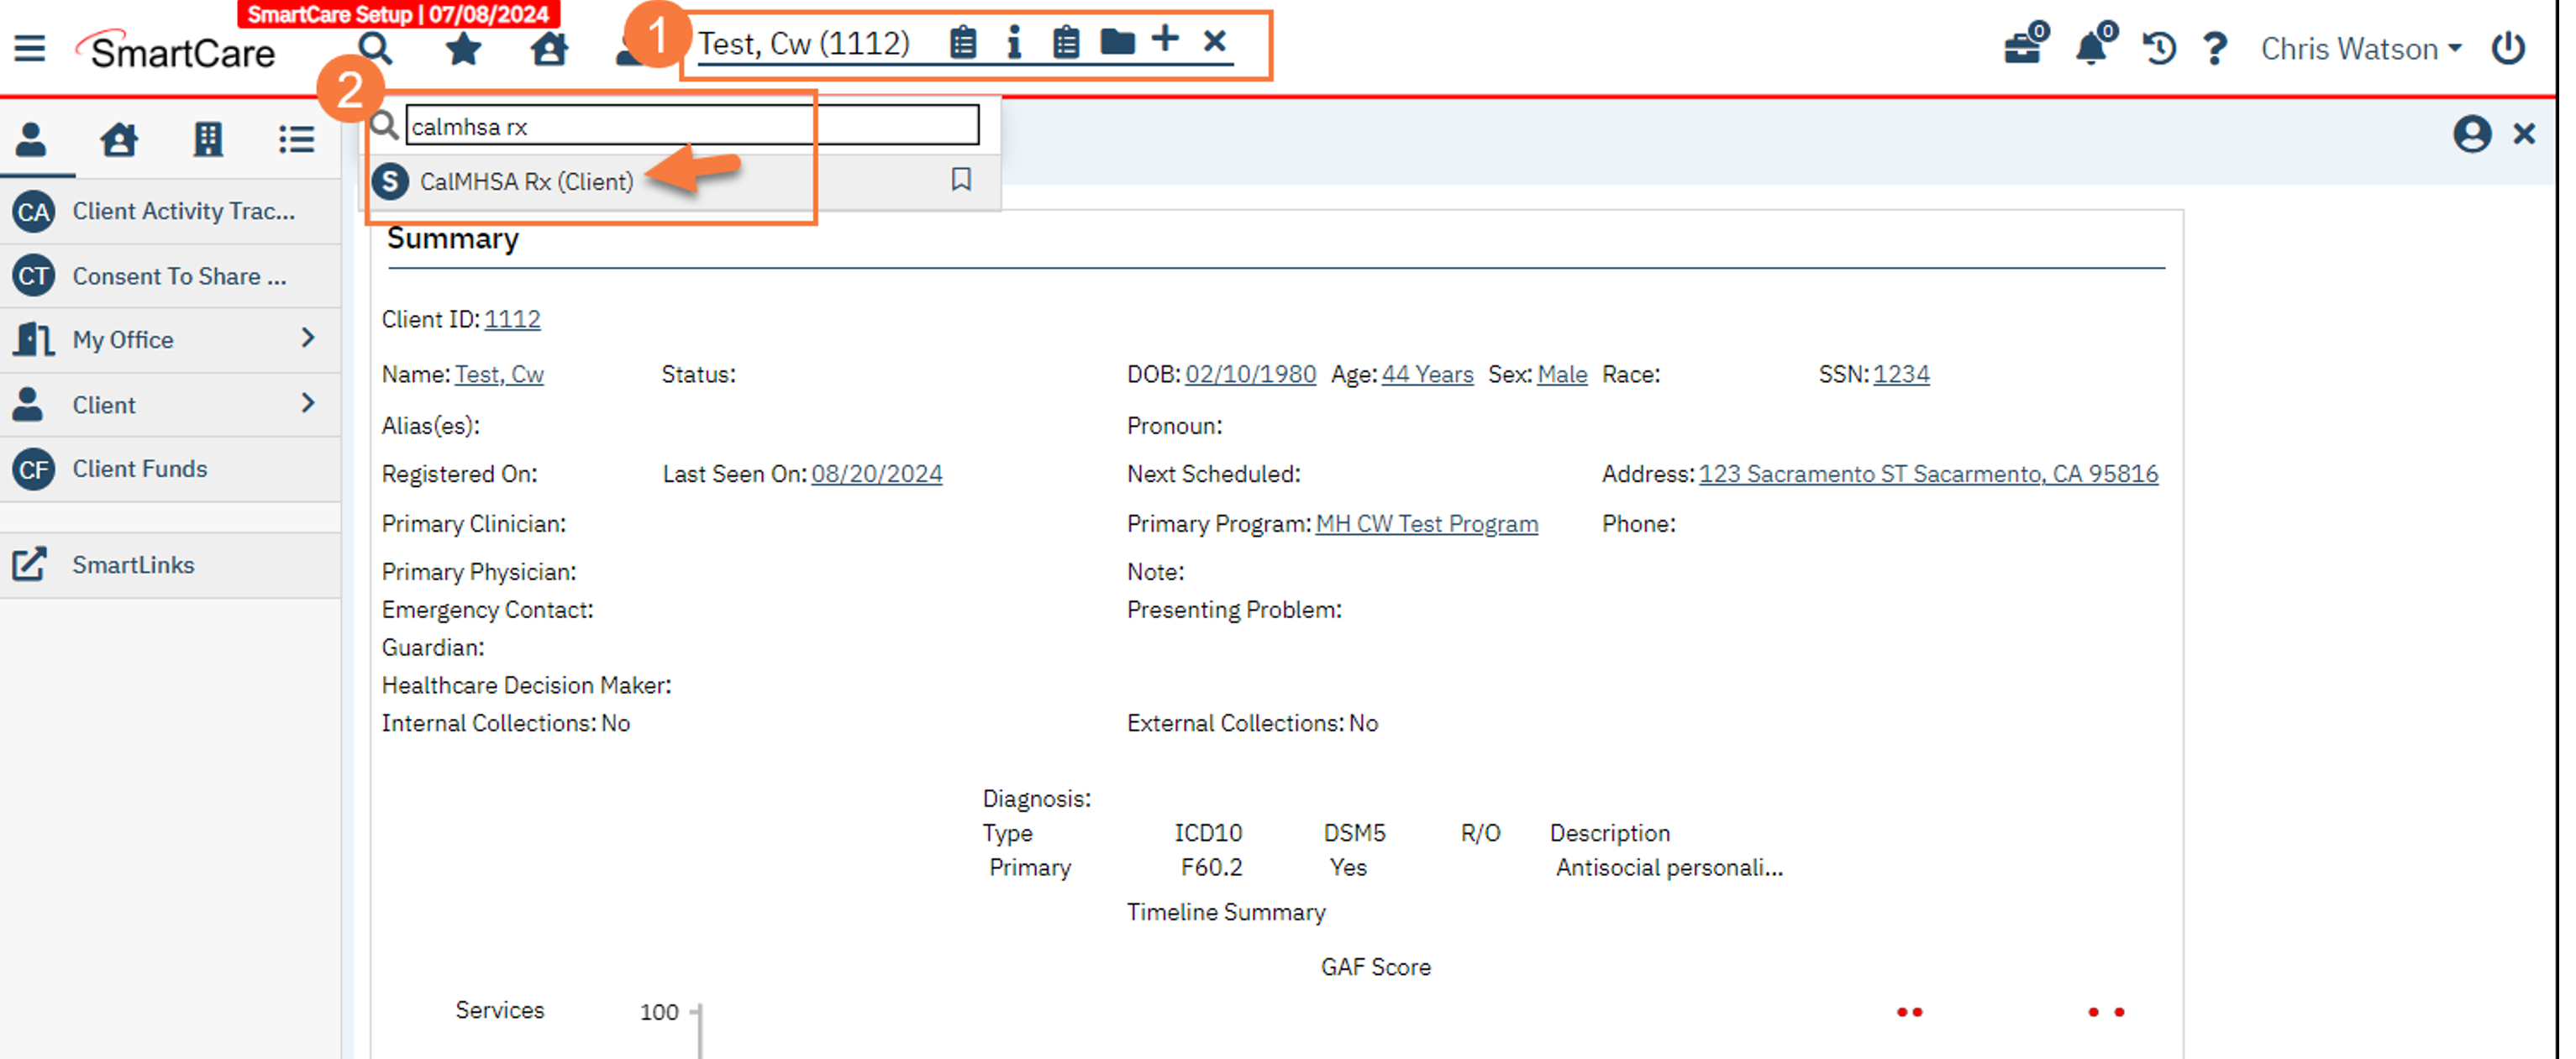
To prescribe a medication we first need to have our client chart open within SmartCare and then we need to go to the CalMHSA Rx transition page.
- Have your clients chart open in Smartcare.
- Search for CalMHSA Rx and then Select CalMHSA Rx. This takes you to the CalMHSA Rx transition screen.
- You will land on CalMHSA Rx transition screen. Select Client Summary.
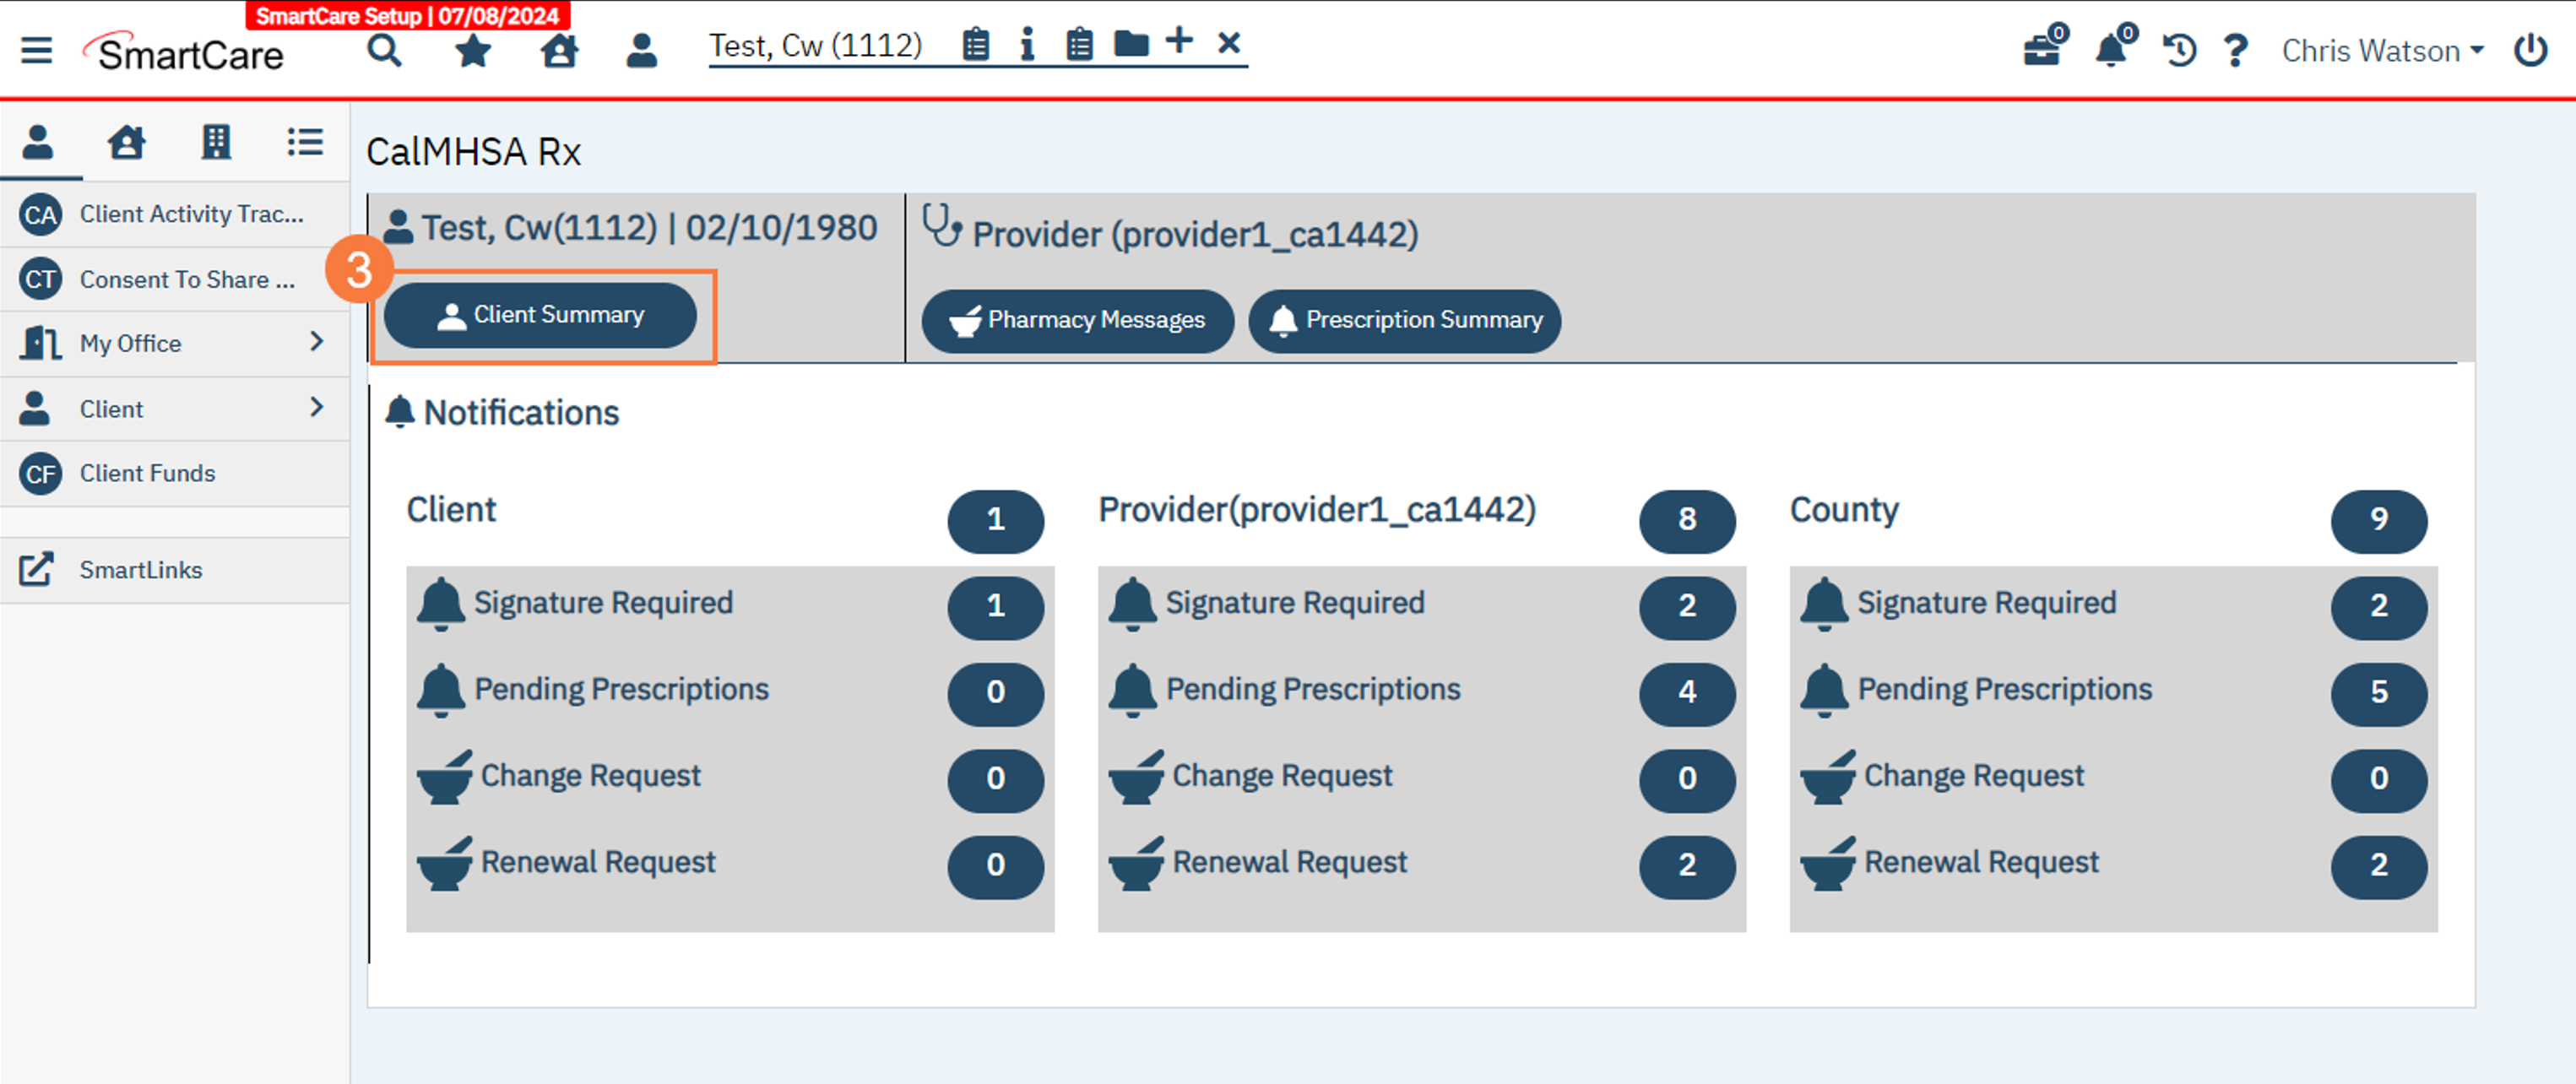
NOTE: You could have selected any one of the three icons at the top, Client Summary, Pharmacy Messages, and Prescription Summary, and been taken to a page where you could start a new prescription. Selecting Client Summary takes you to the Patient/Client Info screen within CalMHSA Rx which has the most information about the client.
You should land at the Patient/Client Info screen.
- At the top of the Client Info screen, you will see your clients name and some demographic information along with the Create NewRx icon

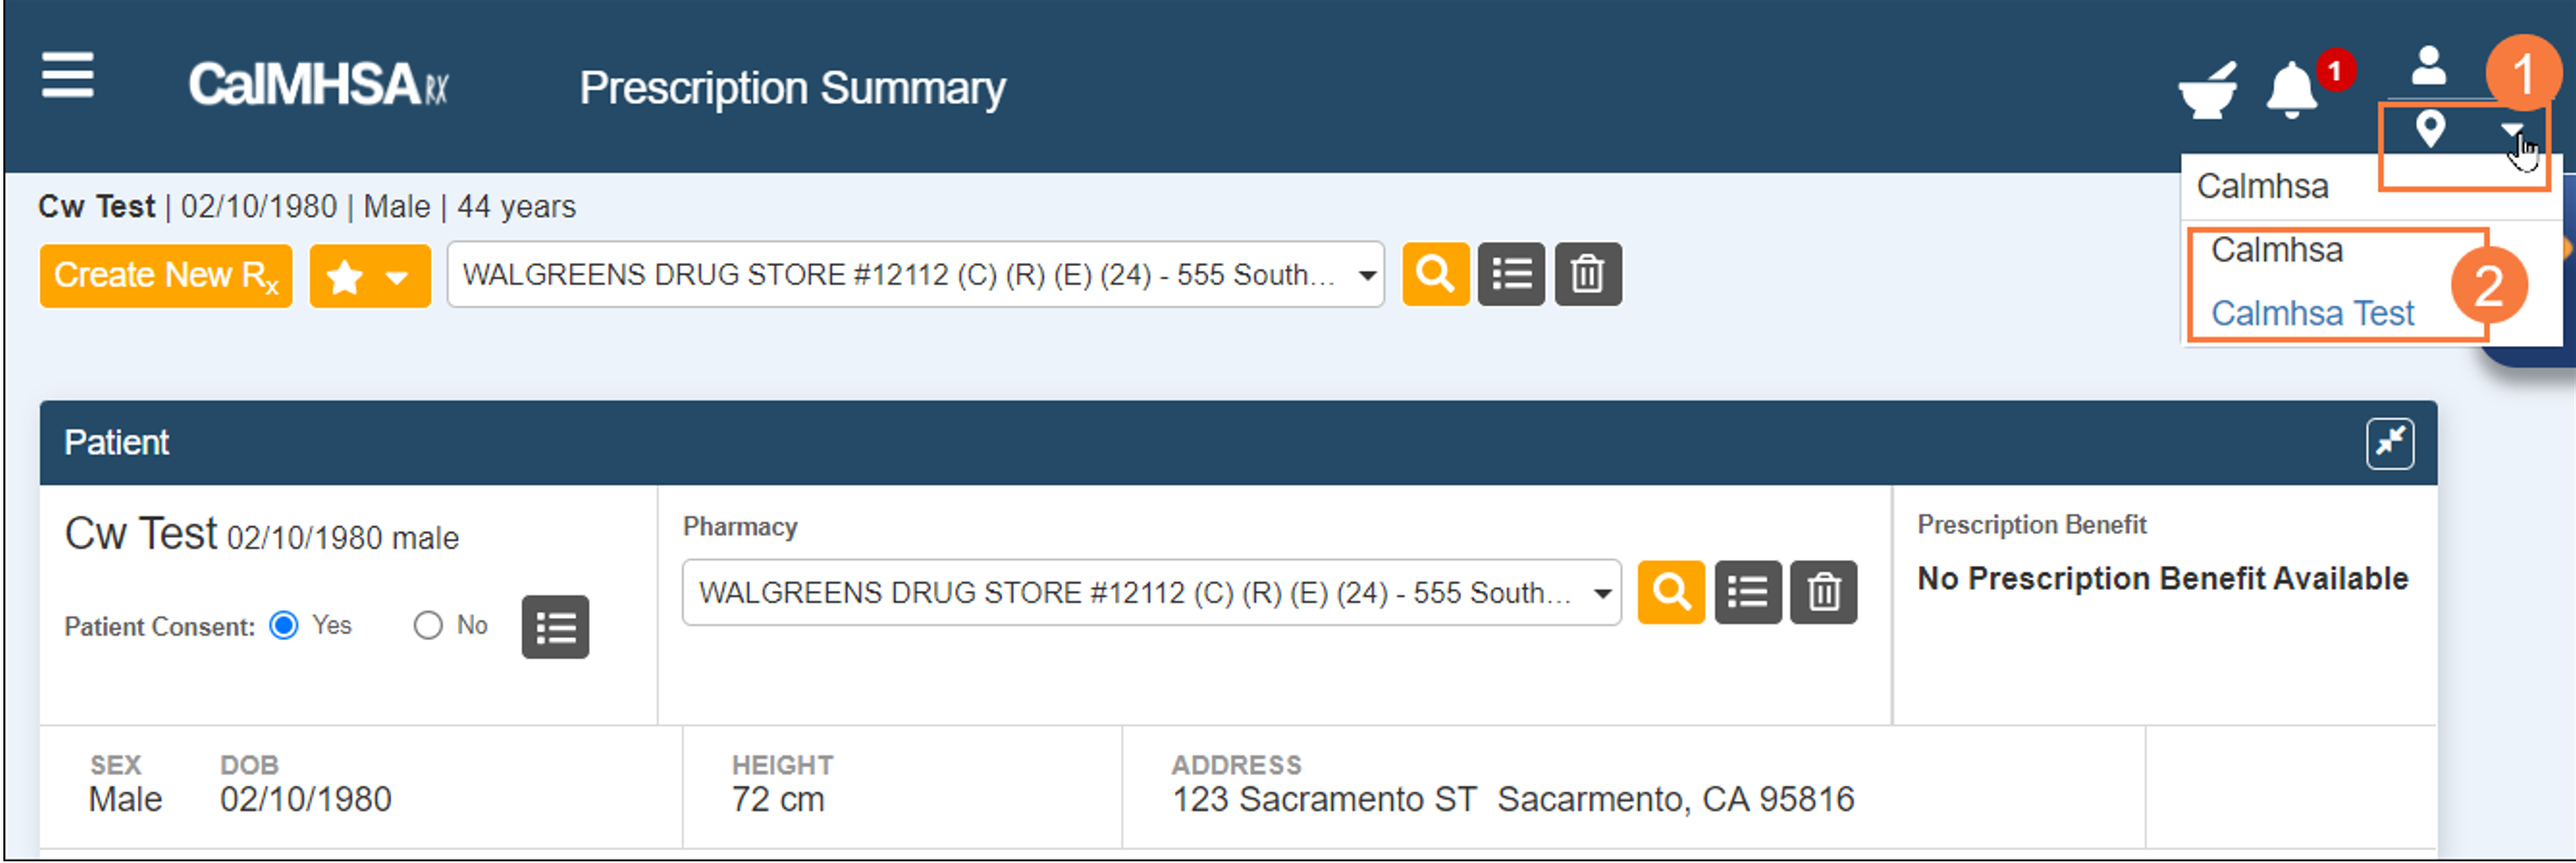
Locations
Before starting the process of creating a new prescription, you will want to make sure you have set the correct location/program. If you start the prescription and then go back to change the location it will wipe out your current progress and make you start over.
- Locations can be found at the top right of your screen. The list for you will be set by your system administrator. Select dropdown for Location.
- Choose Location from the list if required.
Pharmacies
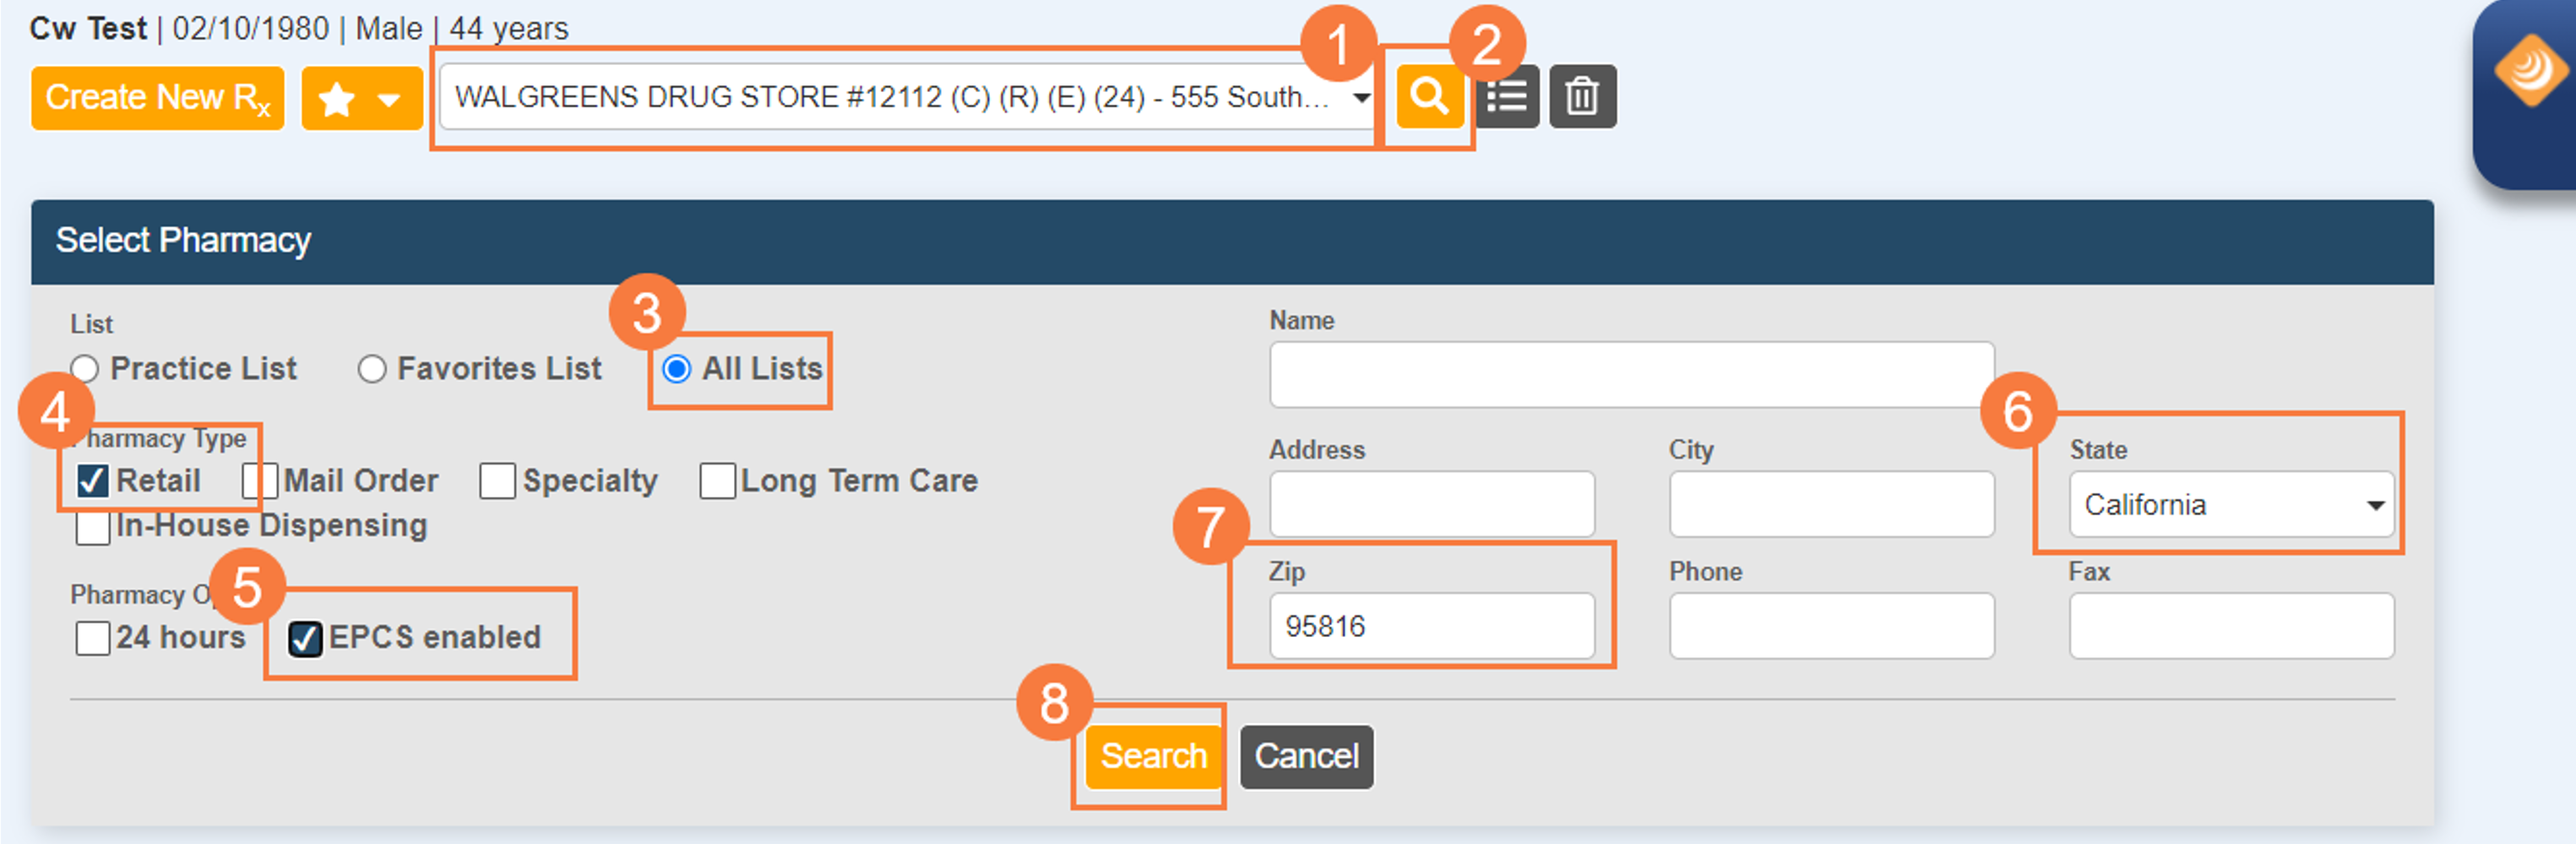
You will want to verify that the client has a pharmacy listed or choose one from the dropdown. If there isn’t one listed, you can search and select one for your client.
- Select dropdown to choose pharmacy.
- If client has no pharmacy, Select magnifying glass and search for the pharmacy.
- All Lists should be selected.
- Retail is selected by default.
- Select EPCS enabled if requiring pharmacy to handle controlled substances.
- Choose State, California entered for example.
- Enter Zip Code, zip code entered for example.
- Select Search. A list of pharmacies should populate. Select the one you desire, and it should take you back to the screen and populate the pharmacy field.
- When entering criteria to search for a pharmacy you can enter as many fields as you want. In our example I just chose State and Zip code.
When entering criteria to search for a pharmacy you can enter as many fields as you want. In our example I just chose State and Zip code.
How to Create a New Prescription to be Sent: Send, Signature to Follow
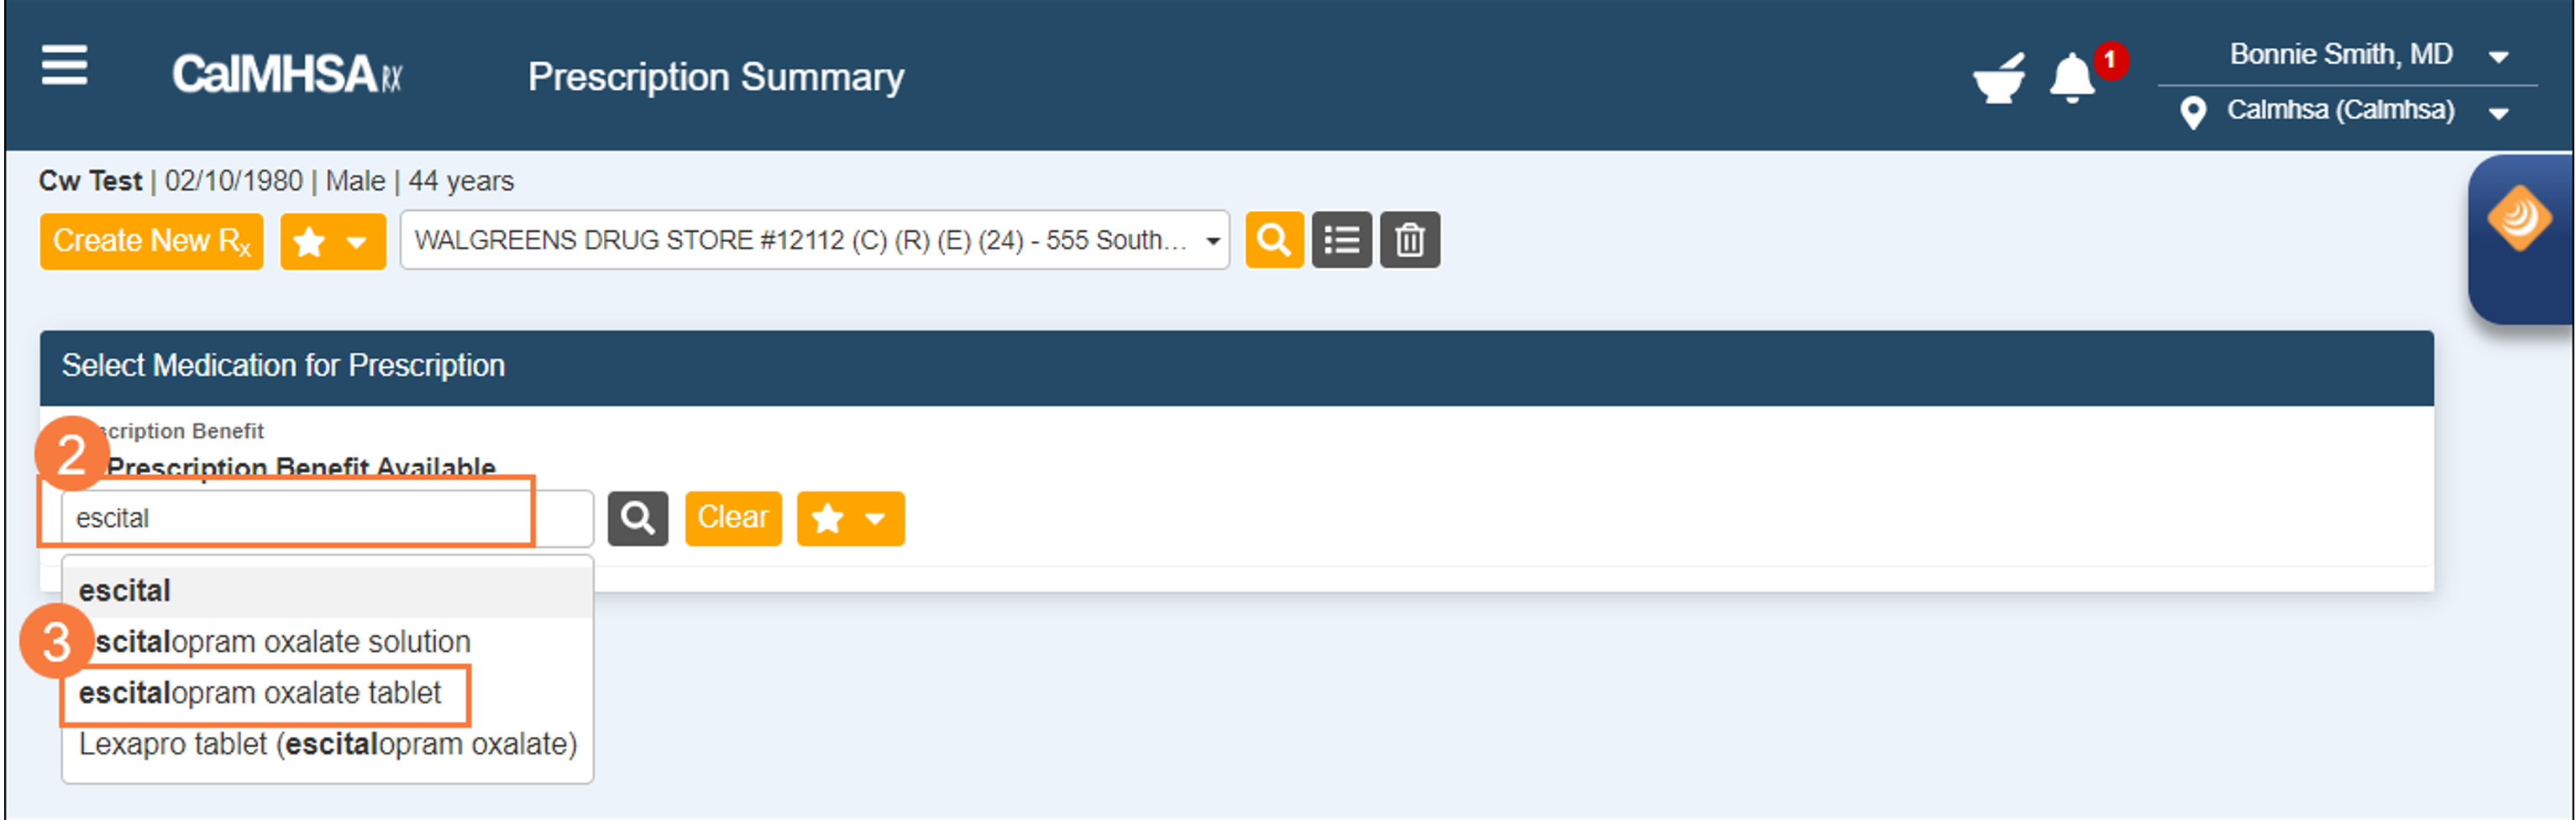
- Select Create New Rx.

- Enter the first several letters of the drug you wish to prescribe in the search field. The results will begin to auto-populate. In our example, we entered Lexa, for Lexapro.
- Select desired medication. In our example, escitalopram oxalate tablet.

- The next window will show you the strengths for the selected medication. Select desired strength. In our example, 10 mg.
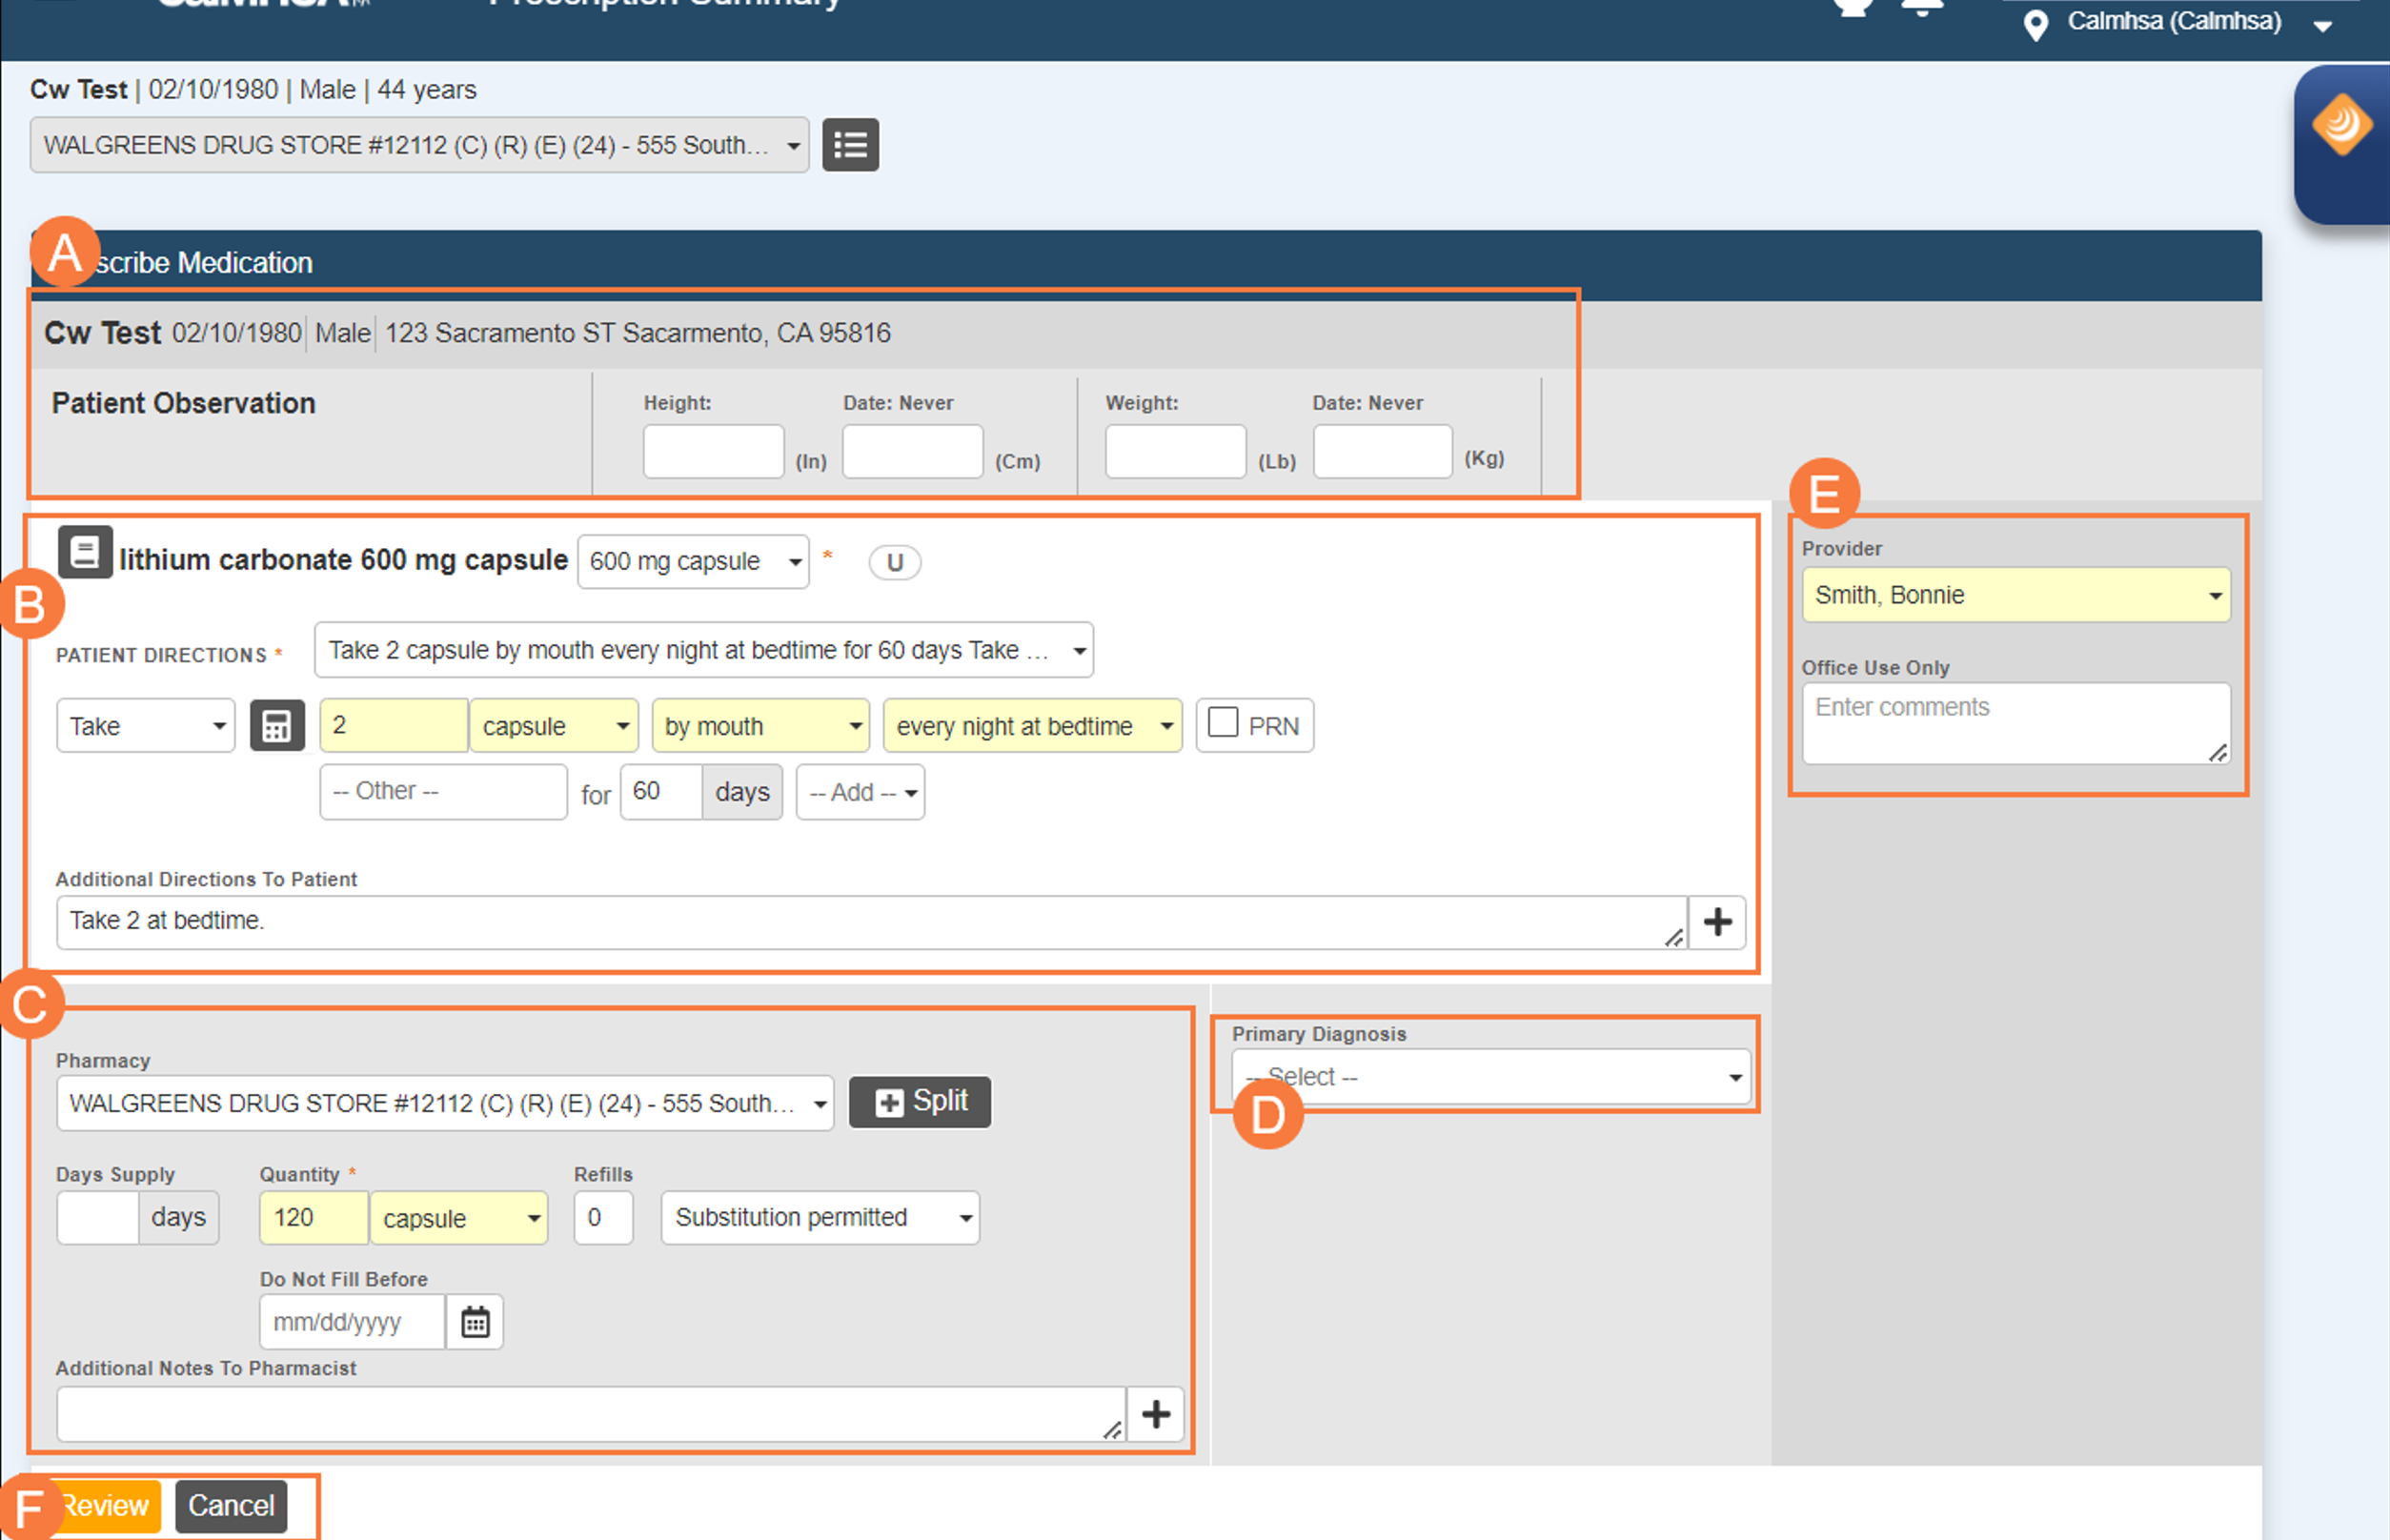
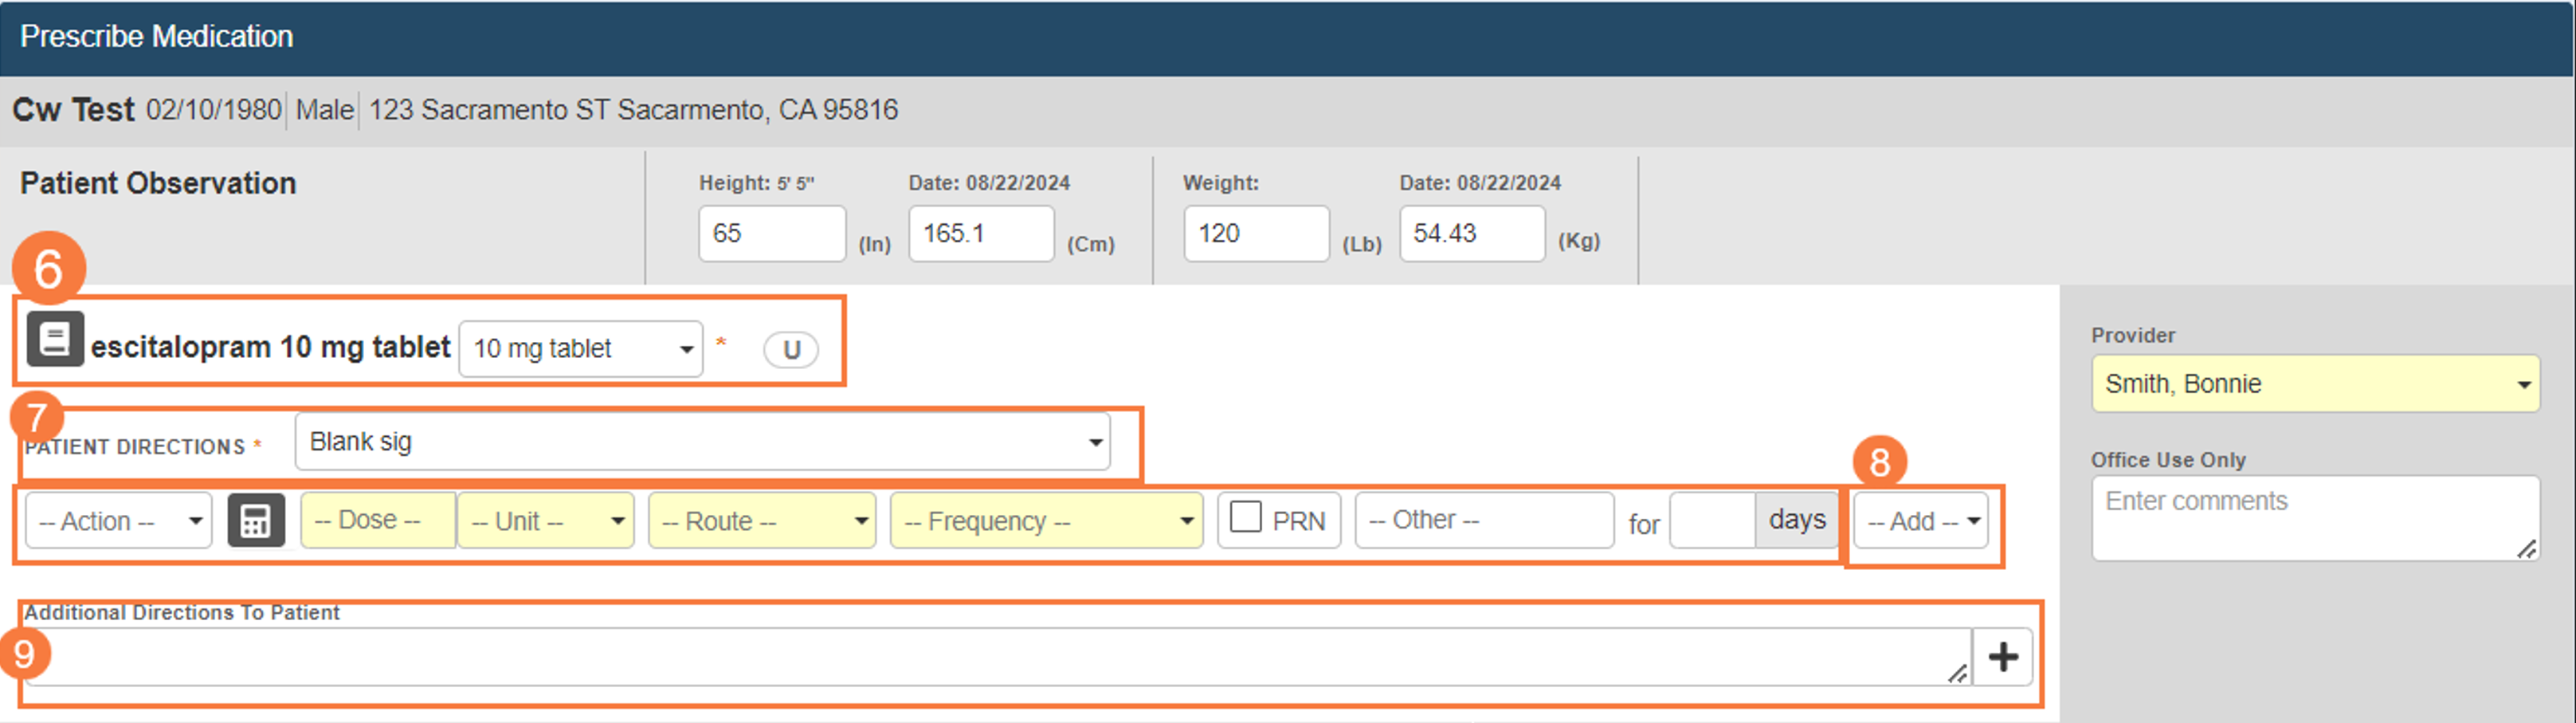
This will bring you to the Prescription Medication widget. This is where you will complete the sig for this medication.
Prescription Medication Widget
- Patient Observation – Shows fields for client’s height and weight. This section contains data fields for Height (ln & cm) and Weight (Lb and Kg). However, this data is not pulled from SmartCare and hence, needs to be entered manually. Please make sure that accurate data is filled and current Height and Weight of Client is documented in these fields.
- Drug Sig details –Section shows current drug being prescribed. Here you will add patient directions, add additional direction to patient (free text), and view
- Pharmacy – Section shows pharmacy receiving prescription. There is the option to choose another from the dropdown. You can also split the prescription to another pharmacy. You can adjust refills, substitution allowances, and do not fill before dates.
- Primary Diagnosis – Primary diagnosis can be chosen from the dropdown. These diagnoses should pull from Smartcare.
- Provider – If you are the prescriber your name should automatically be set. If you are queuing a medication or prescribing on behalf of another prescriber, you can choose their name from the dropdown. Being able to send a medication on behalf of another prescriber will require specific “Provider Agent” rights. Office Use Only allows for comments to be left which will only be seen internally.
- Review/Cancel – If the prescription is set your next step is to Select Review, otherwise if you want to just stop this process Select Cancel.
Filling in Sig Details – Continuing Prescription
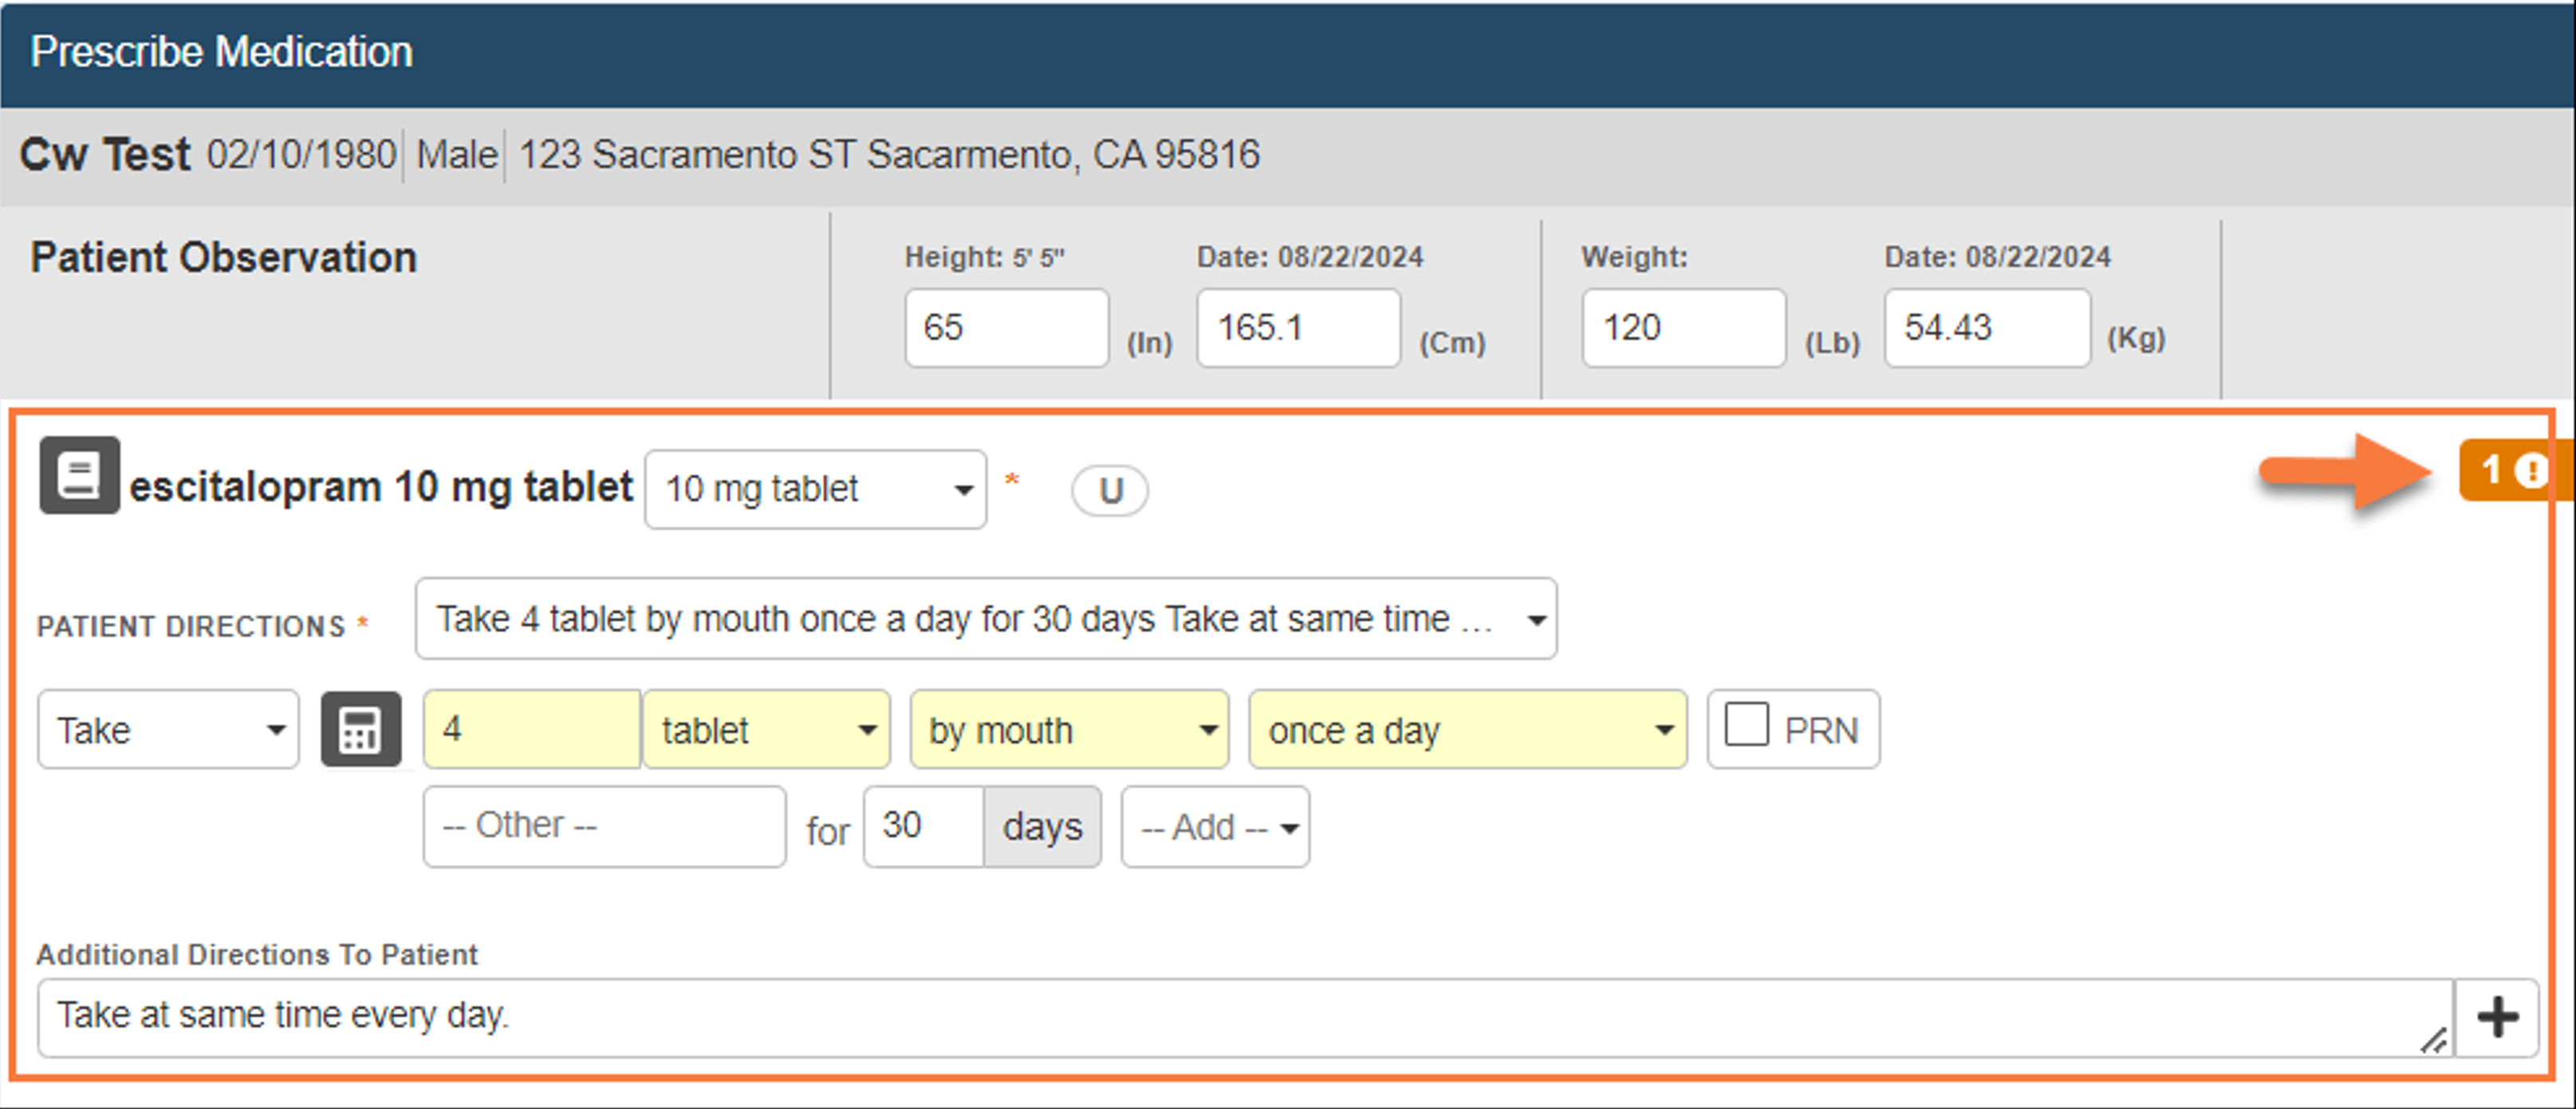
- Patient Observation – Confirm height and weight are entered These values are not pulling in from Smartcare. Please add them here to complete the prescription, but they won’t push back to Smartcare. You will need to go back into the client’s chart in Smartcare to enter this information
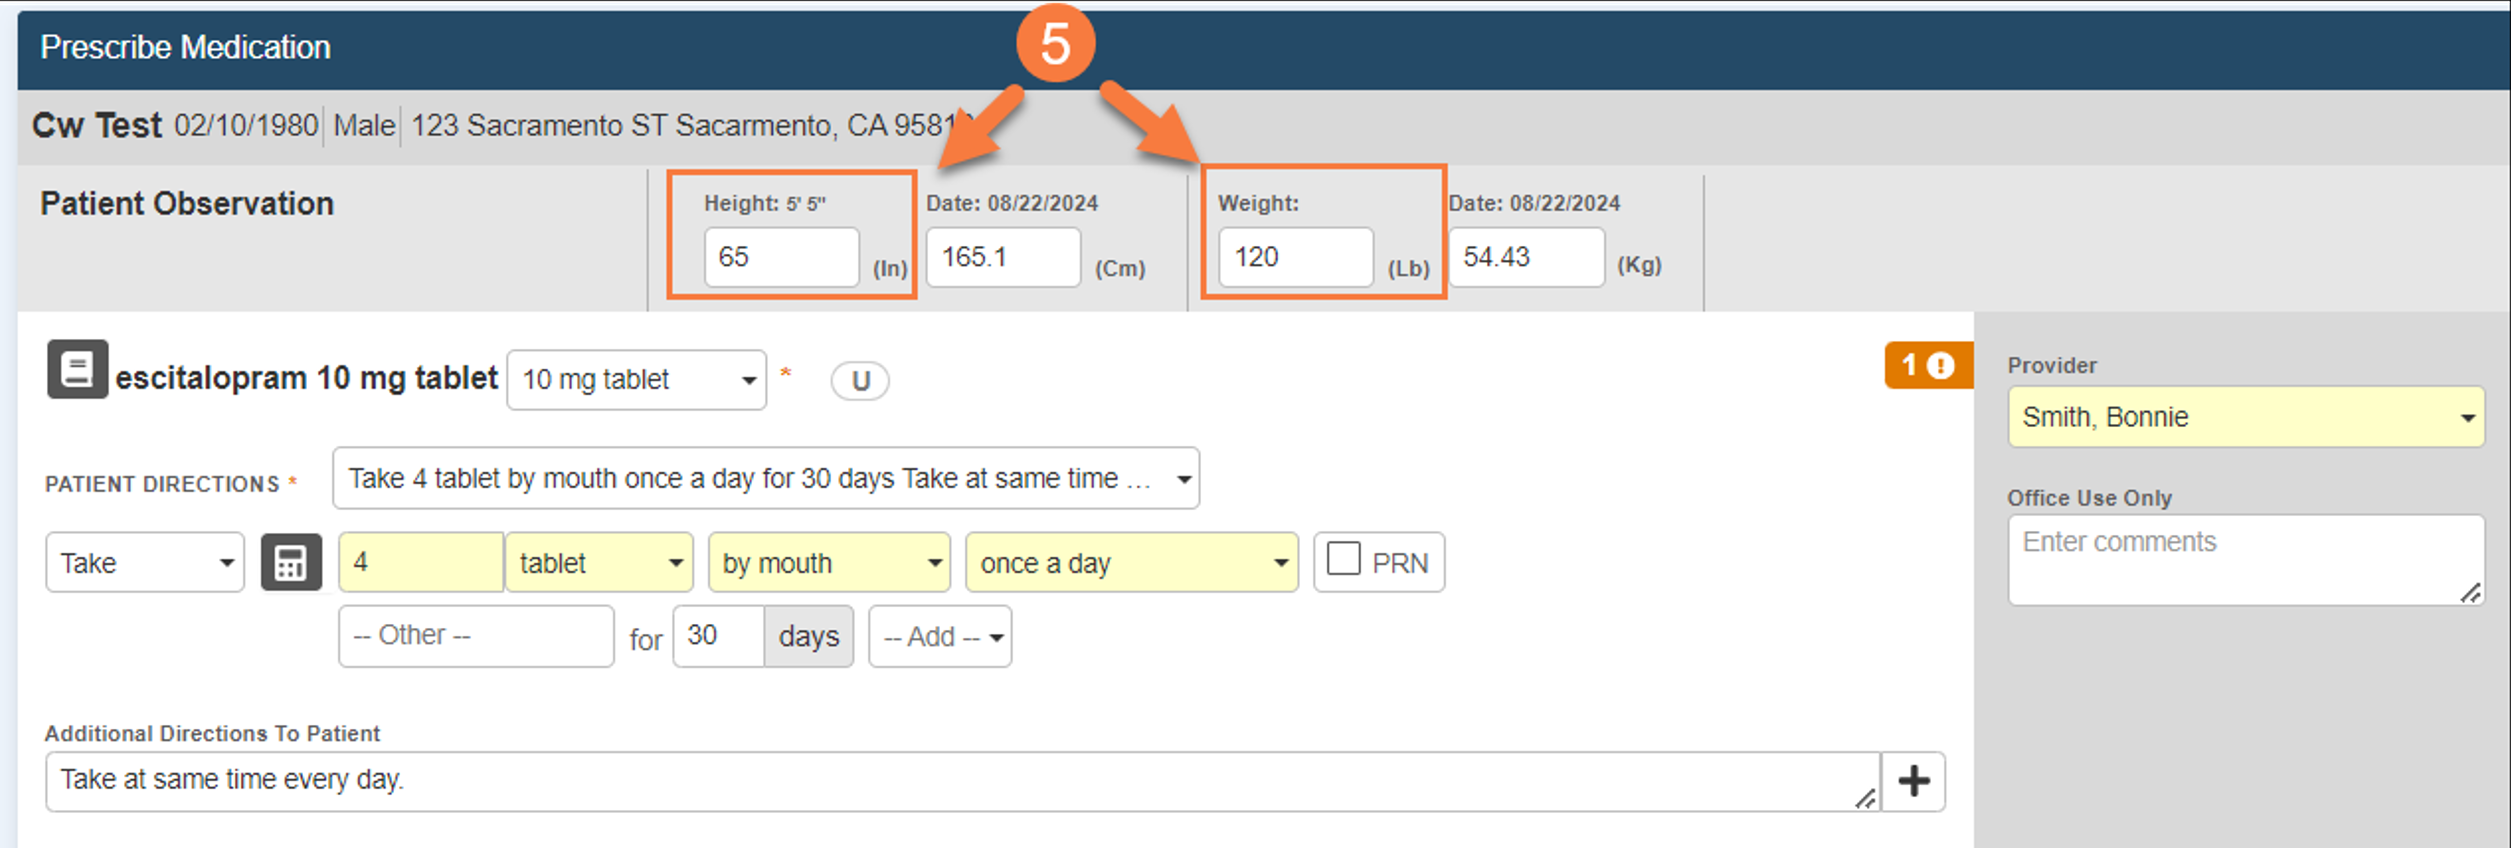
- Drug – Confirm the drug and strength are as desired. If you want to change the strength select the dropdown.
- Select the dropdowns of each field to show the list of choices for Action, Dose, Unit, Route, Frequency, and Other. Enter the days’ supply for the medication.
- Select Add to begin if you are creating a complex drug order such as a titration.
- Enter Additional Directions To Patient – this is a free text field that allows you to enter more directions to the client. Be aware there is no character limit but if you exceed 140 characters the prescription will automatically be sent by fax. It will not be transmitted electronically.
For our example, escitalopram, we have created our directions. You can see an alert appeared to the right of the screen. This can be selected now to view, or you can wait when we review the medication before prescribing.
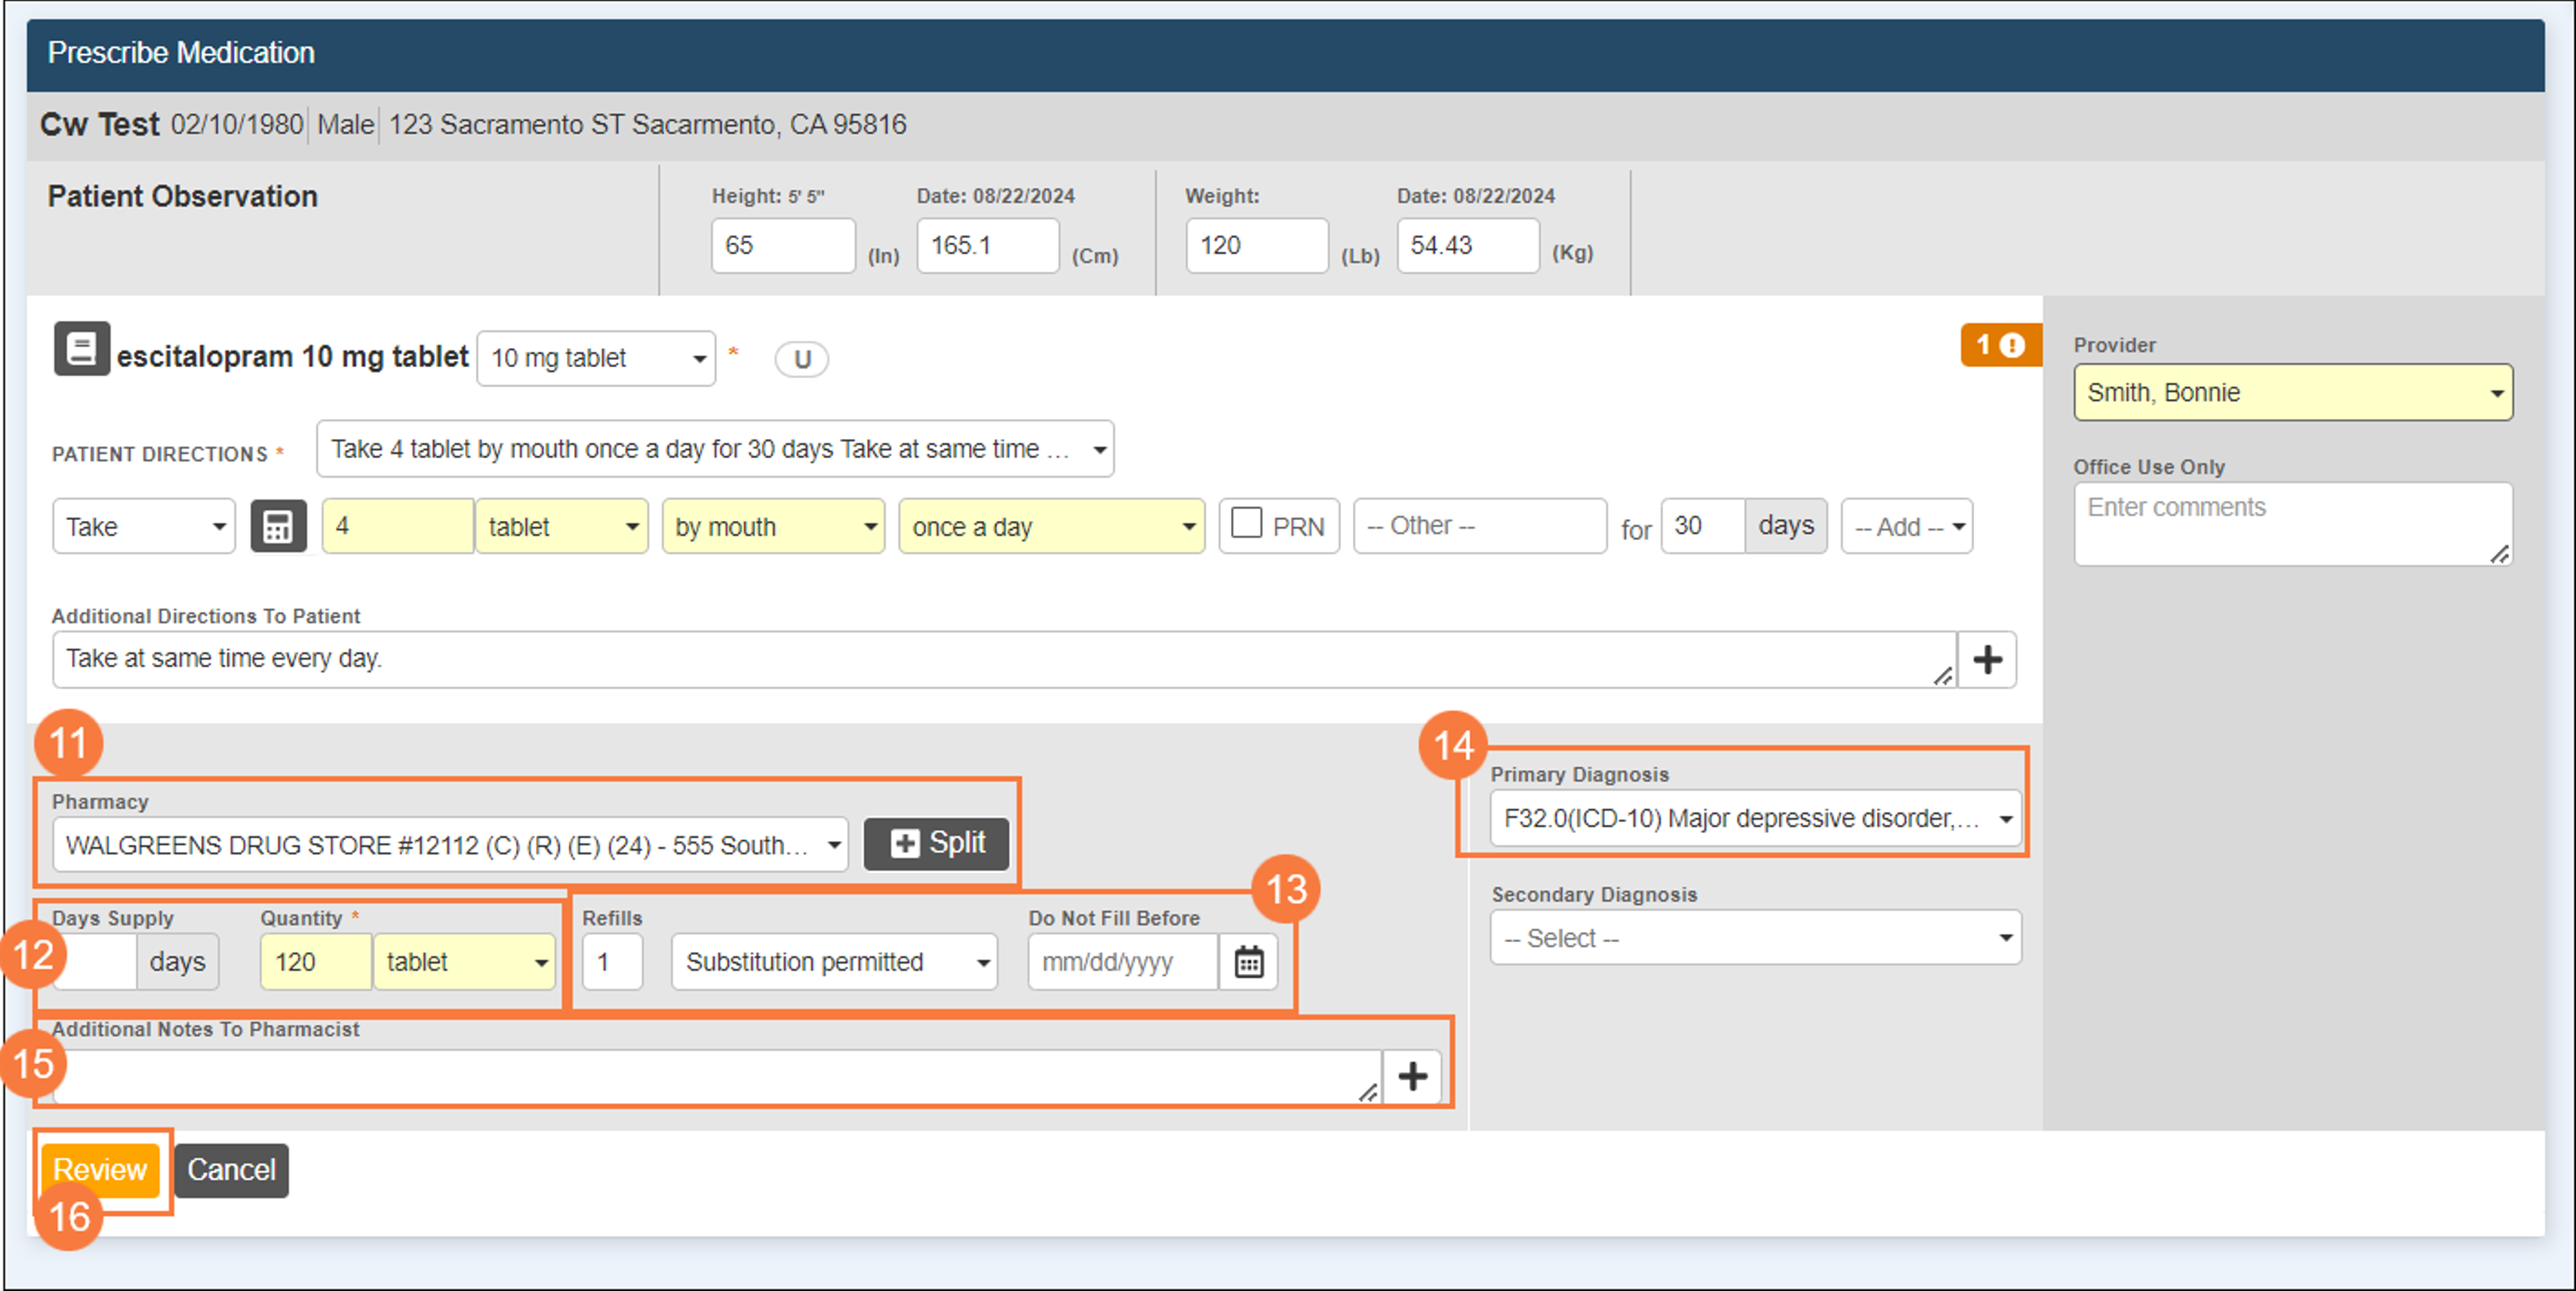
- Provider and Office Use Only – If you are prescribing on behalf of another prescriber, you will be required to select the dropdown to choose that prescriber. Select Provider dropdown to choose provider. If you are the prescriber your name should already filled. Enter notes in Office Use Only if desired.
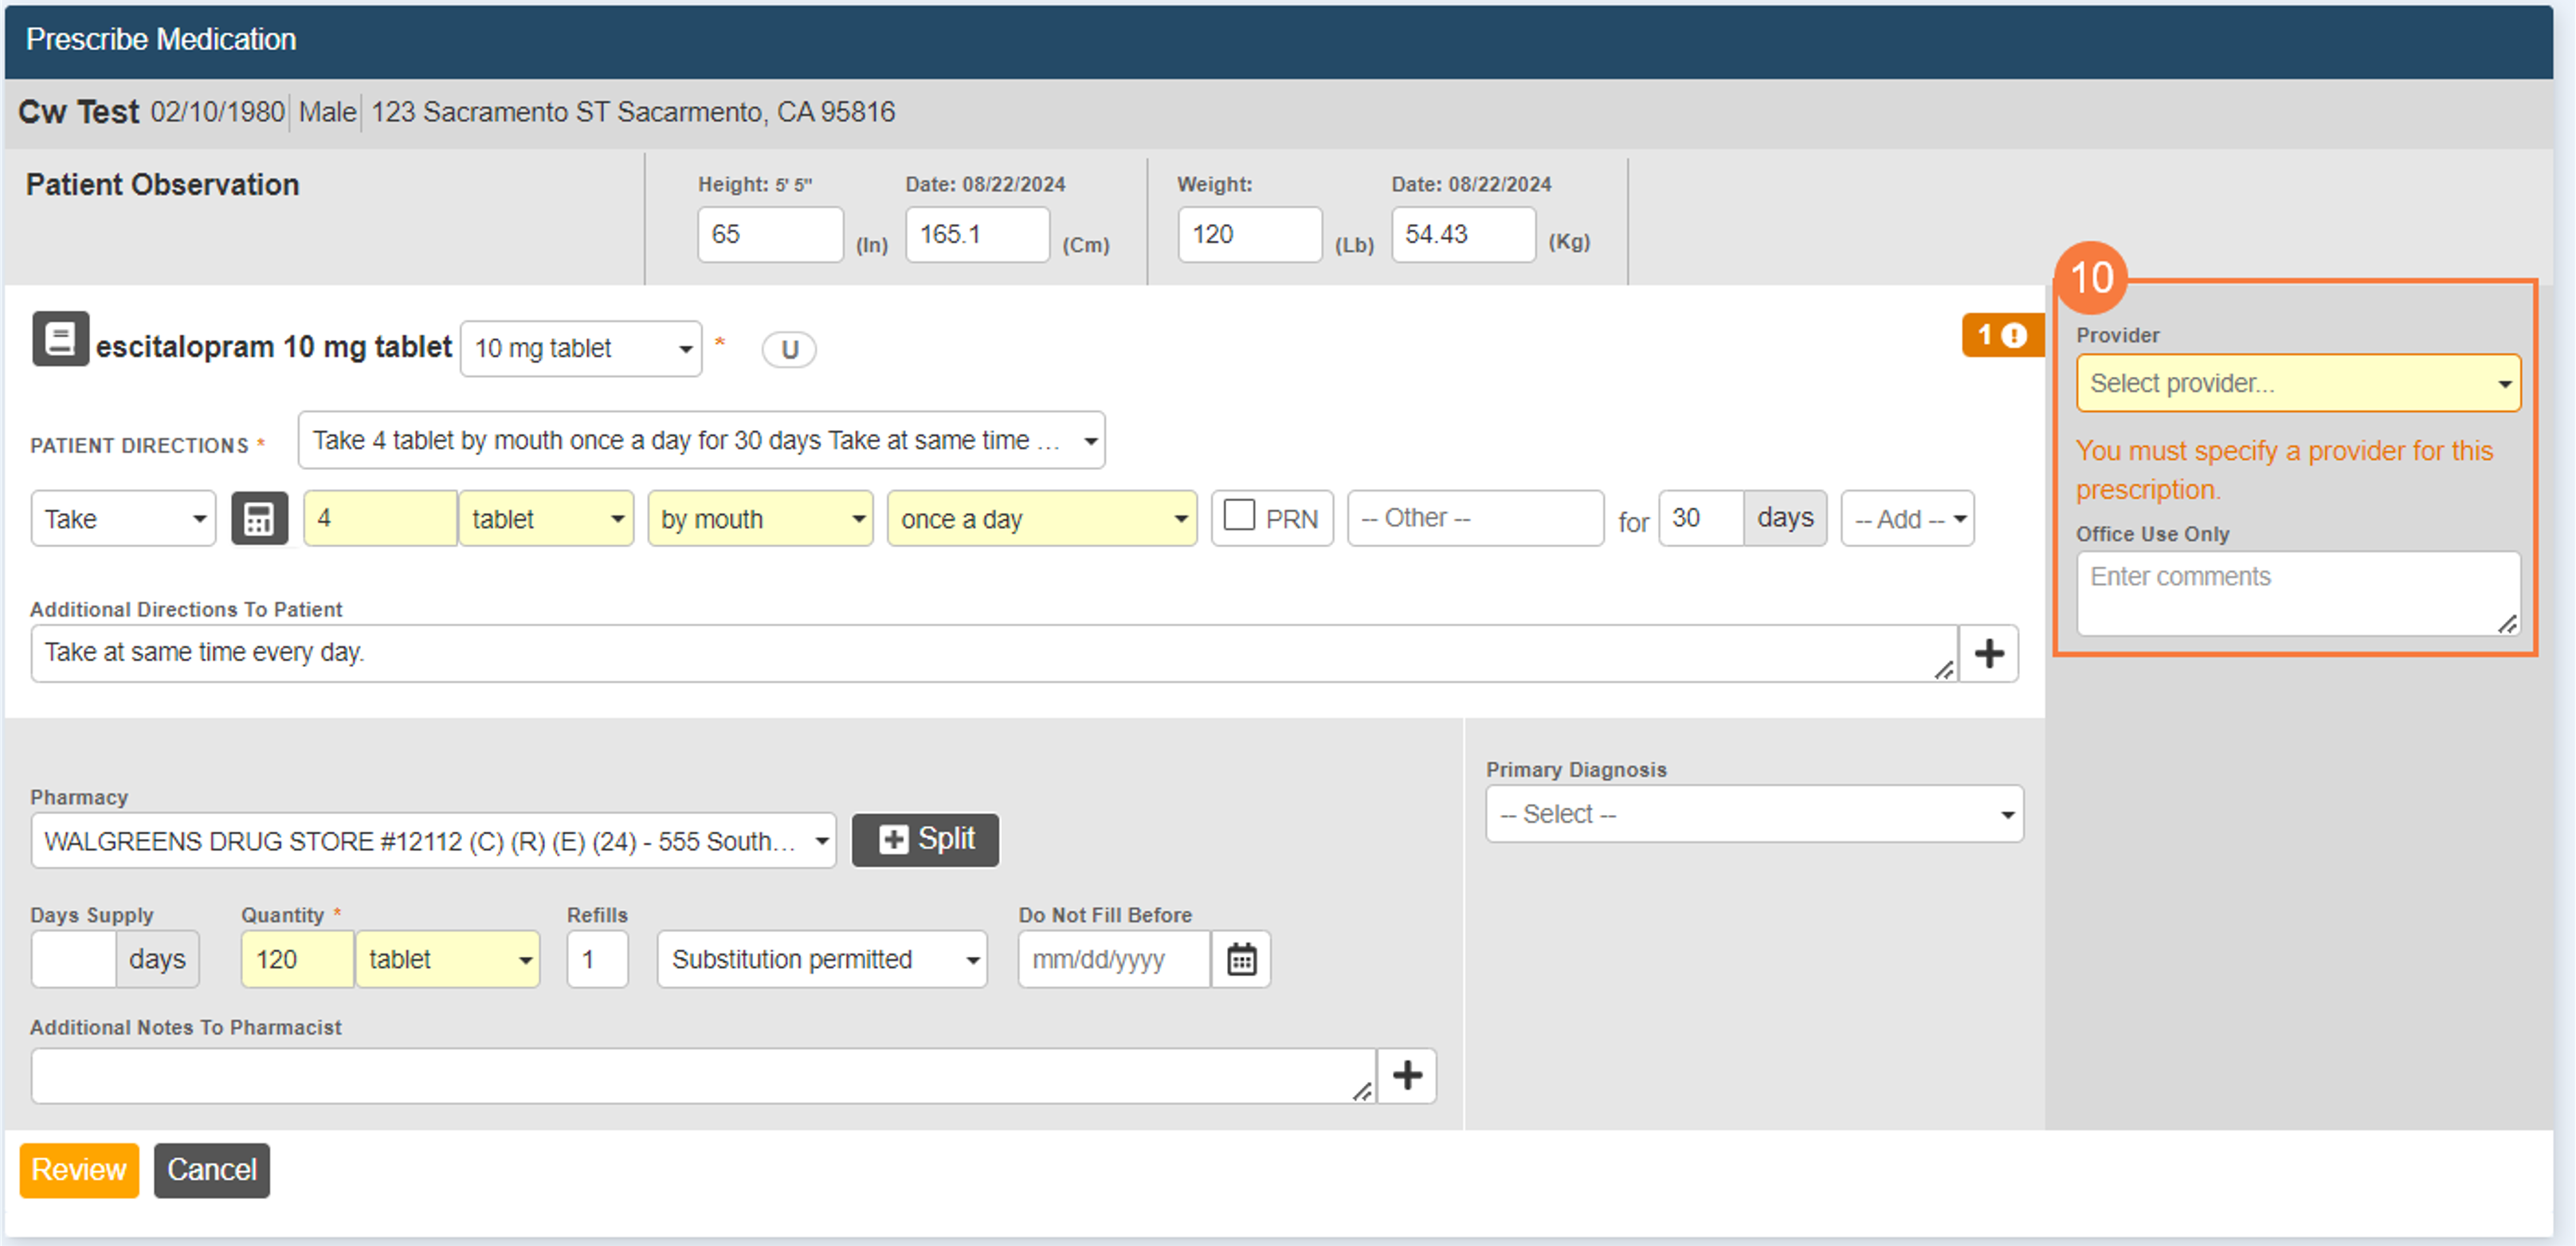
- Confirm Pharmacy or choose a new one from the dropdown. You can also split the order if you desire.
- Verify Days Supply and
- Add Refills, Select Substitution permitted or Dispense As Written, and add Do Not Fill Before date if desired.
- Select Primary Diagnosis from the dropdown if one is necessary.
- Add Additional Notes To Pharmacist if there are to be any.
- At this point, you can Select Review to proceed to the next screen to review, save, and queue the order.
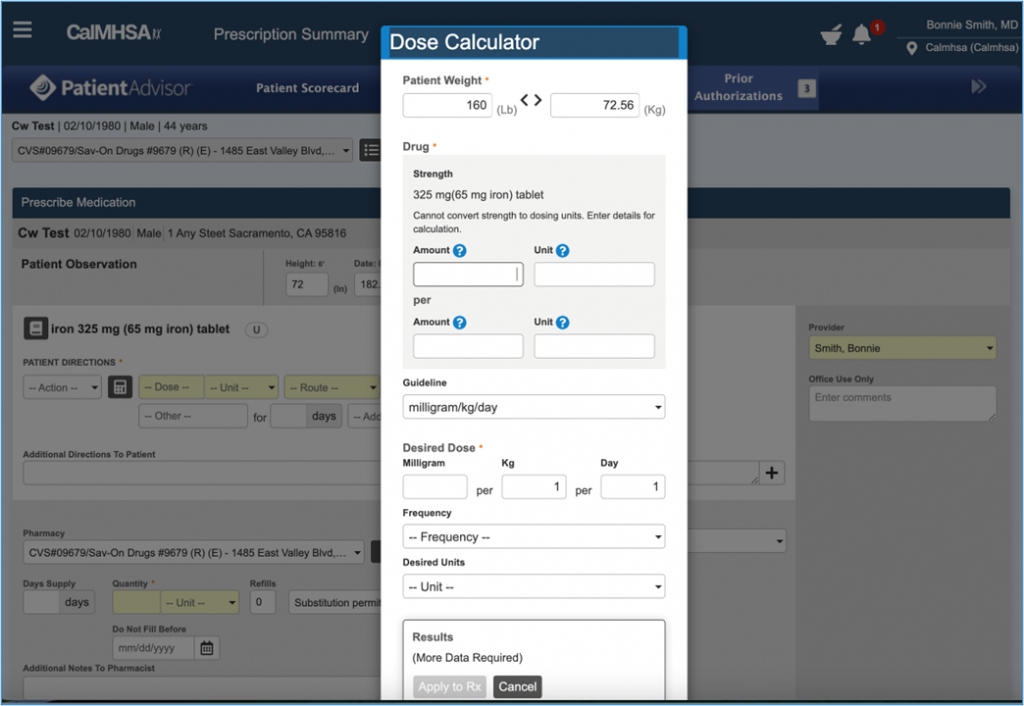
In case the prescriber wants to calculate the dose of medication before prescribing medication (e.g. in instances of pediatric medications or patients suffering from hepatic/renal failure), it can be done in two ways-
- Using the Height and Weight, manual calculations can be done outside the system.
- Use the ‘Dose Calculator’ indicated by an icon next to Patient Directions (As shown below).
Clicking on the ‘Dose Calculator’ icon will result in a pop up window where the following data needs to be entered in the fields provided
- Patient Weight
- Drug Amount/Unit
- Guideline
- Desired Dose Frequency
- Desired Units
When all the above data fields are completed, the result is displayed in the bottom of ‘Dose Calculator’ window (as shown below) and this can be applied to Rx, as appropriate.
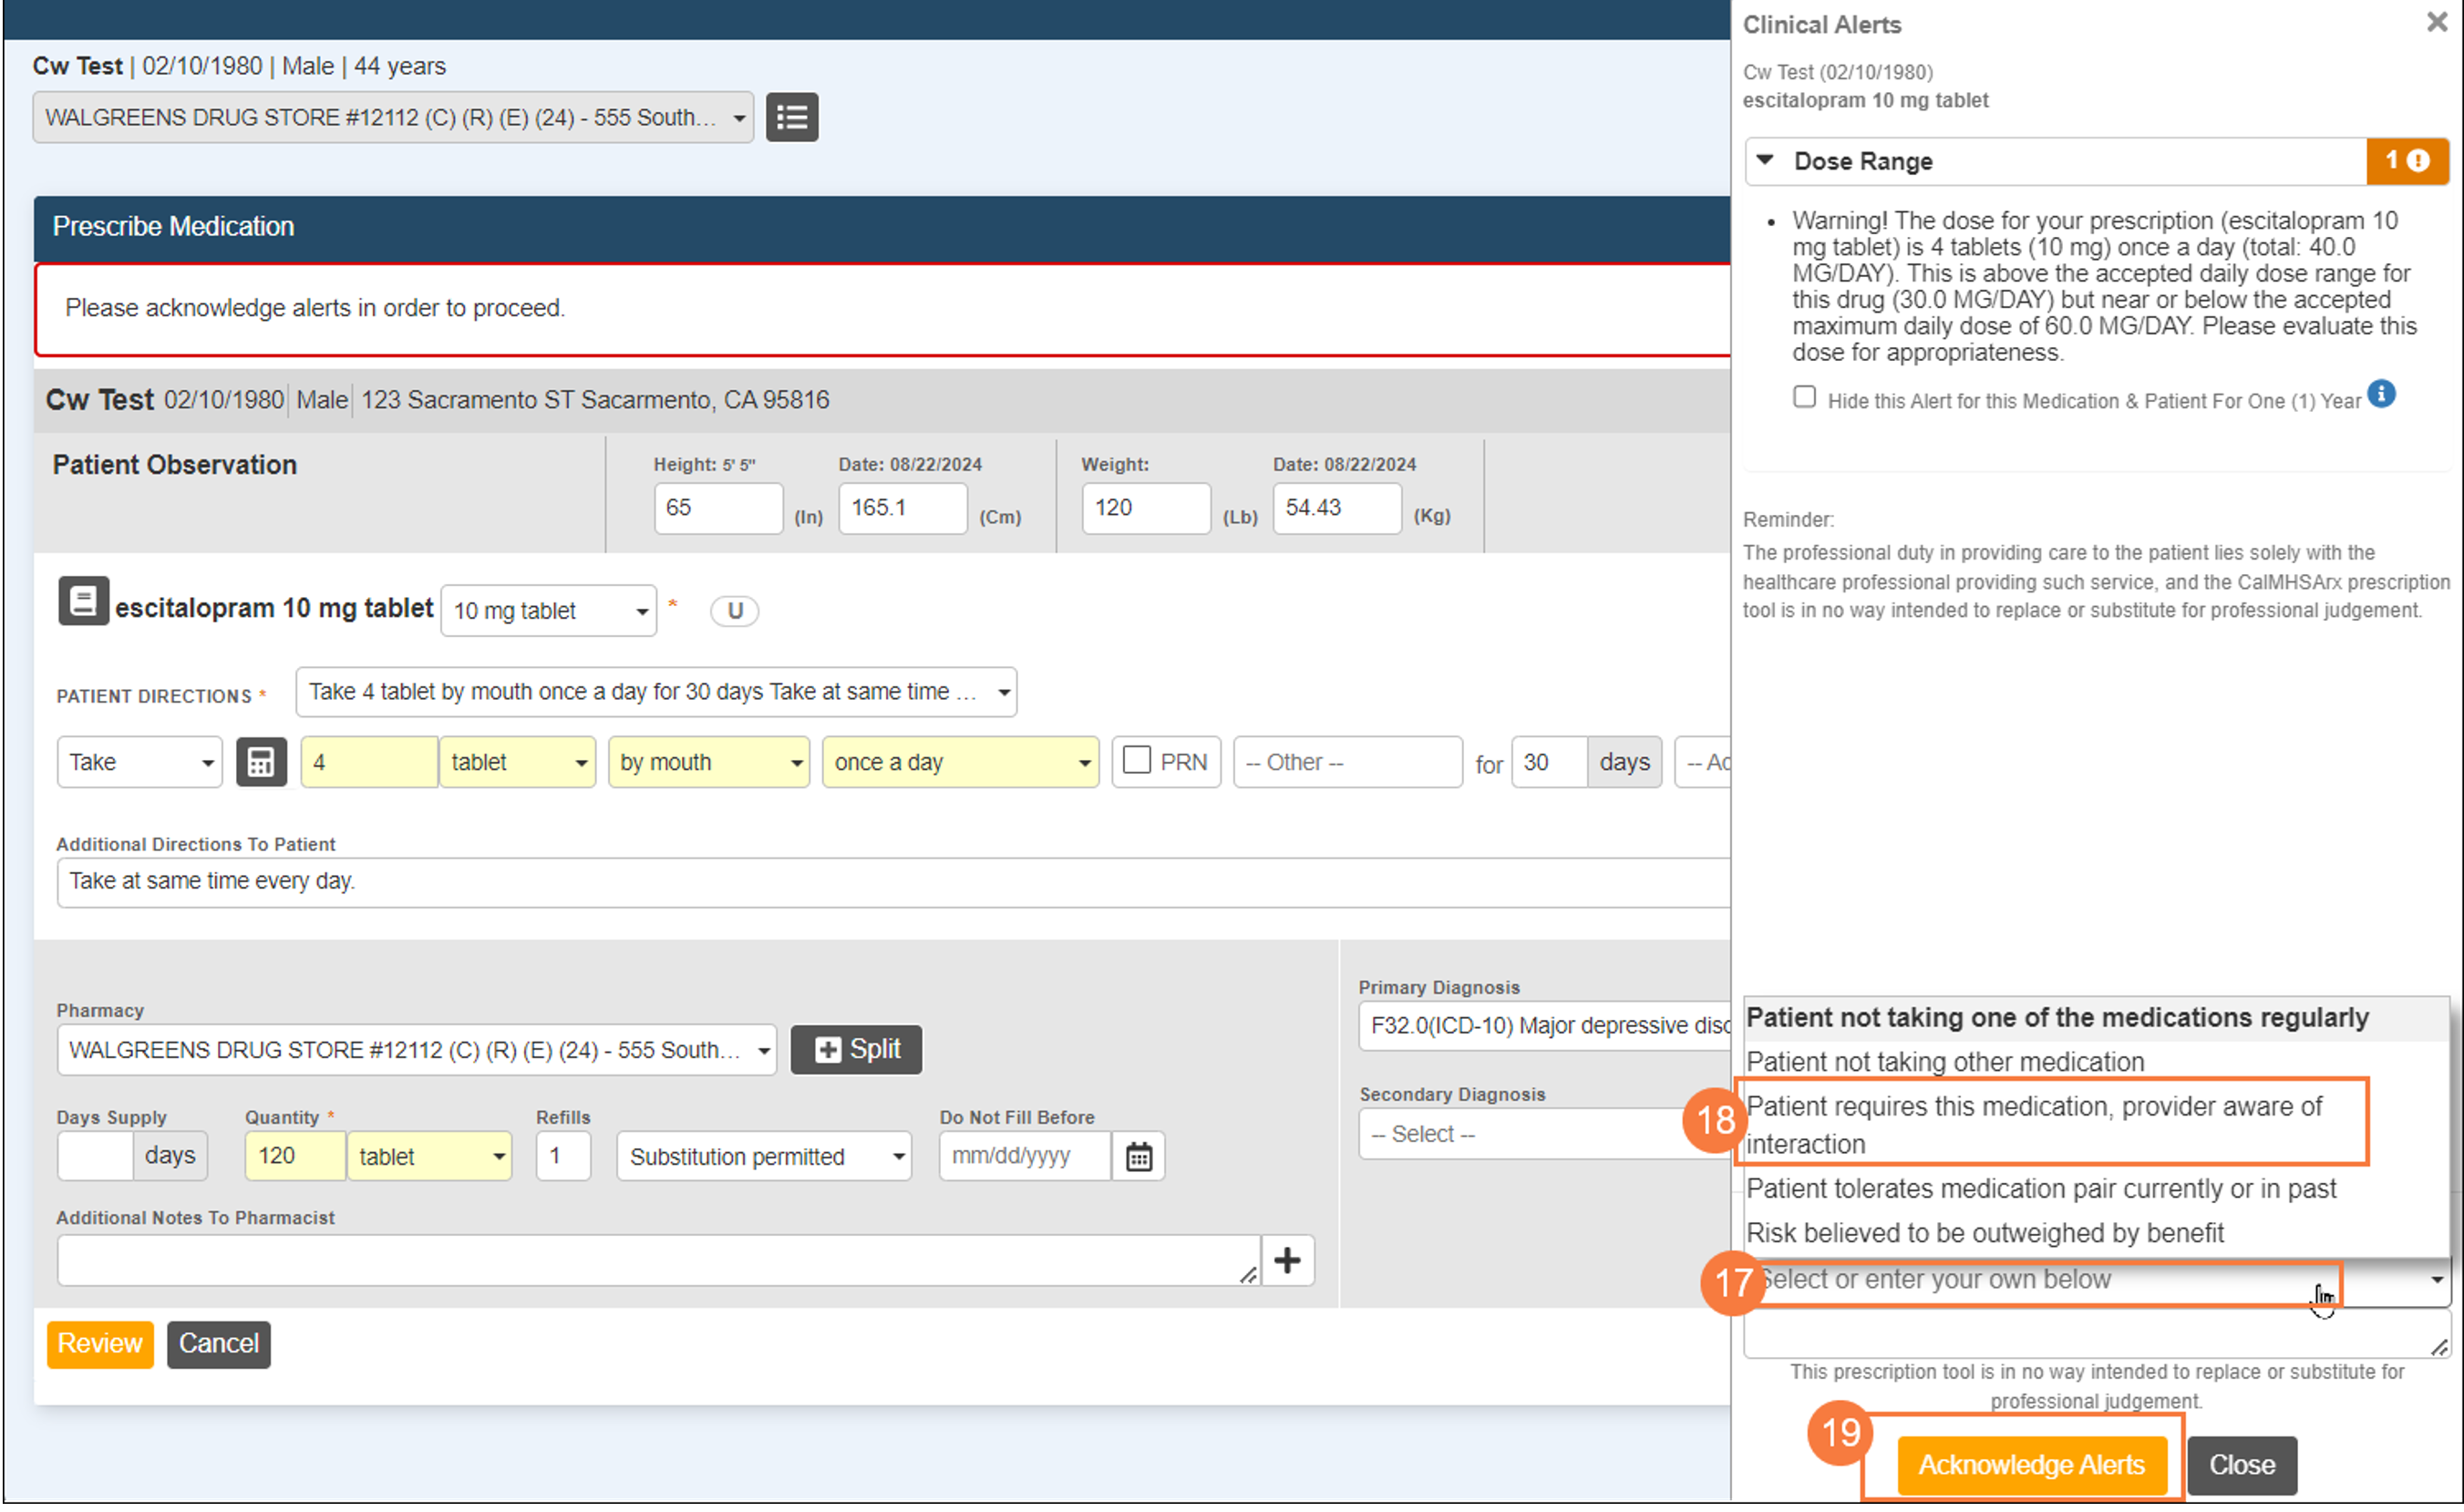
Review Prescription
- For this example, we Selected ‘Select or enter your own below’.
- Selected ‘Patient requires this medication, provider aware of interaction.
- Selected ‘Acknowledge Alerts.’
- Verify client information, drug information, provider information, and pharmacy information.
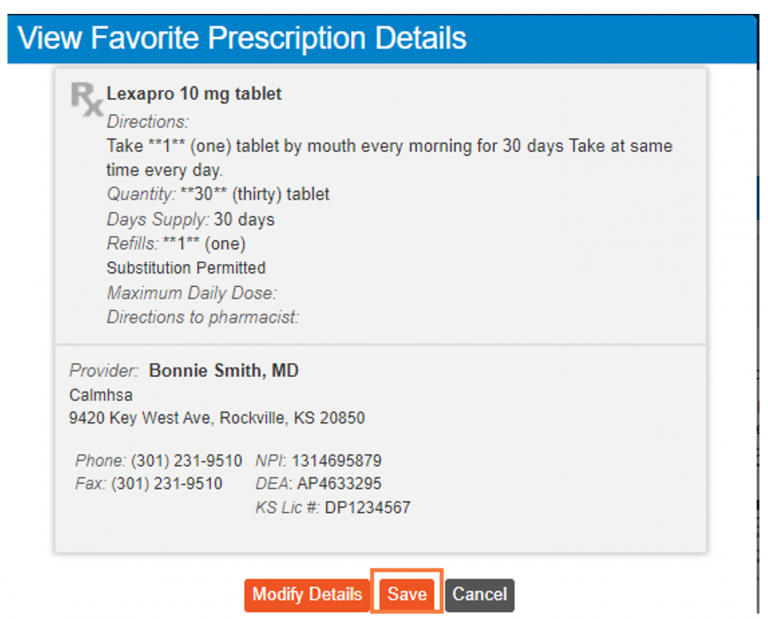
- Select Favorite icon (star) if this is a prescription you will enter often and would like to make it a favorite. This will make it quicker and easier to prescribe in the future.
- For our example, Select Send, Signature to Follow.
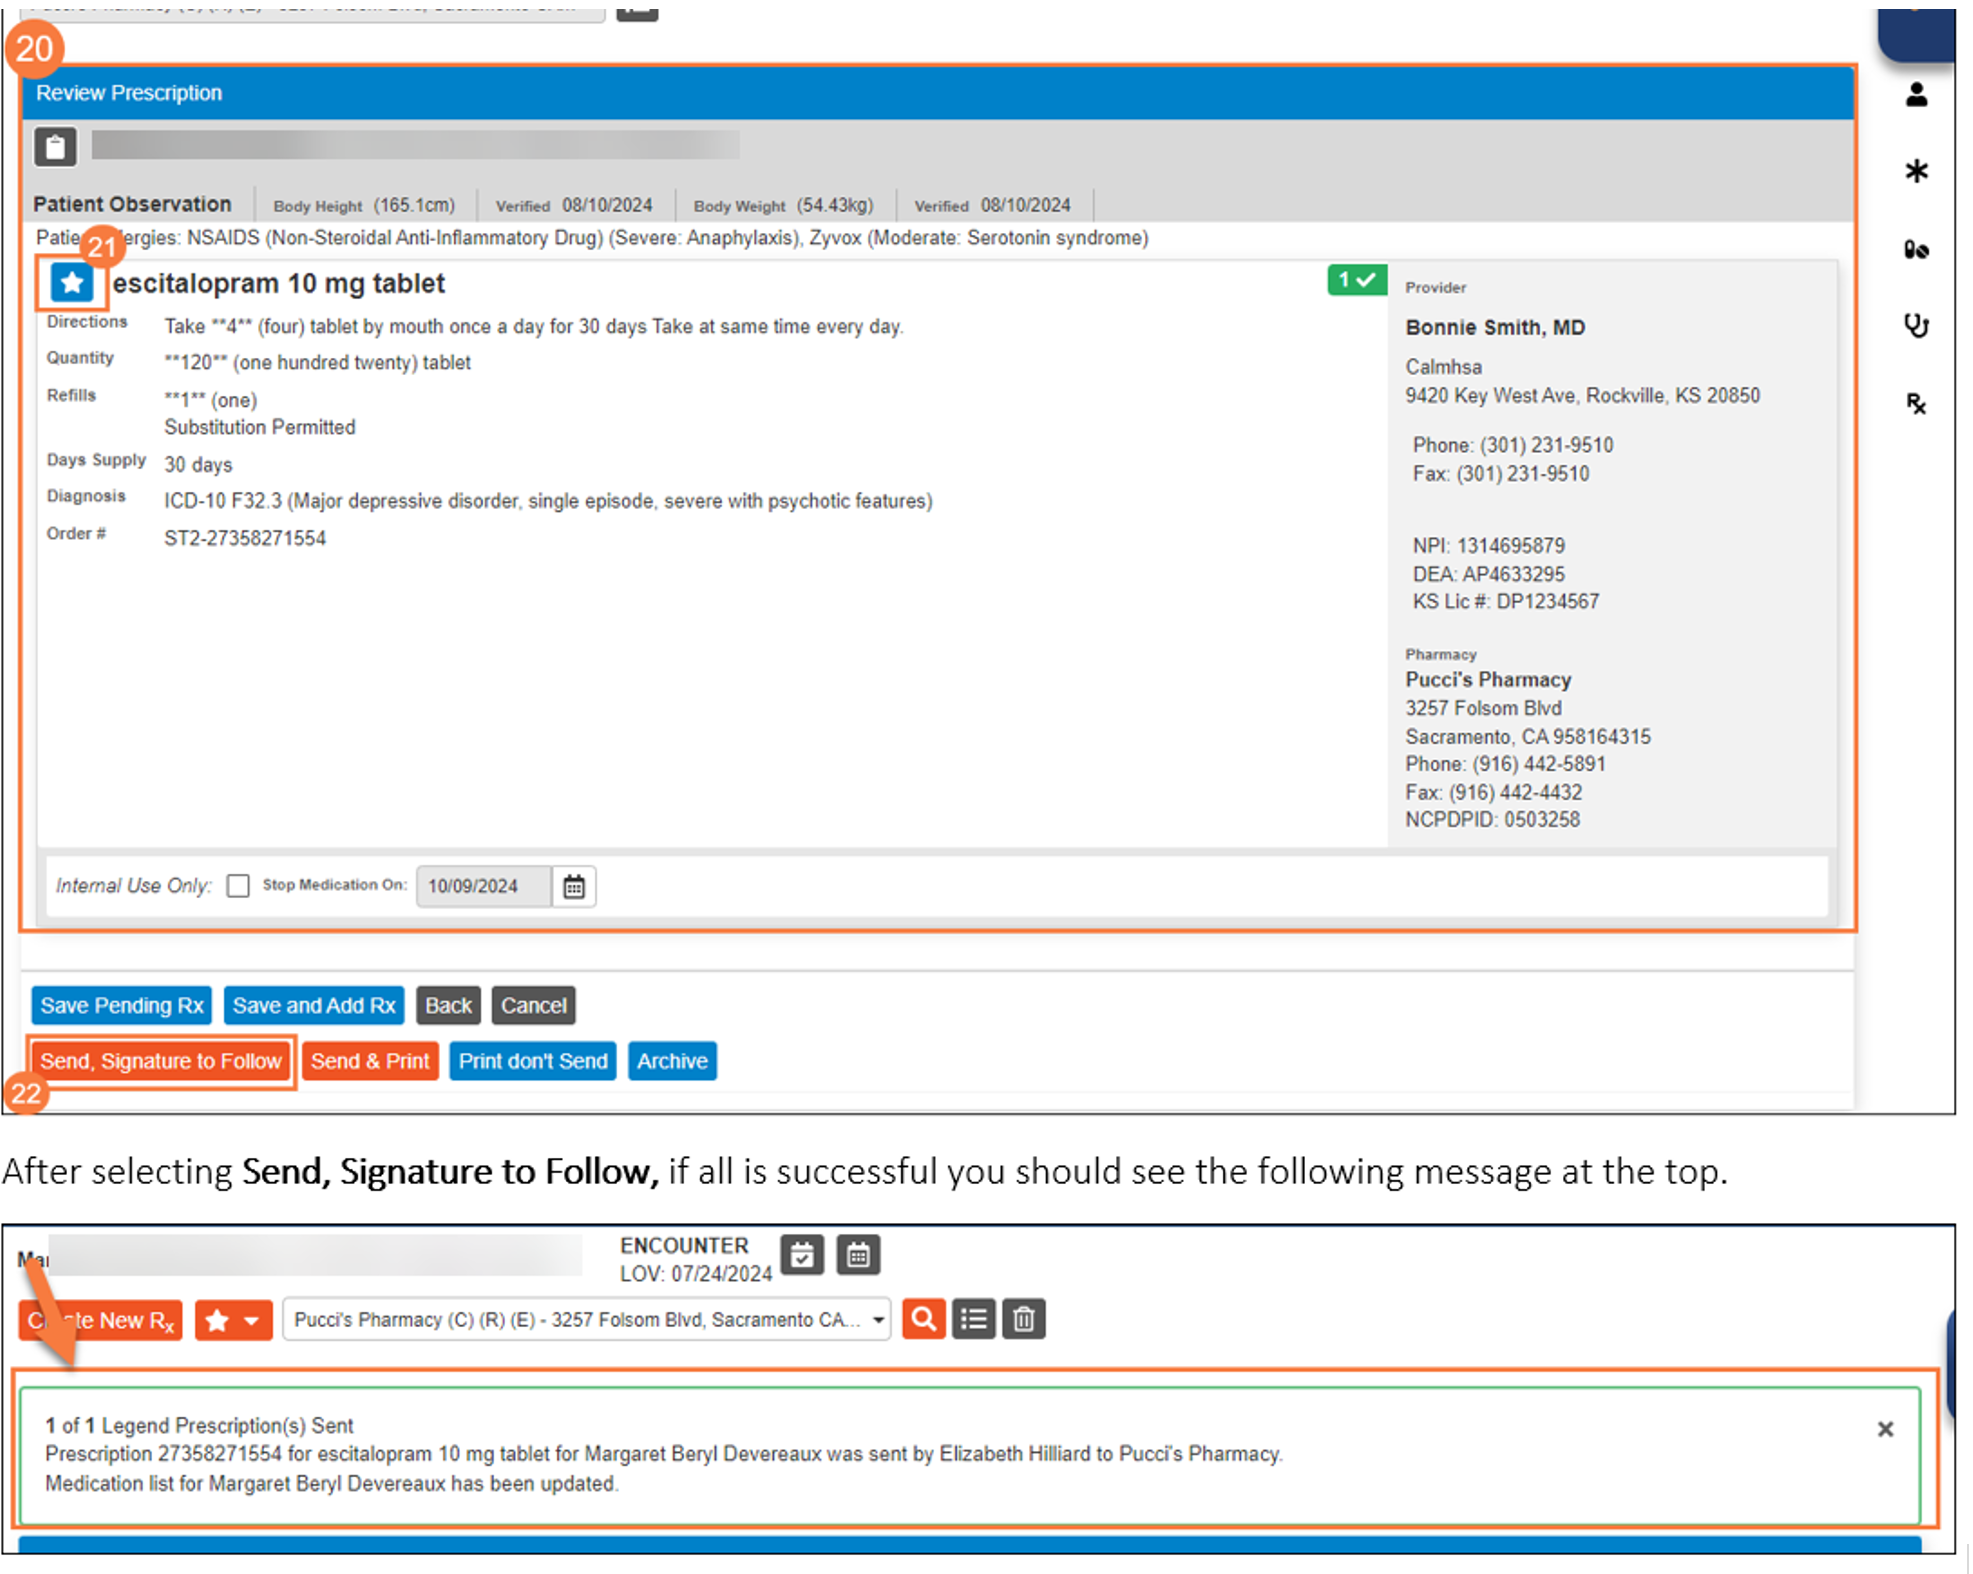
At this point, the prescription has been sent to the pharmacy and queued for prescriber to sign. This queued medication can be seen in the Patients Info Screen under Prescription Management or in the Prescription Summary Screen.
Other options that could have been selected:
- Send & Print – transmits prescription(s) to pharmacy and prints prescriptions to office printer.
- Back – allows you to edit the Sig details in the Prescribe Medication widget.
- Cancel – cancels the prescription.
- Save Pending Rx – adds the prescription to the Prescription Management section on the Patient Info Screen for review and sign off.
- Save and Add Rx – creates a pending prescription and navigates the user back to medication search widget.
- Print don’t Send – sends the prescription(s) to the local office printer but does not send it to the pharmacy.
- Archive – adds medication(s) to patient’s active list and does not send to prescriber.
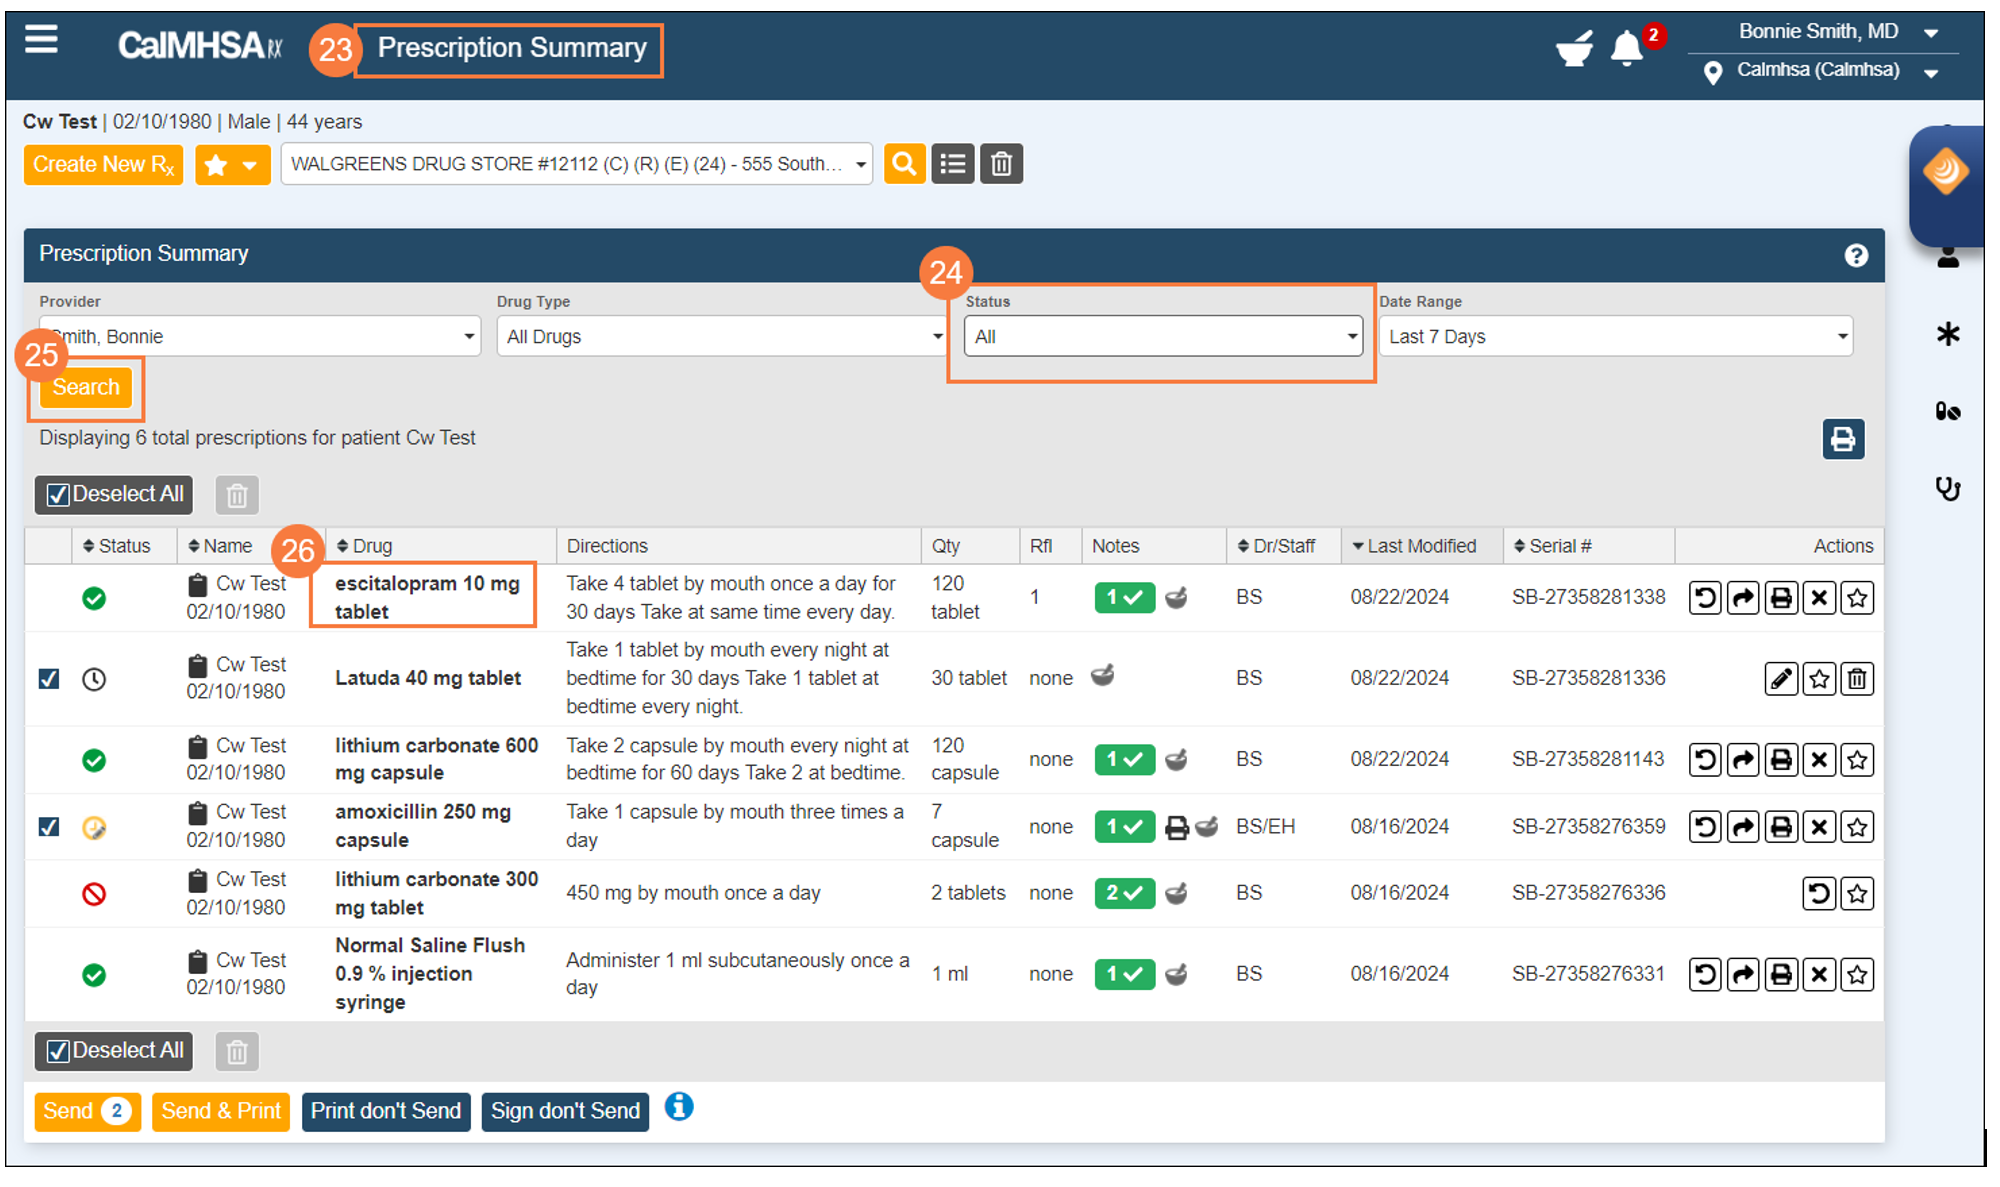
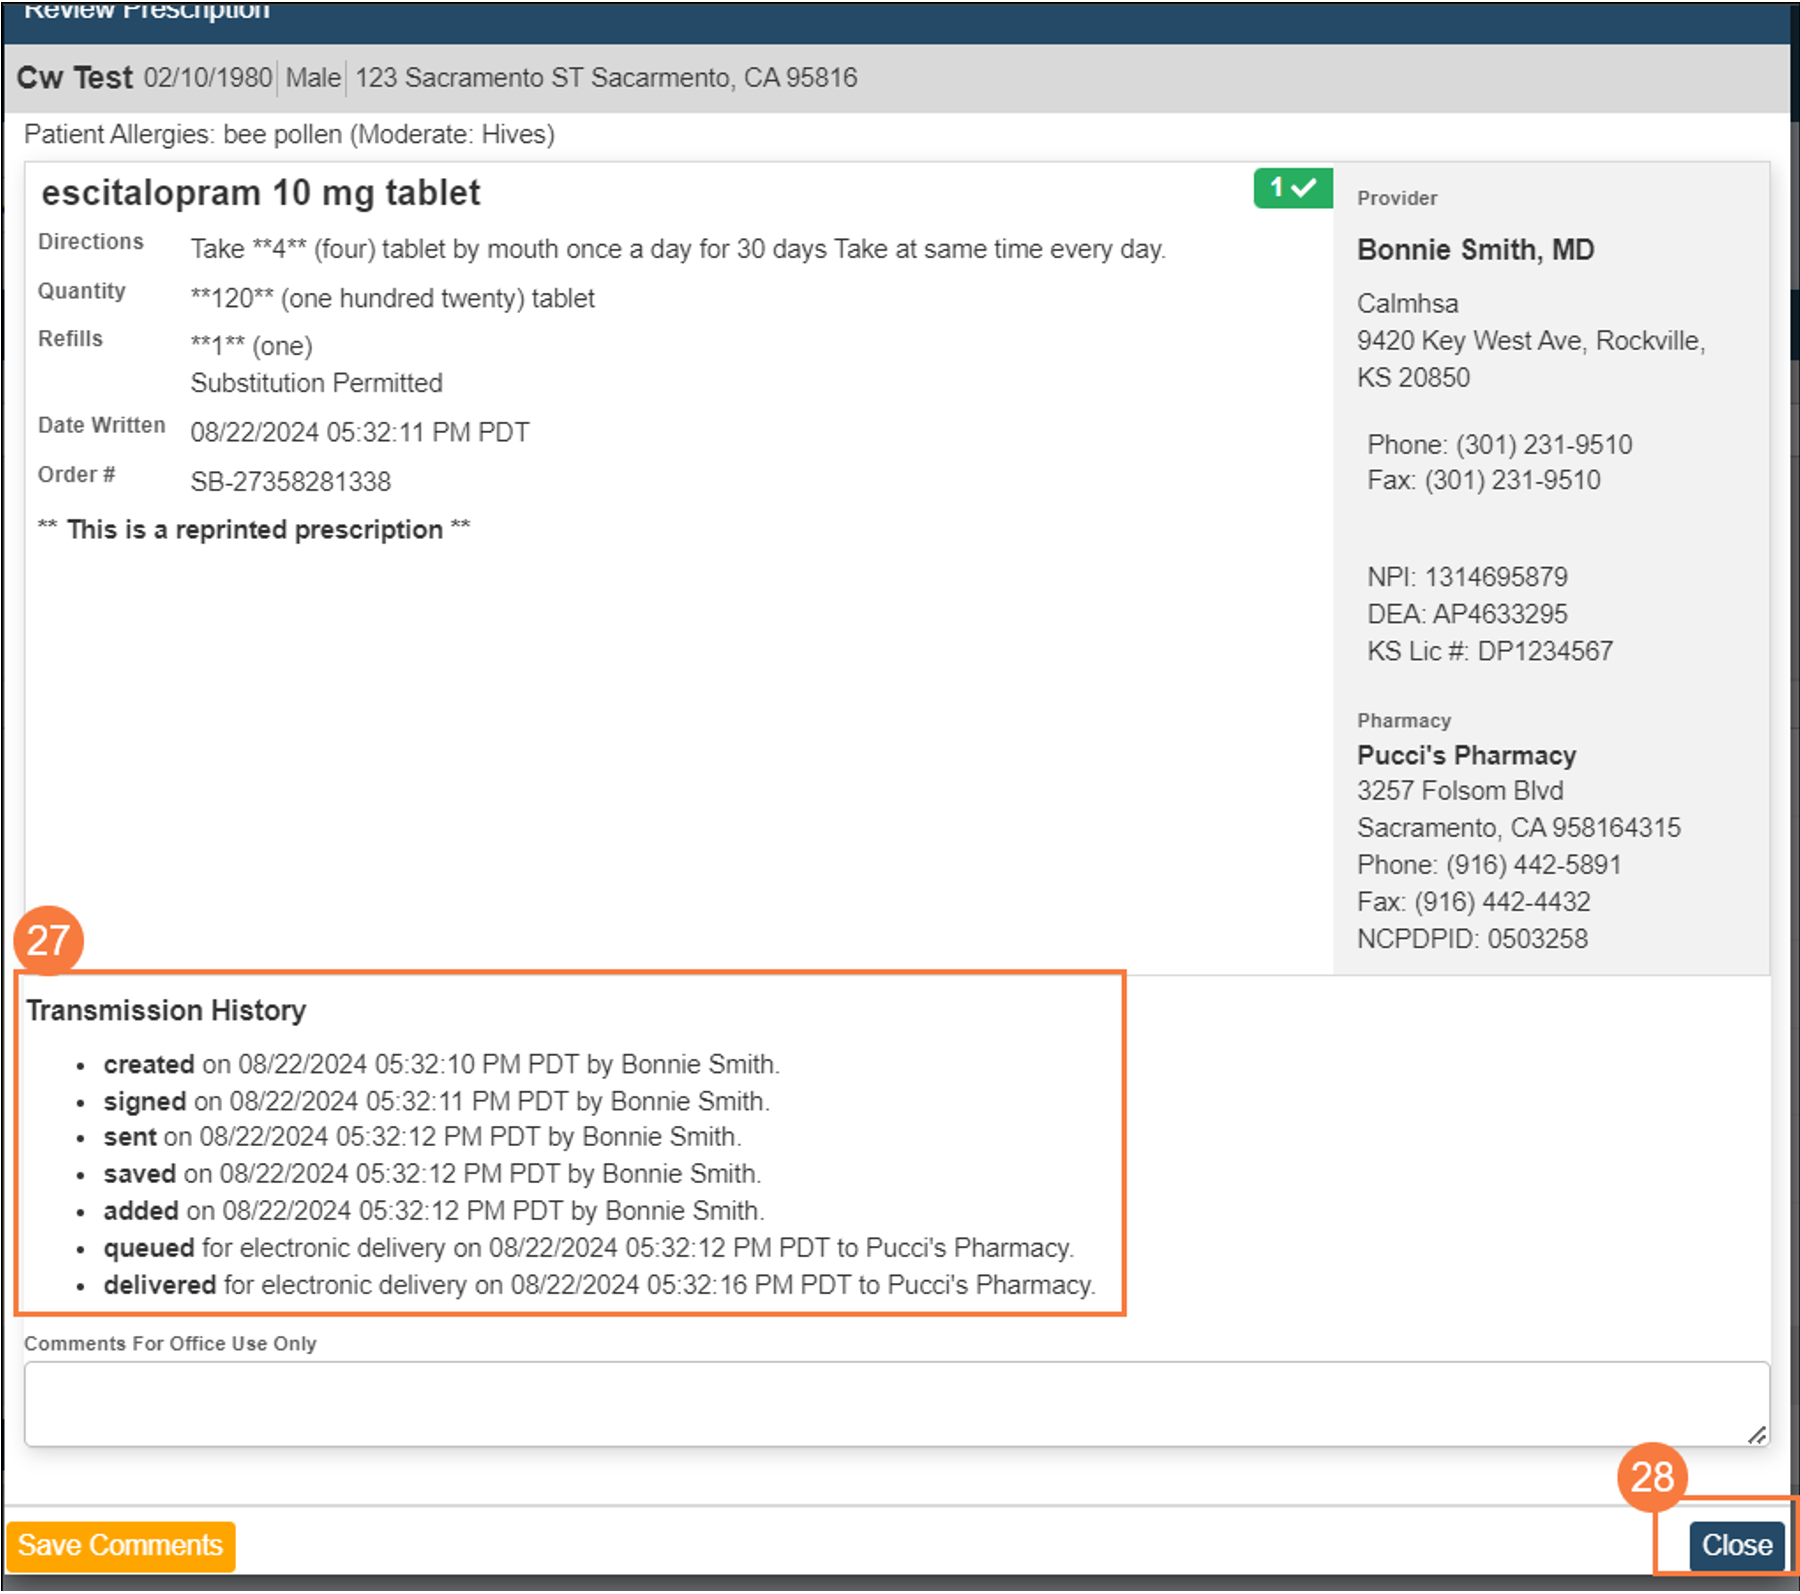
Check Prescription Status
- Select Prescription Summary.
- Make sure Status is set to All or Select dropdown to make choice.
- Select Search.
- List will populate. Click Drug that was prescribed.
- A new window will popup. Go to bottom left of screen to view Transmission History.
- Select Close when finished.
Select Favorite Icon
If we had selected the Favorite Icon it would have opened a popup window giving us the details of the prescription and asking us to modify it or save it in our favorites list.