CalMHSA has created letter templates for state required items, such as NOABDs. However, counties may need to create their own letter templates to suit their needs. Create a letter template in SmartCare is a multi-step process. We’ll break out these steps in different sections.
First: Create a Letter Template
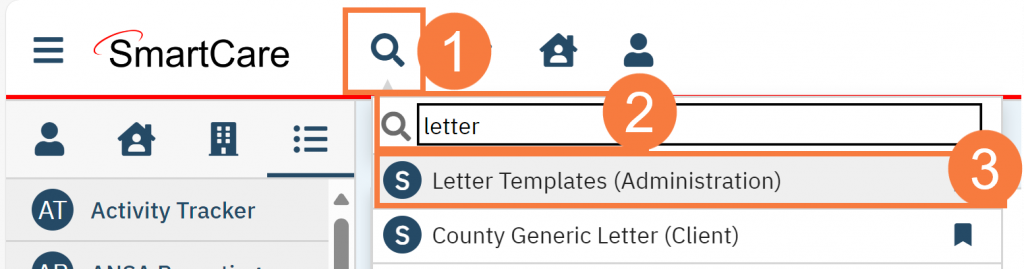
- Click on the Search Icon
- Type in “Letter Templates” in the search bar
- Select “Letter Templates (Administration)” from the search results.
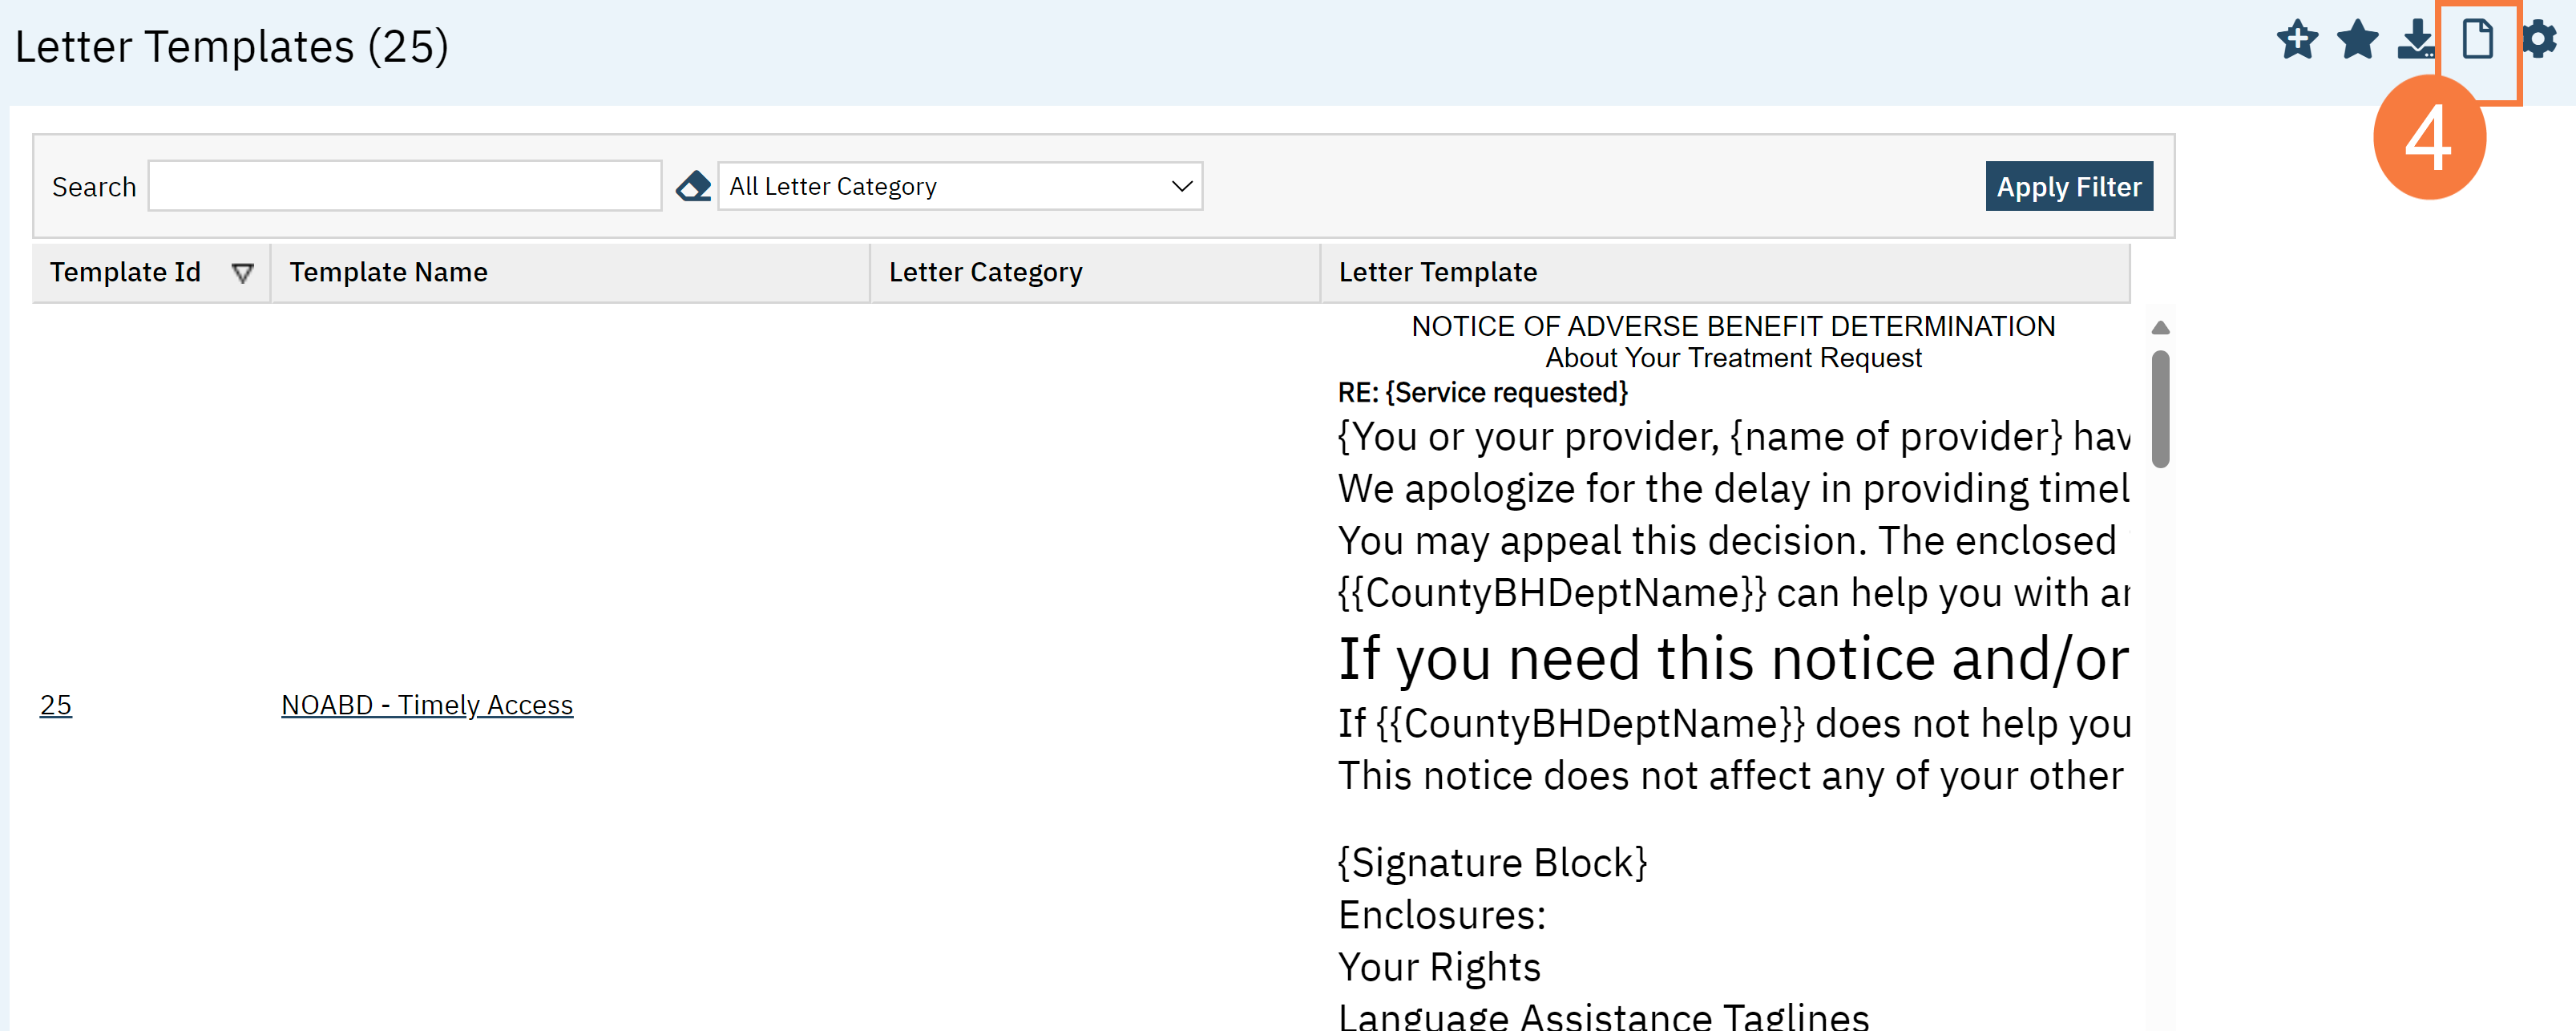
- This will bring up the Letter Templates list page. To create a new template, click the New icon.
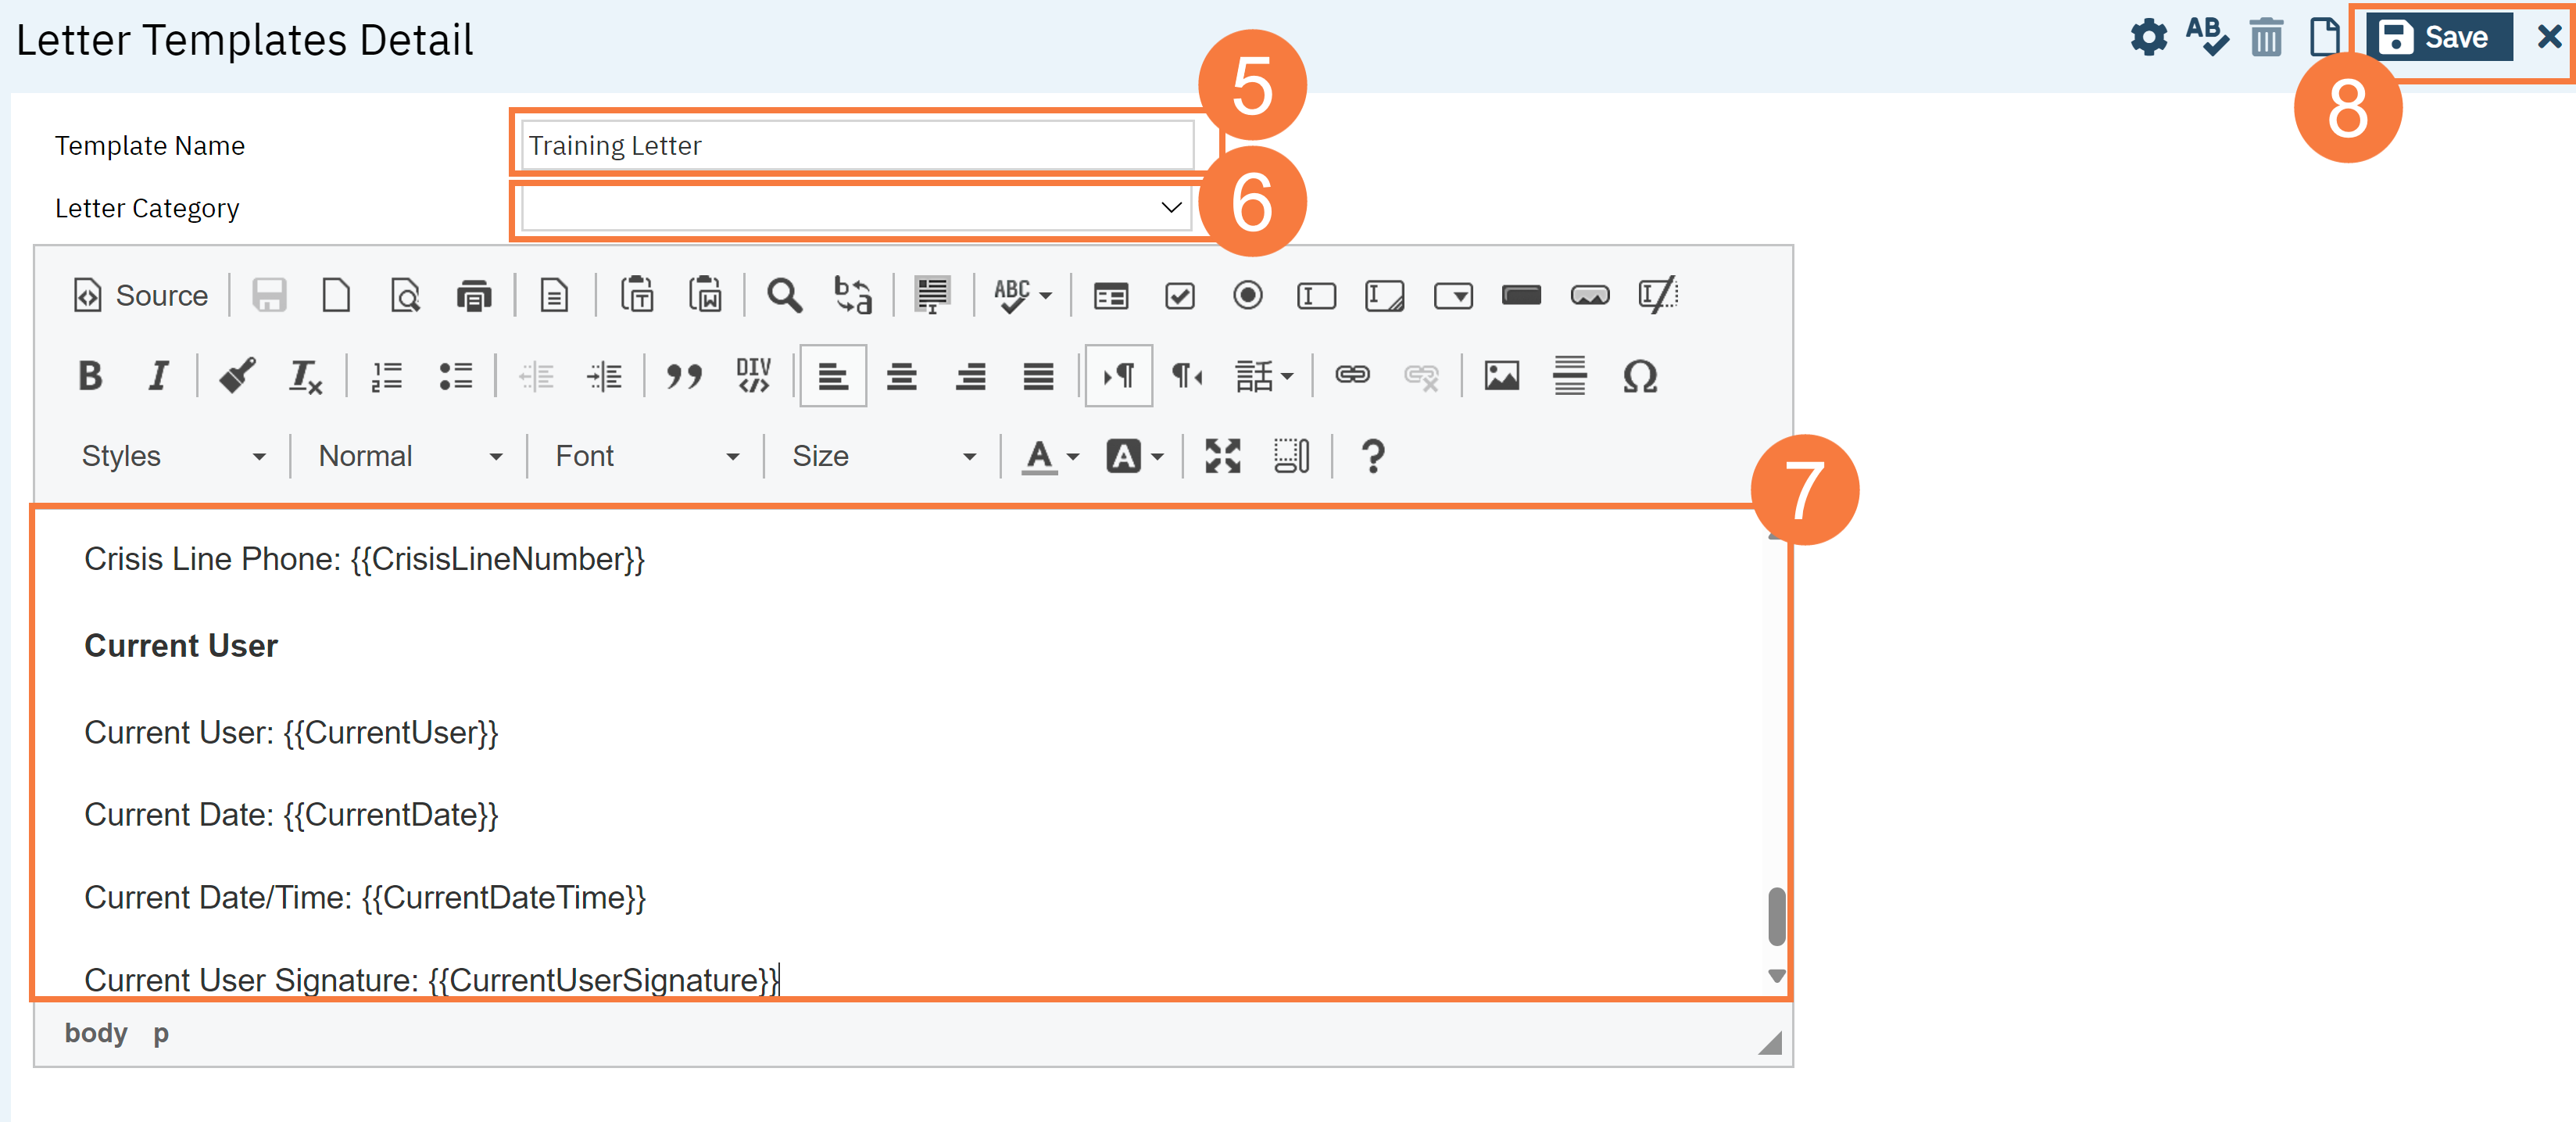
- This brings you to the Letter Template Detail screen. Enter the Template Name. This is also what you’ll name the corresponding document and corresponding screen. NOTE: When naming your template, ensure you don’t use any special characters except a hyphen (-). CalMHSA recommends the following Naming Convention: “{CountyName} Letters – Letter Name”. Example: “Imperial Letters – Notice of Concern”
- Leave the Template Category blank for general letters.
- Write your letter. You can use the following tags for populating pertinent information dynamically.
- Client Information – Will pull data from the Client Information screen for the client you’re creating the letter for.
- If the client has more than one address, {{ClientAddress}} will pull the Mailing address first (if available), Home address next, and Billing address third.
- {{ClientPreferredName}} will pull from the Aliases tab in Client Information for the alias that’s marked as “Preferred Name”.
- Appointment Information – Will pull data from the next service appointment the client has.
- Type: Will pull the procedure code name. NOTE: this is not the display name, but rather than actual procedure code that’s in the Billing Manual
- Duration: Will pull the data from the Total Duration field
- With: Will pull the data from the Clinician field
- Mode of Delivery: Will pull the data from the Mode of Delivery field
- Selected Program Information – Will pull data from the Program Details screen, based on the program that’s associated with this letter (what’s selected from the CDAG dropdown by the user when creating the letter)
- County Information – Will pull data from the County Information screen
- Current User – Will pull data from the Staff Details screen for the user who is creating the letter
- Current User: Will pull the username that’s used to log into SmartCare
- Current User Signature: Will pull the signature that’s used when signing documents
- Client Information – Will pull data from the Client Information screen for the client you’re creating the letter for.
| Client Information | Insert Statement | Format |
|---|---|---|
| Client Information Last Name | Insert Statement {{ClientLastName}} | Format Last |
| Client Information First Name | Insert Statement {{ClientFirstName}} | Format First |
| Client Information First/Last Name | Insert Statement {{ClientName}} | Format First Last |
| Client Information Preferred Name | Insert Statement {{ClientPreferredName}} | Format First Last |
| Client Information Client ID | Insert Statement {{ClientID}} | Format Number |
| Client Information Prefix | Insert Statement {{ClientPrefix}} | Format Text |
| Client Information Date of Birth | Insert Statement {{ClientDOB}} | Format m/d/yy |
| Client Information Client Address | Insert Statement {{ClientAddress}} | Format 000 Street City, CA 00000 |
| Appointment Information | Insert Statement | Format |
|---|---|---|
| Appointment Information Type | Insert Statement {{TypeOfAppnt}} | Format Text |
| Appointment Information Duration | Insert Statement {{AppntDuration}} | Format Integer |
| Appointment Information Day and Date | Insert Statement {{AppntDayAndDate}} | Format Friday, mm/dd/yyyy |
| Appointment Information Time | Insert Statement {{AppntTime}} | Format 8:00AM |
| Appointment Information With | Insert Statement {{AppntWith}} | Format First Last |
| Appointment Information Mode of Delivery | Insert Statement {{ModeofDelivery}} | Format Text |
| Selected Program Information | Insert Statement | Format |
|---|---|---|
| Selected Program Information Address | Insert Statement {{SelectedProgramAddress}} | Format Text |
| Selected Program Information Manager | Insert Statement {{SelectedProgramManager}} | Format Text |
| Selected Program Information Phone | Insert Statement {{SelectedProgramPhone}} | Format (555) 555-5555 |
| County Information | Insert Statement | Format |
|---|---|---|
| County Information County Code | Insert Statement {{CountyCode}} | Format Integer |
| County Information County Name | Insert Statement {{County}} | Format Text |
| County Information Behavioral Health Department Name | Insert Statement {{CountyBHDeptName}} | Format Text |
| County Information Hours of Operation | Insert Statement {{CountyHours}} | Format Text |
| County Information County Address | Insert Statement {{CountyAddress}} | Format Text |
| County Information County City | Insert Statement {{CountyCity}} | Format Text |
| County Information County Zip | Insert Statement {{CountyZip}} | Format 55555 |
| County Information Main Phone Number | Insert Statement {{CountyPhoneNumber}} | Format 555-555-5555 |
| County Information TTY Phone Number | Insert Statement {{CountyTTYPhoneNumber}} | Format 555-555-5555 |
| County Information Accessibility Phone Number | Insert Statement {{CountyAccessPhoneNumber}} | Format 555-555-5555 |
| County Information Member Services 24/7 Phone Number | Insert Statement {{CountyMemberServicesPhoneNumber}} | Format 555-555-5555 |
| County Information Crisis Line Name | Insert Statement {{CrisisLineName}} | Format Text |
| County Information Crisis Line Phone | Insert Statement {{CrisisLineNumber}} | Format 555-555-5555 |
| Current User | Insert Statement | Format |
|---|---|---|
| Current User Current User | Insert Statement {{CurrentUser}} | Format Text |
| Current User Current Date | Insert Statement {{CurrentDate}} | Format Mmm dd, yyyy |
| Current User Current Date & Time | Insert Statement {{CurrentDateTime}} | Format Mmm d yyyy h:mmAM/PM |
| Current User Current User Signature | Insert Statement {{CurrentUserSignature}} | Format Text |
Use the “County Generic Letter” to see an example of the formatting. This letter template is maintained by CalMHSA and is a demonstration of all the different insert statements.
To create a County Generic Letter, have a client open. Use the Search icon to find the screen “County Generic Letter”. If needed, click New. This will show you want the end user will see when creating a letter with these insert statements. Signing the test letter will show you what these insert statements will look like in PDF format.
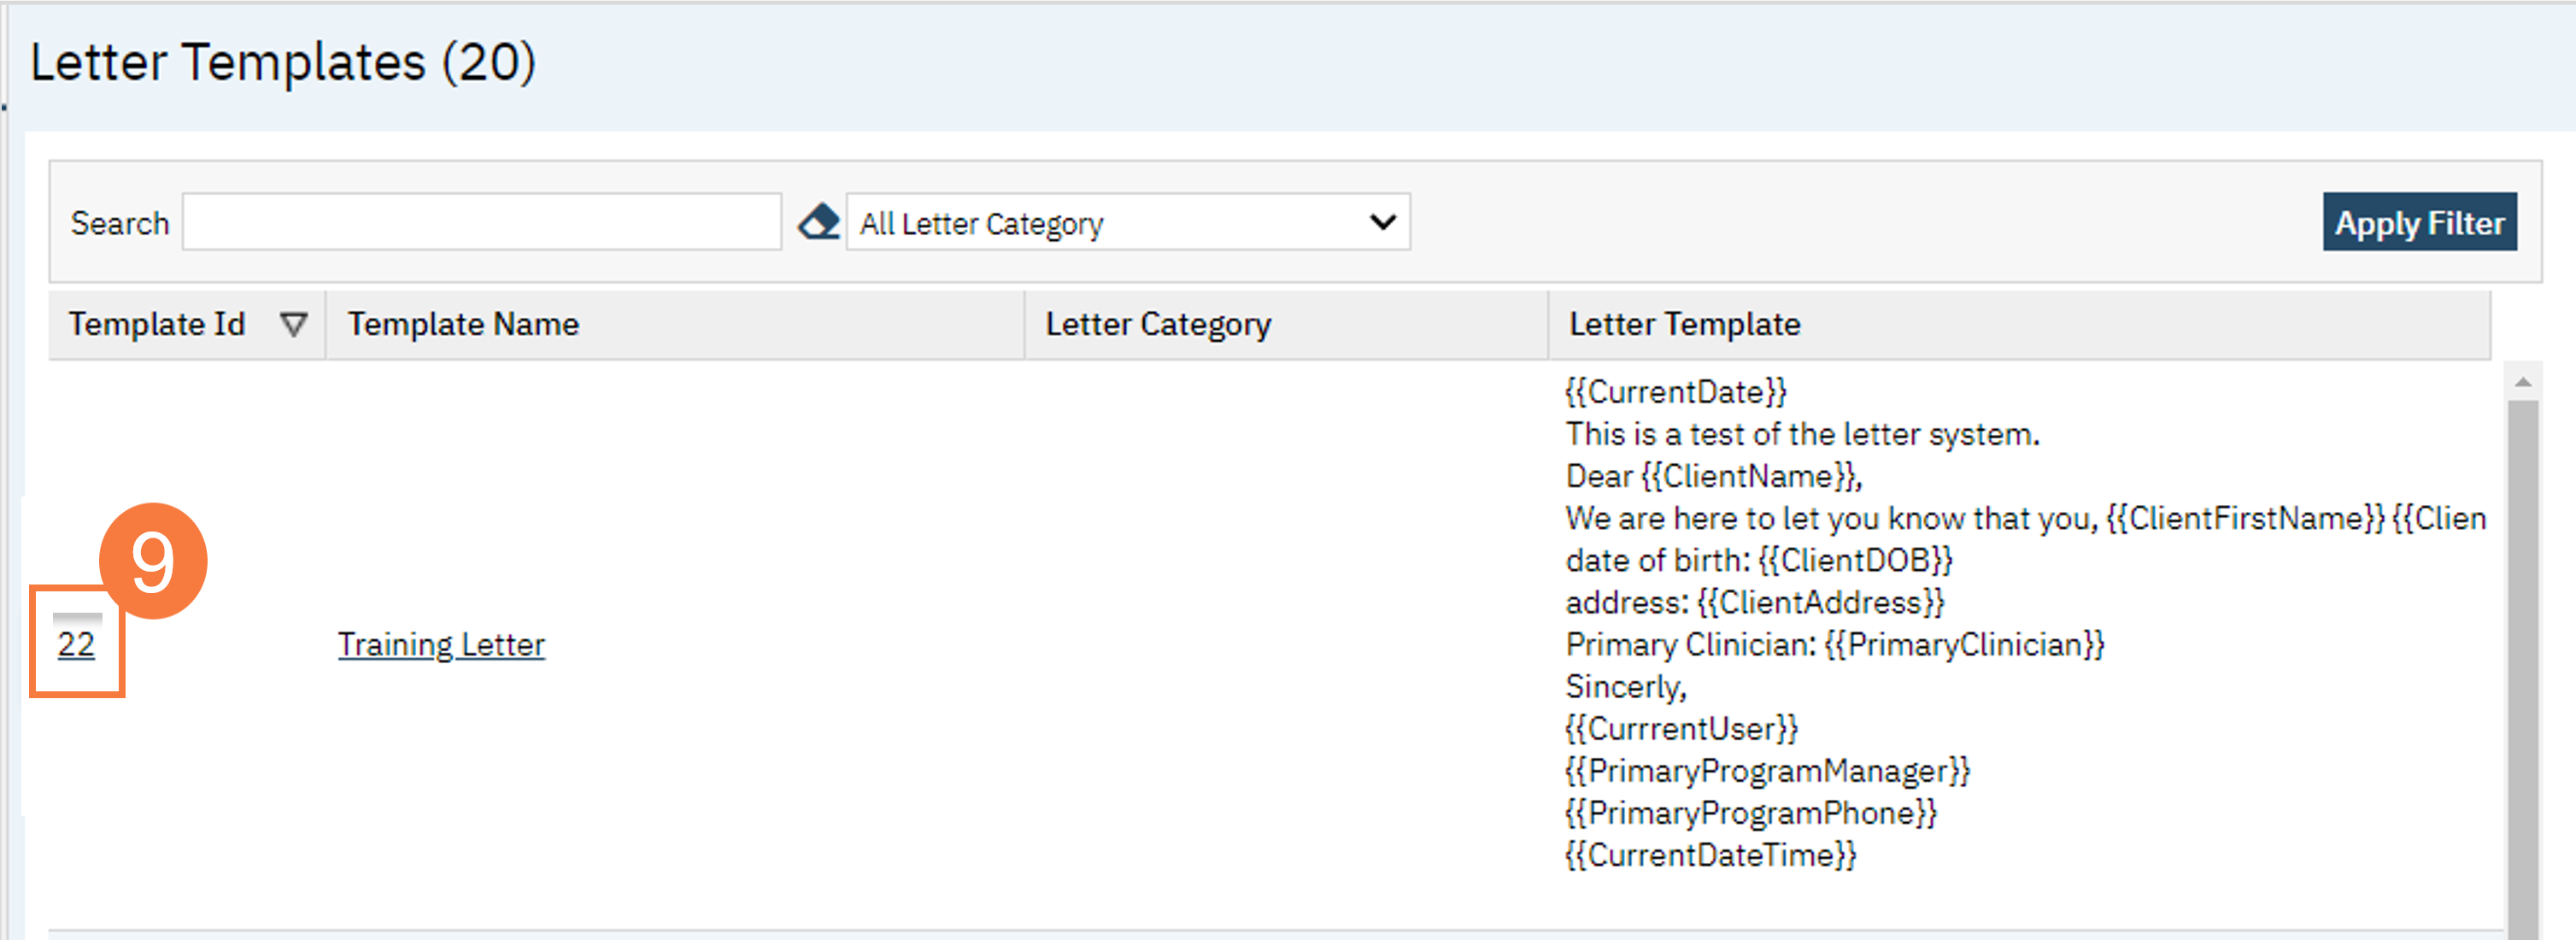
- Once you’ve finished writing the letter, click Save and close.
- This takes you back to the list page. Note the Template ID for your letter template, as this will be used later.
Second: Create a Corresponding Document
- Click on the Search icon.
- Type in “Document Management” in the search bar.
- Select “Document Management (Administration)” from the search results.
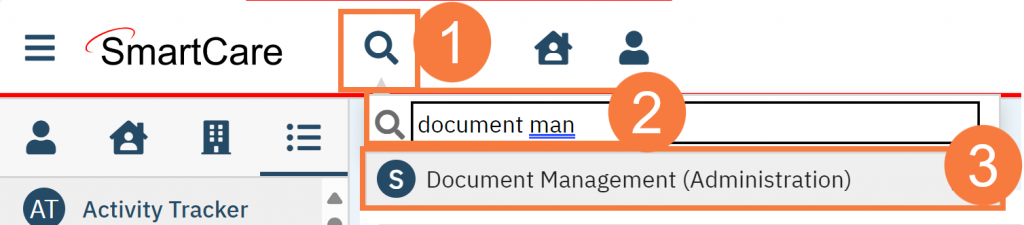
- This brings up the Document Management list page. Click the New icon.
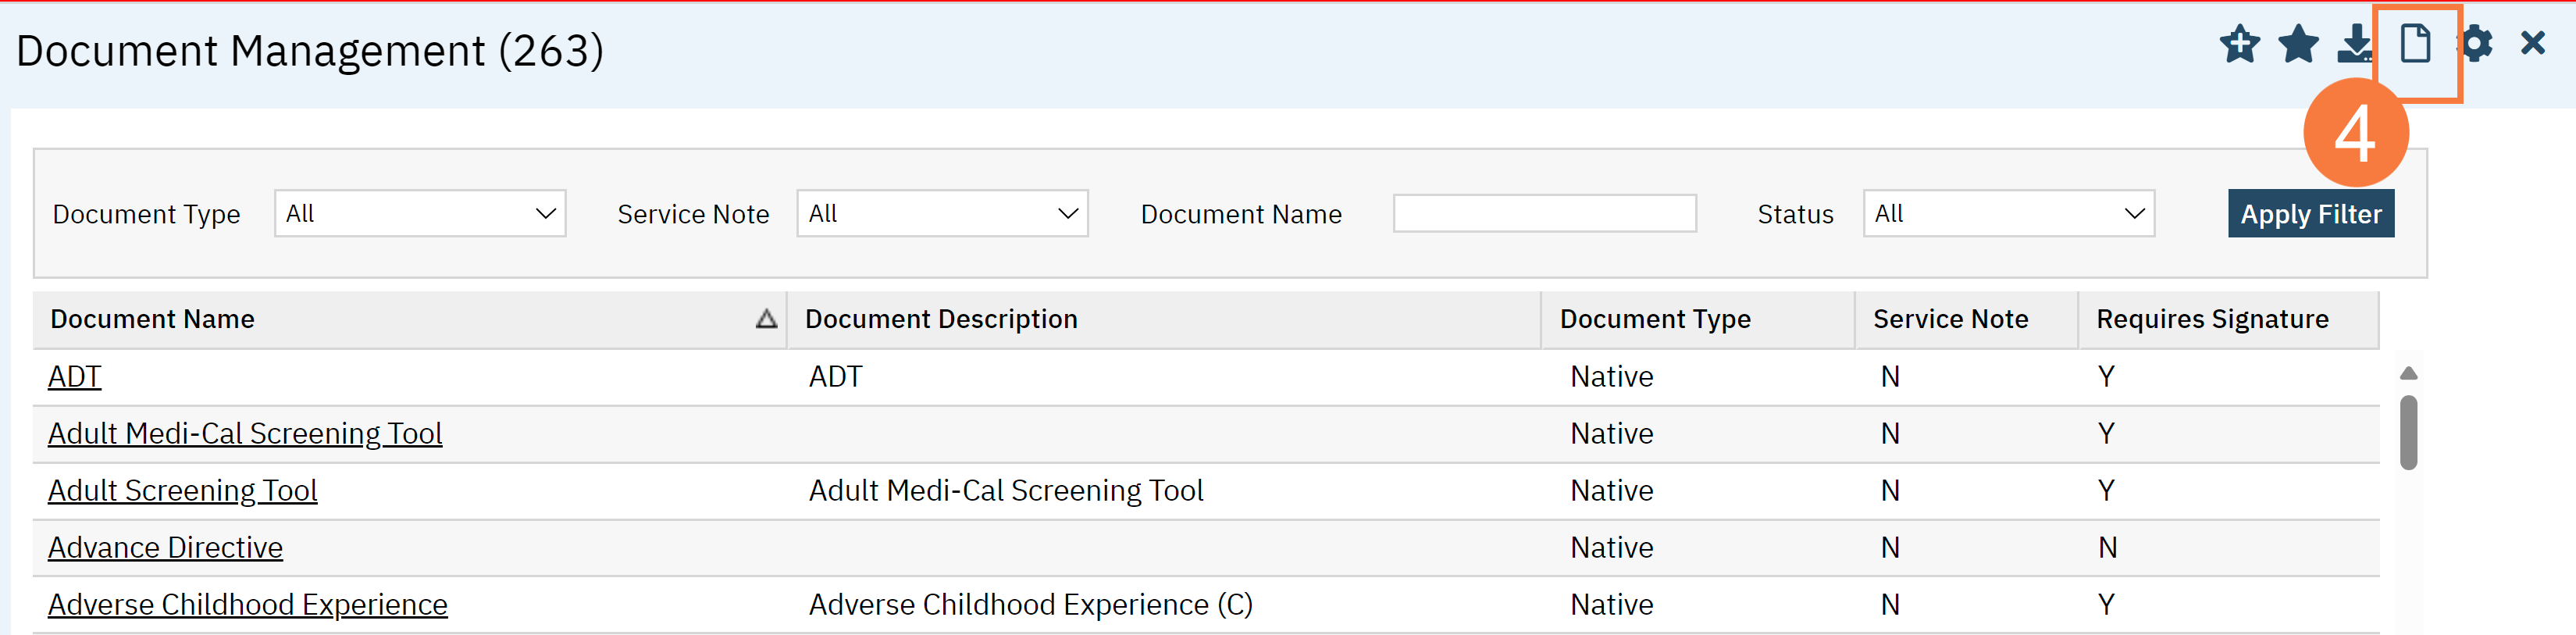
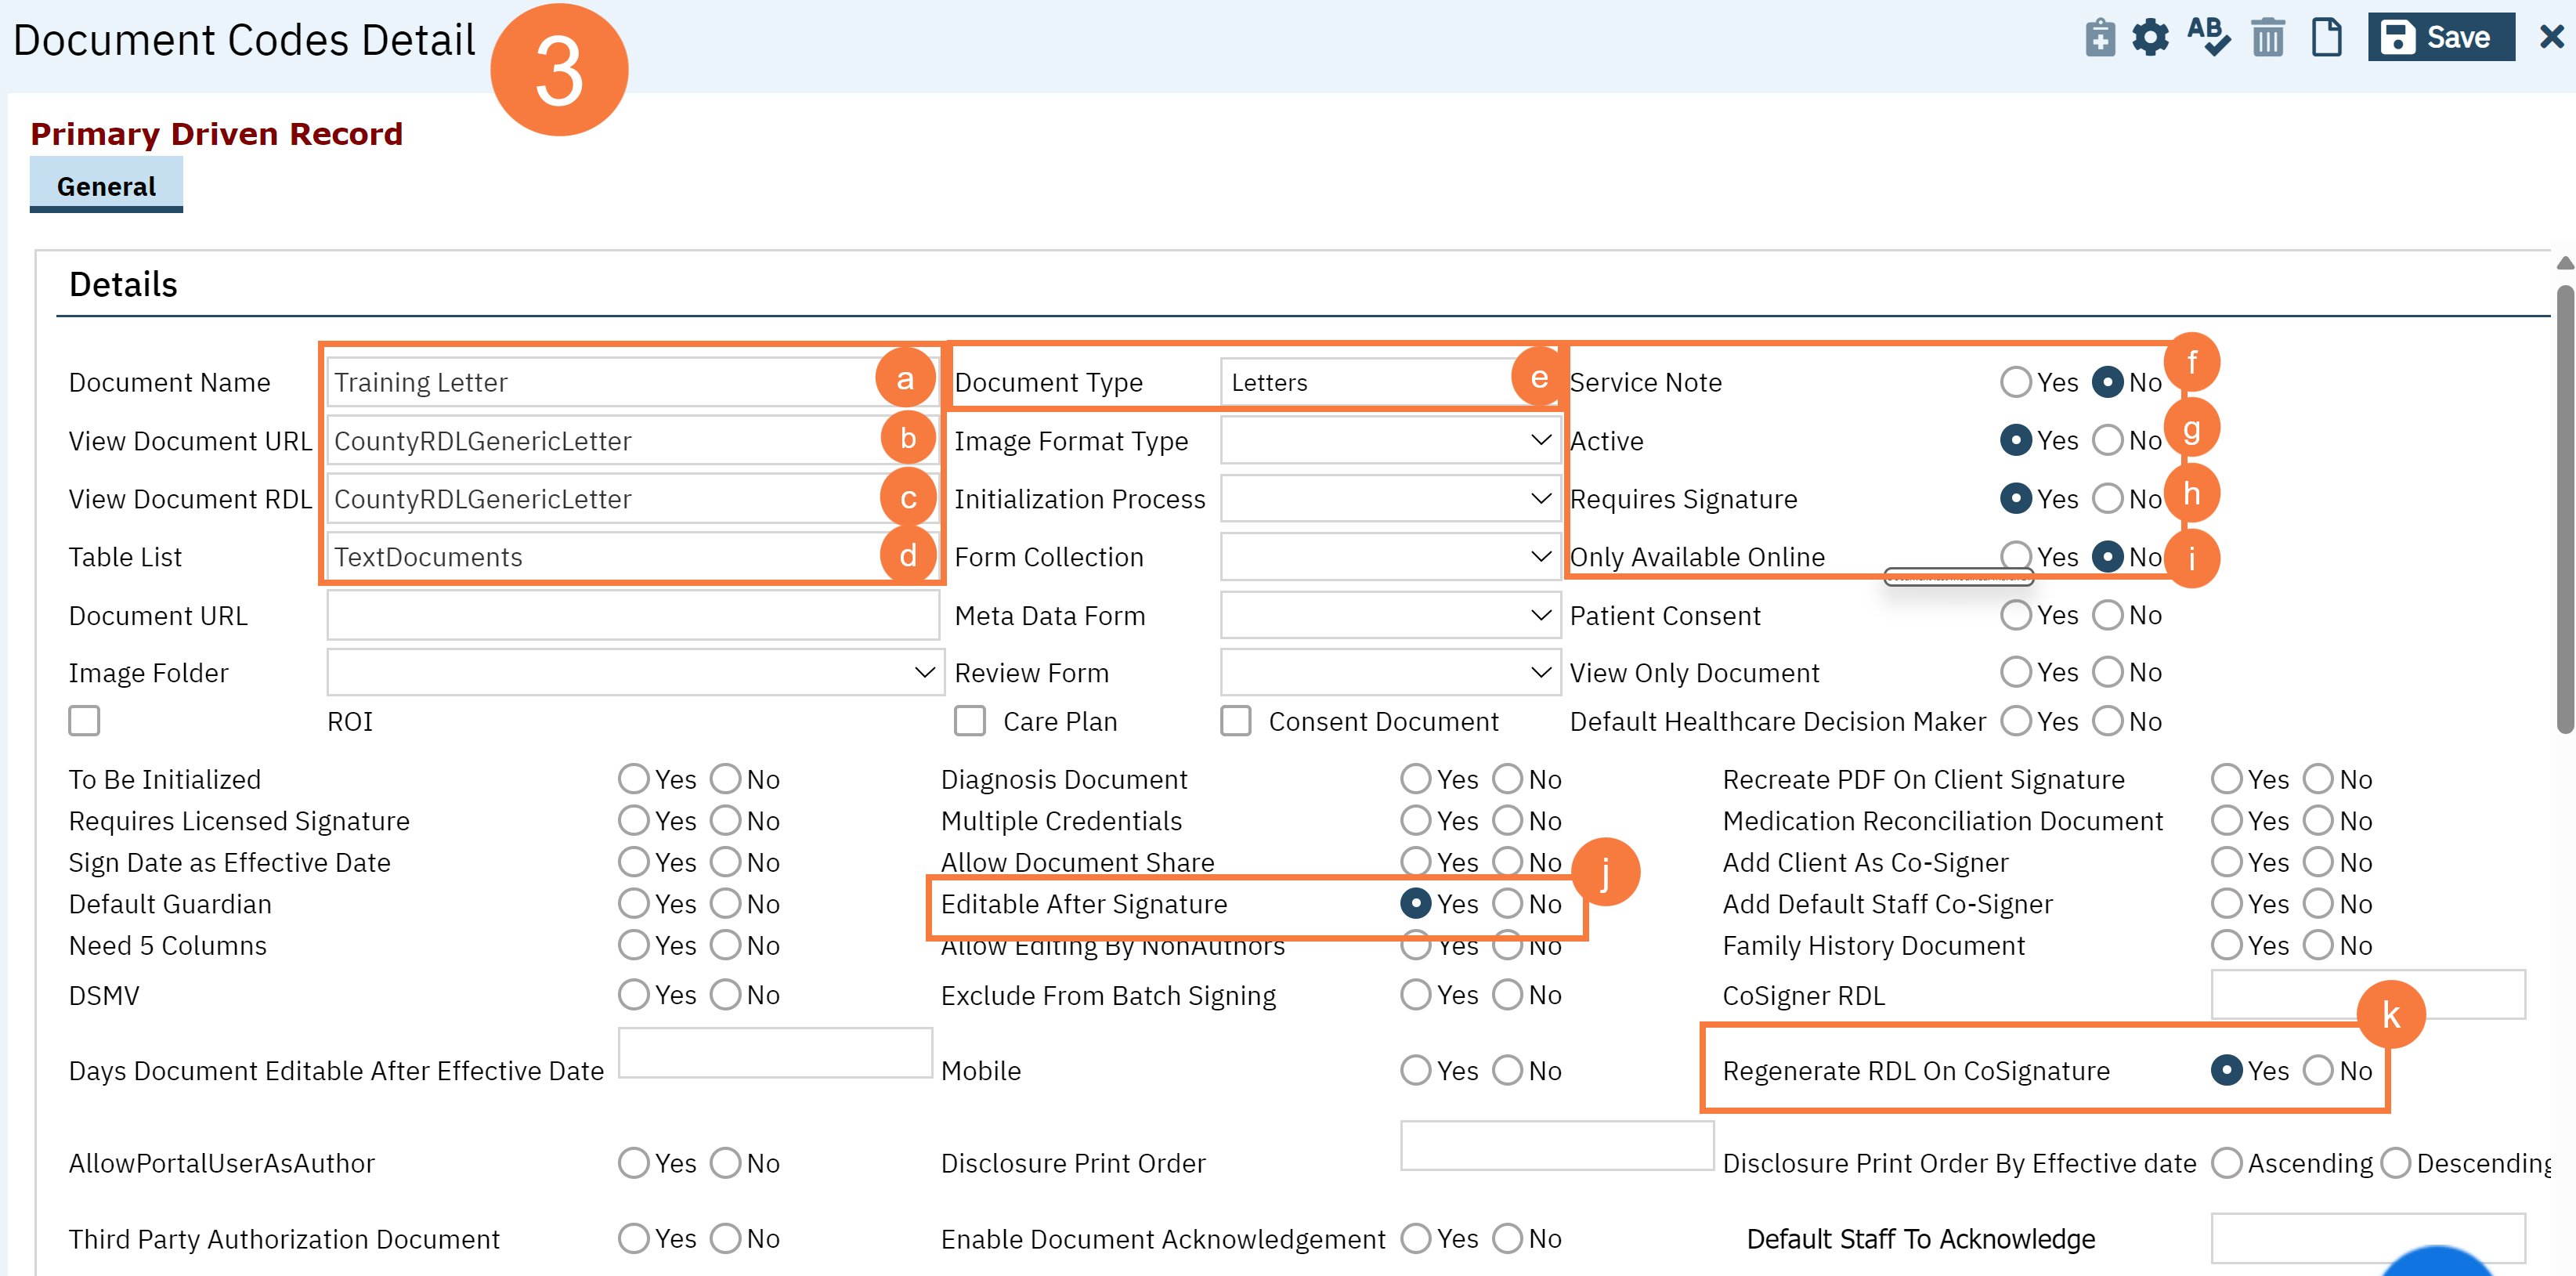
- This brings up the Document Codes Detail screen. In the Details section, set the fields below to the following values:
- Document Name: use the same name as the Letter Template Name in step 5 above
- View Document URL: CountyRDLGenericLetter
- View Document RDL: CountyRDLGenericLetter
- Table List: TextDocuments
- Document Type: Letters
- Service Note: No
- Active: Yes
- Requires Signature: Yes
- Only Available Online: No
- Editable After Signature: Yes
- Regenerate RDL on CoSignature: Yes
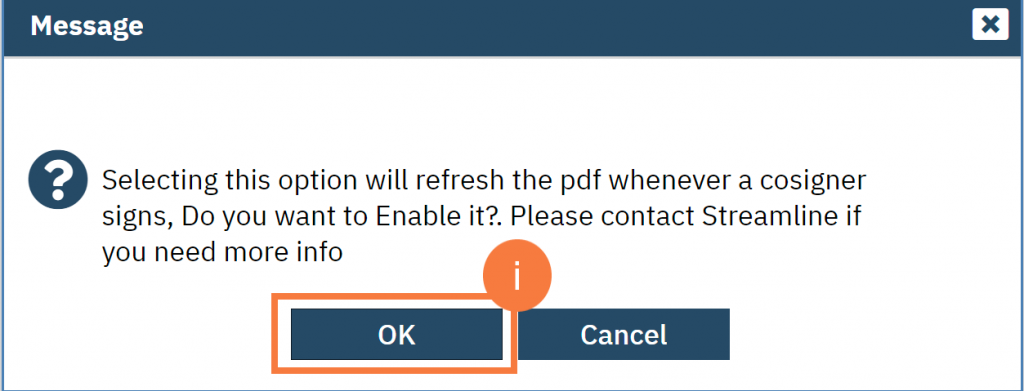
- Item k will result in a pop-up window alert. Click OK
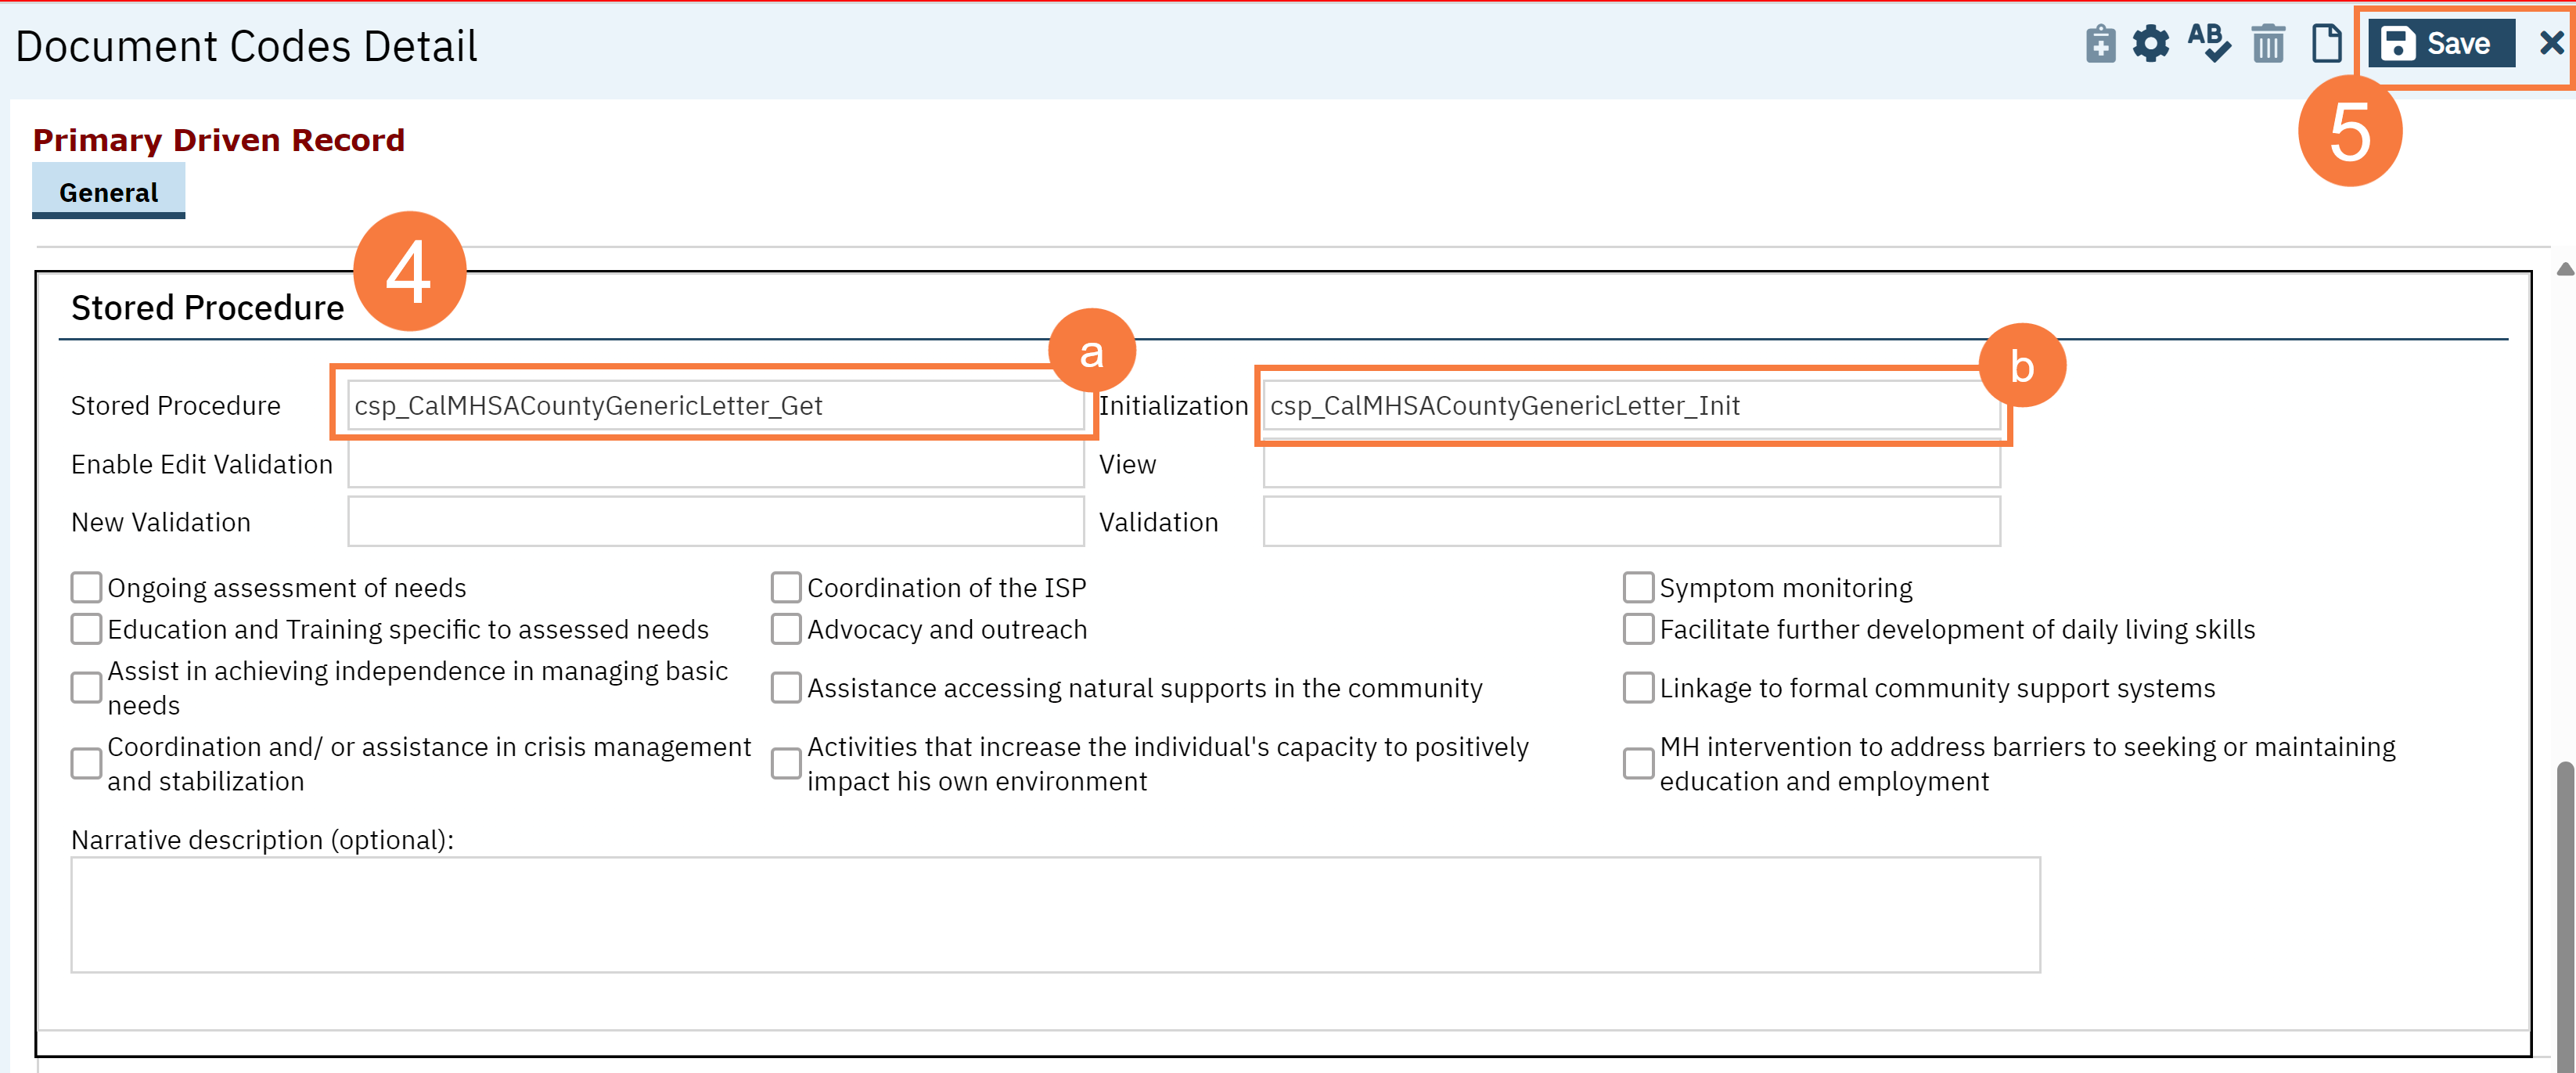
- In the Stored Procedure section, set the fields below to the following values:
- Stored Procedure: csp_CalMHSACountyGenericLetter_Get
- Initialization: csp_CalMHSACountyGenericLetter_Init
- Click Save and close.
Third: Create a Corresponding Screen
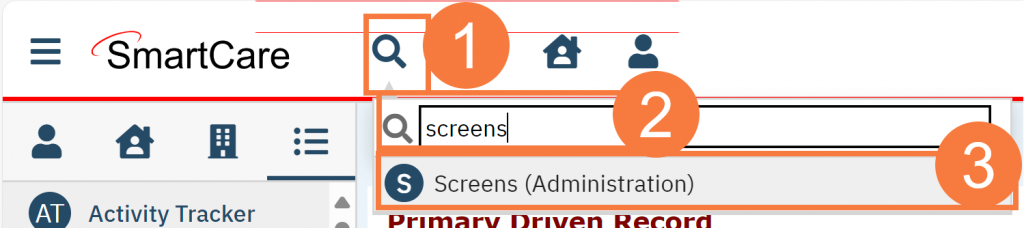
- Click on the Search icon.
- Type in “Screens” in the search bar.
- Select “Screens (Administration)” from the search results.
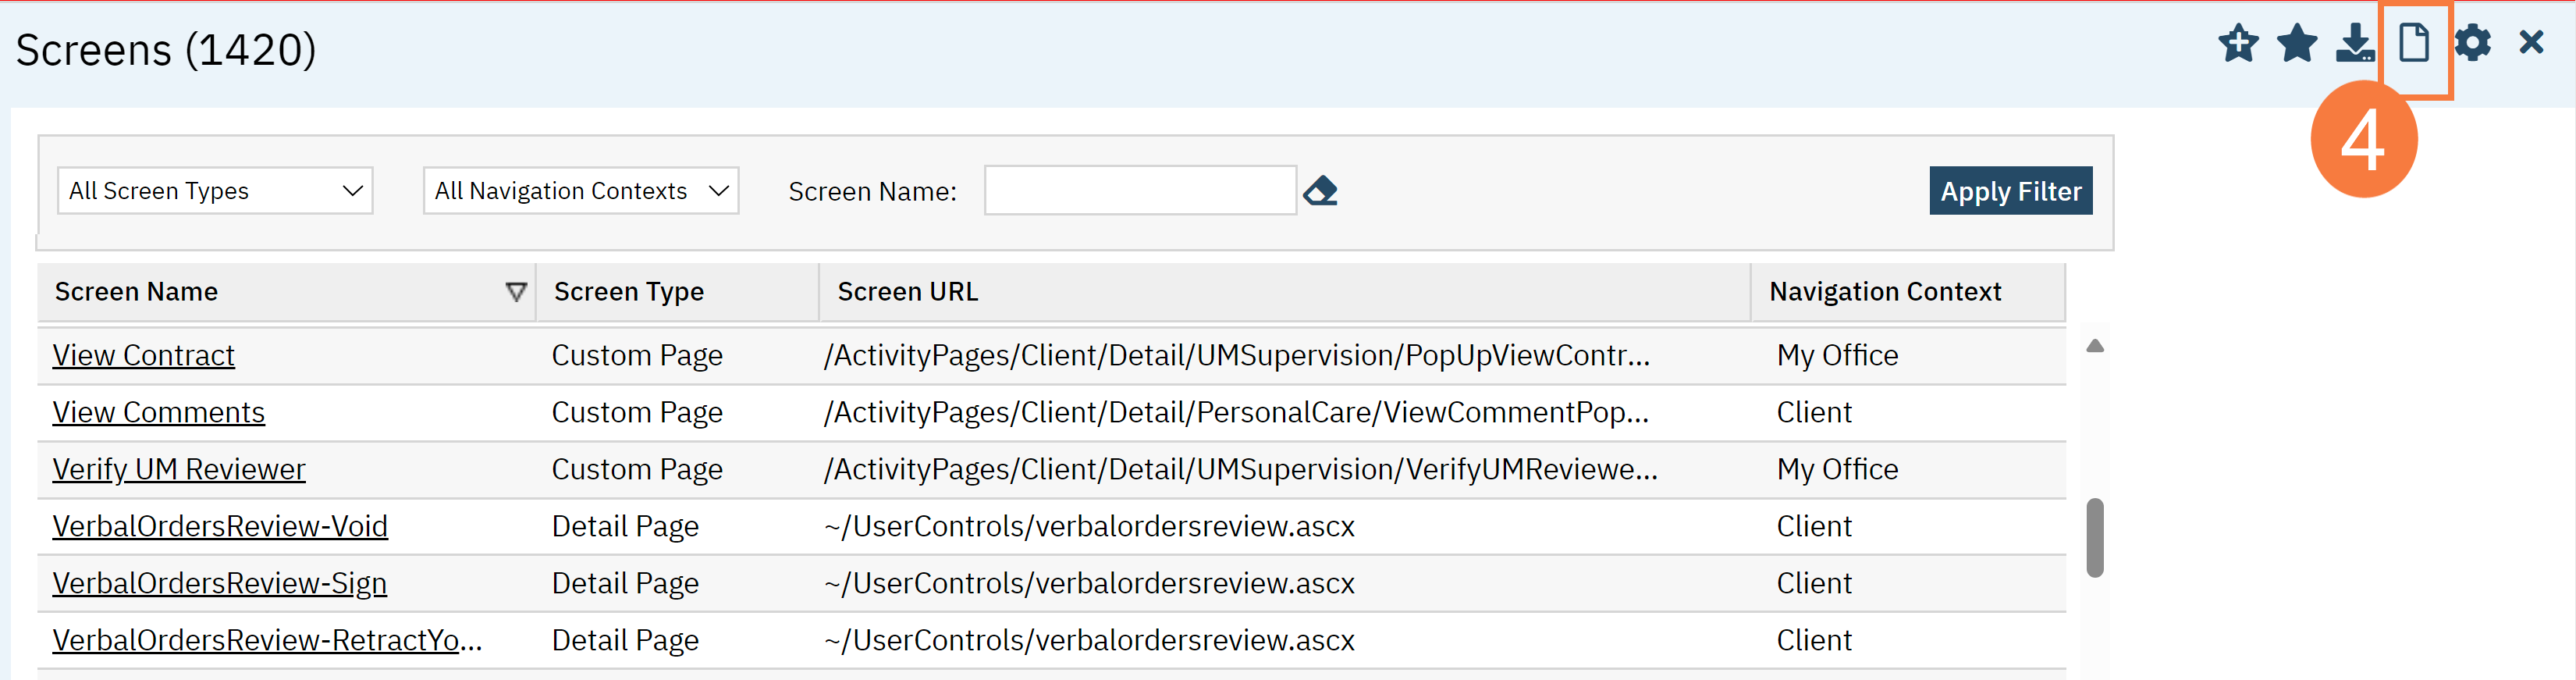
- This brings you to the Screens list page. Click on the New icon.
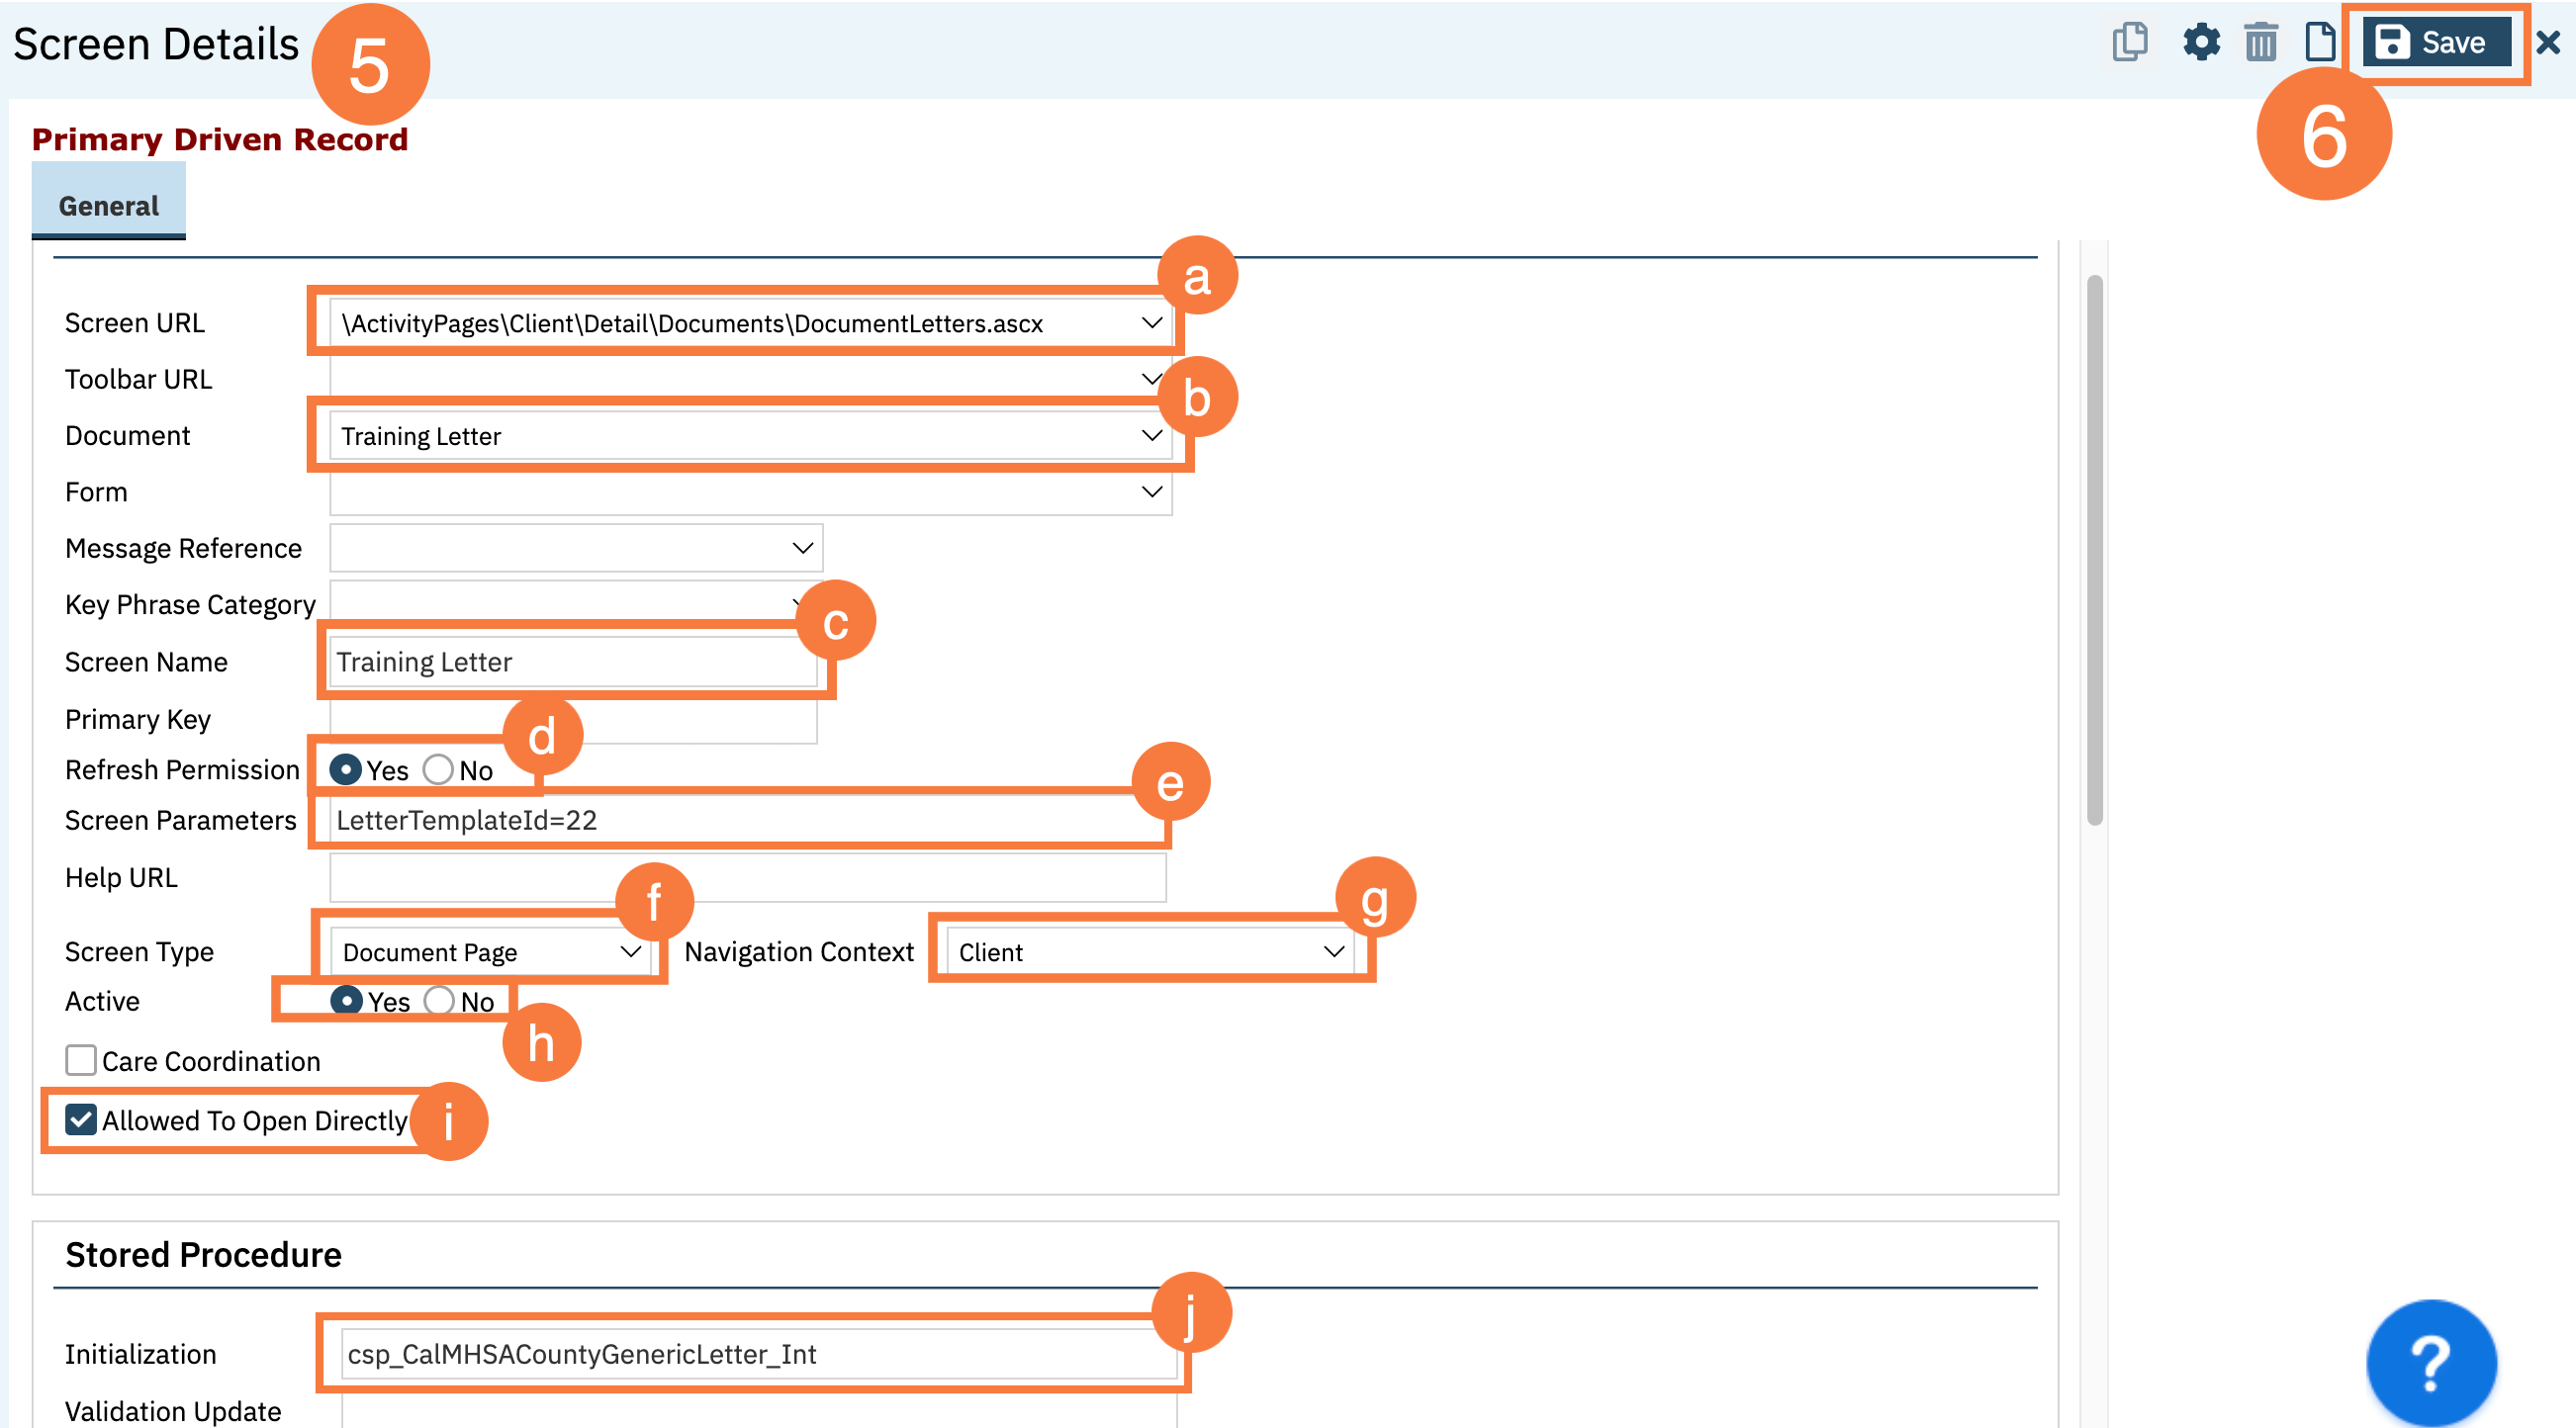
- This brings you to the Screen Details page. Set the fields below to their corresponding values:
- Screen URL: \ActivityPages\Client\Detail\Documents\DocumentLetters.ascx
- Document: select the corresponding document name from above.
- Screen Name: use the same name as the document and letter template
- Click Yes on Refresh Permission
- Screen Parameters: LetterTemplateId=xx instead of xx, use the template id you noted above
- Screen Type: Document Page
- Navigtion Context: Client
- Active: Yes
- Check “Allowed to Open Directly. This will allow users to find this screen when searching using the Search icon.
- Initialization: csp_CalMHSACountyGenericLetter_Init
- Click Save and close.
Fourth (optional): Create a Corresponding QuickLink
- Click on the Search icon.
- Type in “QuickLinks” in the search bar.
- Select “QuickLinks (Administration)” from the search results.

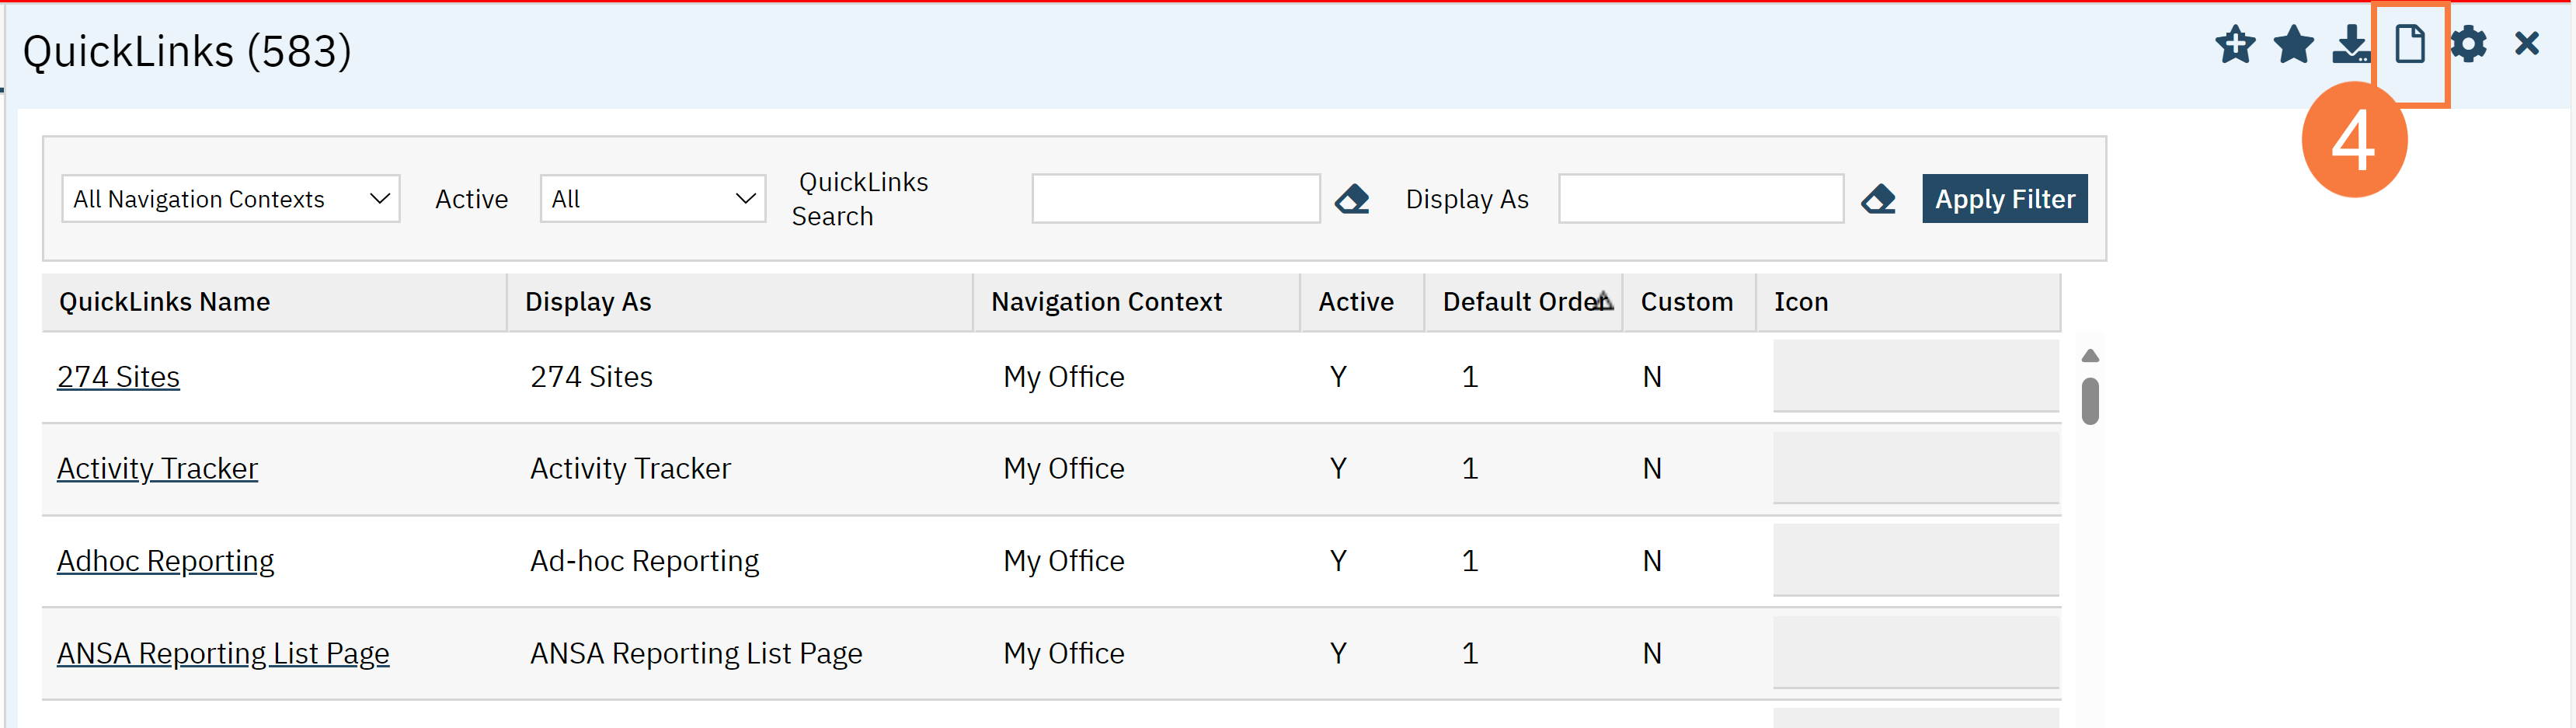
- This takes you to the QuickLinks list page. Click the New Icon.
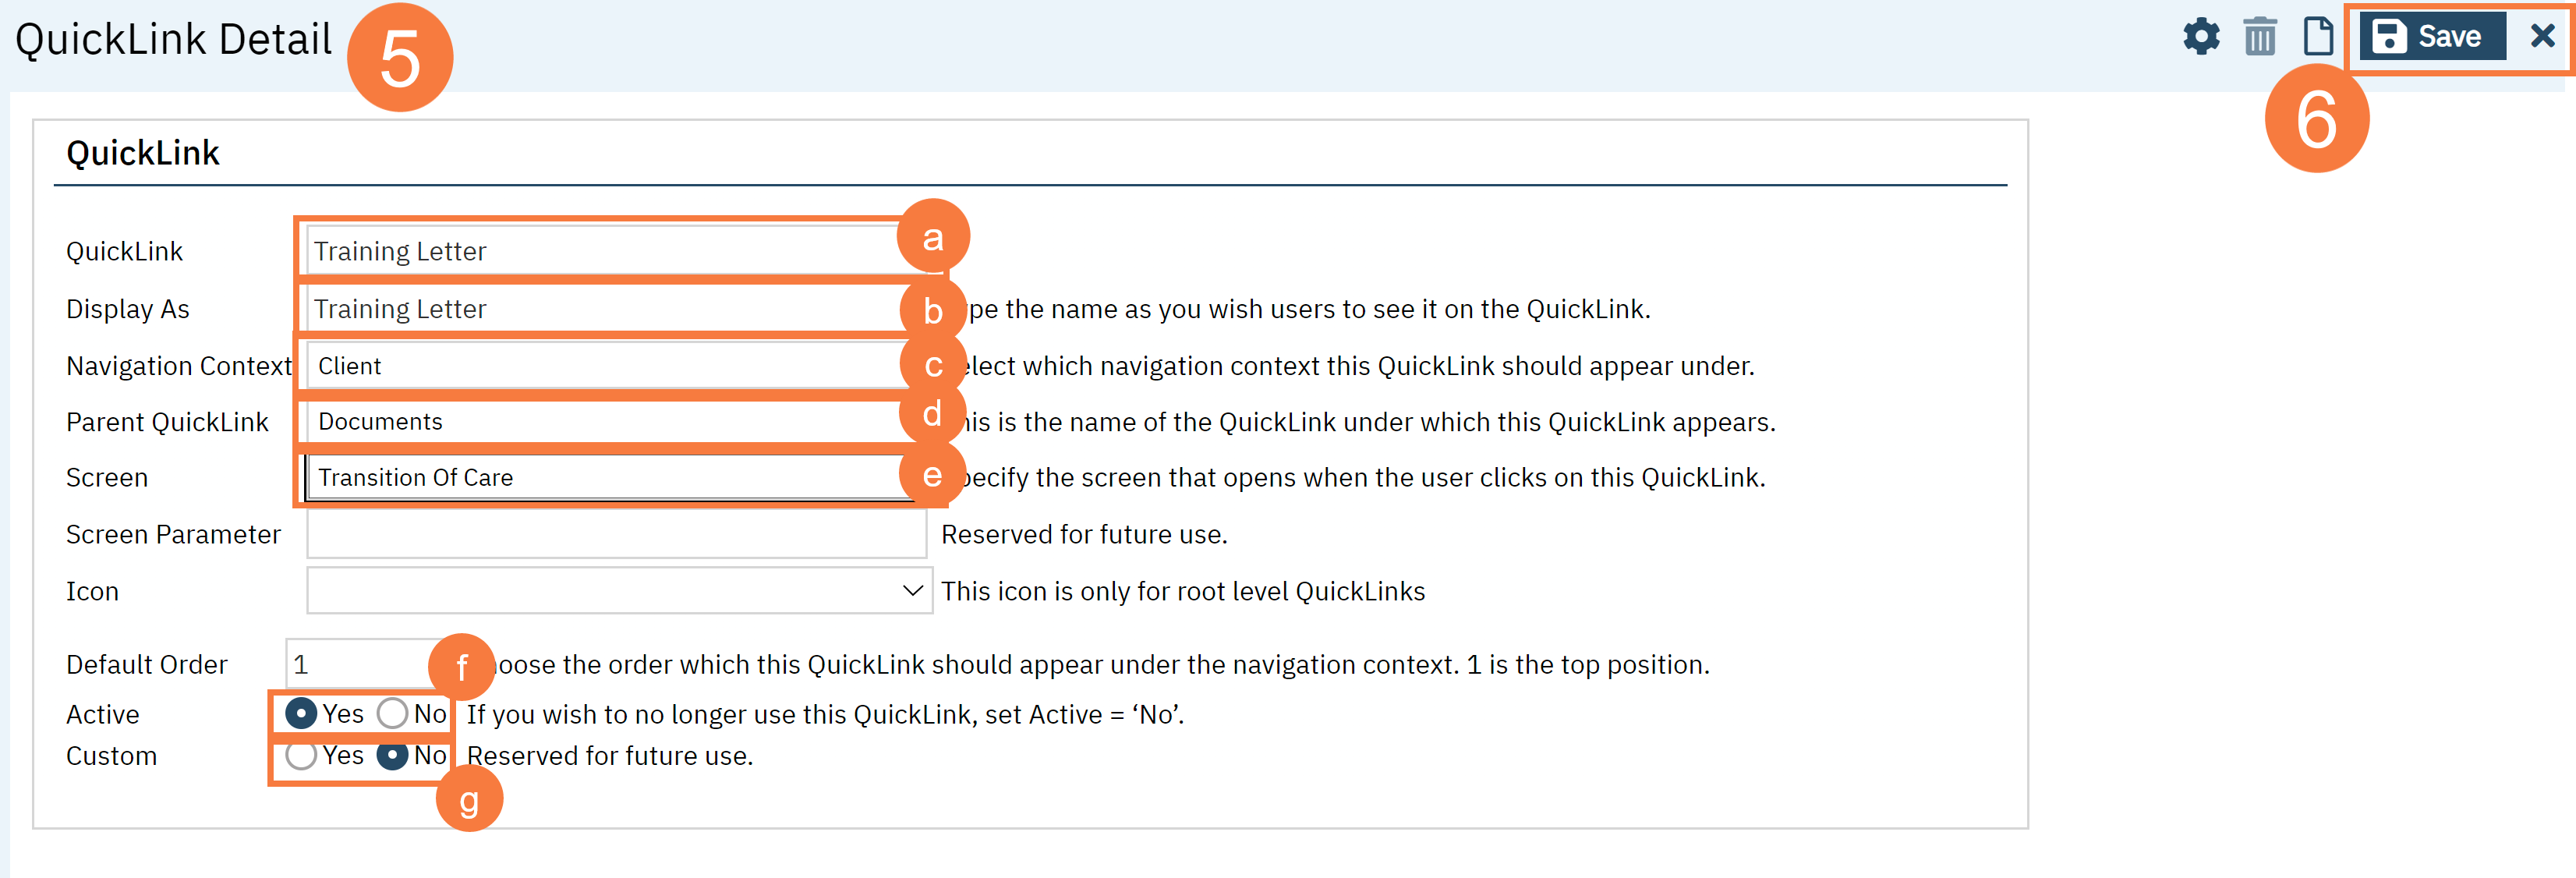
- This takes you to the QuickLink Detail page. Set the fields below to their corresponding values:
- QuickLink: use the same name as your letter, document, and screen from steps above
- Display As: use the same name as your letter, document, and screen from steps aboveNavigation Context: Client
- Navigation Context: Client
- Parent QuickLink: Documents
- Screen: select the corresponding screen name from above
- Active: Yes
- Custom: No
- Click Save and close
Fifth: Add Permissions to Appropriate User Roles
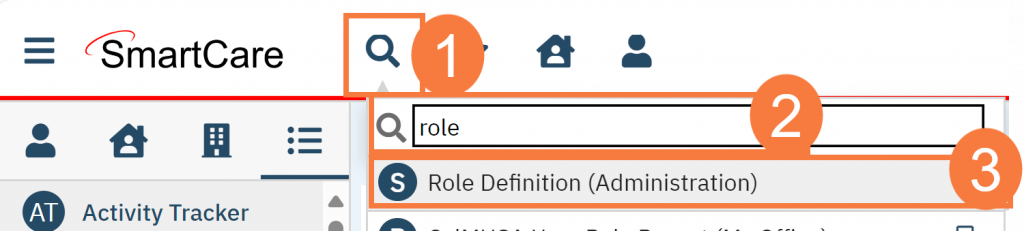
- Click on the Search icon.
- Type in “Role Definition” in the search bar.
- Select “Role Definition (Administration)” from the search results.
- This takes you to the Role Definition page. Follow the instructions on how to edit permissions: see How to Modify Permissions in a Role. Please note that you’ll have to do this for each role you want to give access to. You’ll also need to grant the following permissions in order for someone to fully access your new letter. If you did not create a QuickLink, you can ignore this permission type, as it will not be available for you.
| Permission Type | Parent |
|---|---|
| Screens | Client |
| Document Codes (Edit) * | N/A |
| Document Codes (View) | N/A |
| QuickLinks (optional) | Client |
*Note: If you do NOT want a user role to be able to create this letter, you can forgo the Document Codes (Edit).
- Last Updated: January 31, 2025