The CARE Act Reporting Document is vital to the CARE Act workflows in SmartCare, as it establishes the CARE Episode in SmartCare. The CARE Episode is defined by the specific CARE Act case that the client is involved in. Over time, the client may have multiple CARE Act cases, which would result in multiple CARE Episodes. However, a client may only be involved in one CARE Act case and therefore one CARE Episode at any given time.
Beyond establishing the CARE Episode, state reporting requires monthly data collection for every client involved in the CARE Act. Since the reporting periods are monthly, generally the CARE Act Reporting Document will be completed after the reporting period ends. For example, for the reporting period of September 2024 (data pertaining to date 9/1/24 – 9/30/24), the CARE Act Reporting Document will be completed in October 2024 (after 9/30/24).
The exception to completing the CARE Act Reporting Document after the reporting month is when the client moves from the Initiation Period to the Active Period within the month. In this case, 2 CARE Act Reporting Documents are required for that month – one for the Initiation Period information to establish a baseline and the second for the Active Period information.
Even after the client exits the CARE process, there is a 12-month follow-up period where monthly reports are still required for that CARE Episode. If the client terminates early (e.g. before the 12-months are up), then the month in which termination occurs is the final month that must be reported for that client’s CARE Episode. When a new CARE Episode starts, the reporting process must start from the beginning, as this would be considered a new initiation period.
How to Complete the Initial CARE Act Reporting Document
- With the client open, navigate to the CARE Act Reporting Document.
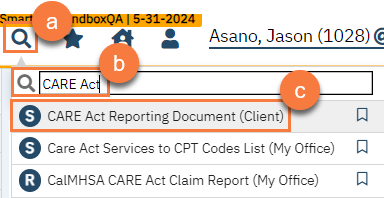
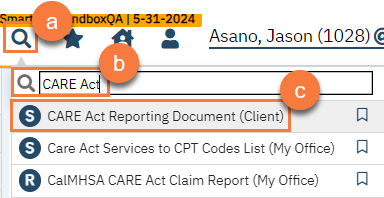
- Click on the search icon.
- Type in “CARE Act Reporting” in the search bar.
- Click to select “CARE Act Reporting Document (Client)” from the search results.
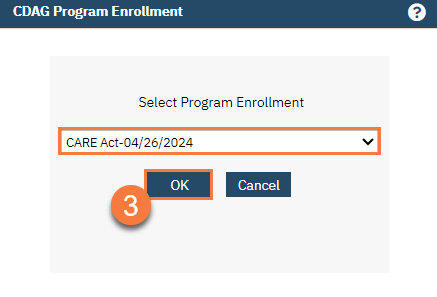
- If this is the client’s first CARE Act case, this will automatically bring up the CDAG Program Enrollment window to popup. Select the appropriate CARE Act program enrollment from the dropdown and click OK.
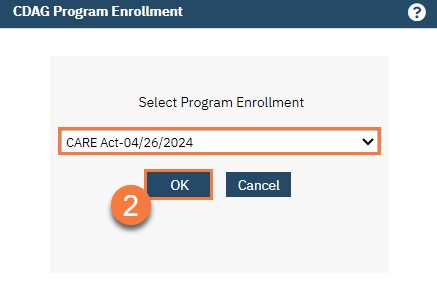
- If the client had a previous CARE Act case, this will bring up the most recent CARE Act Reporting Document. Click on the New button. This will then bring up the CDAG Program Enrollment window. Select the appropriate CARE Act program enrollment from the dropdown and click OK.

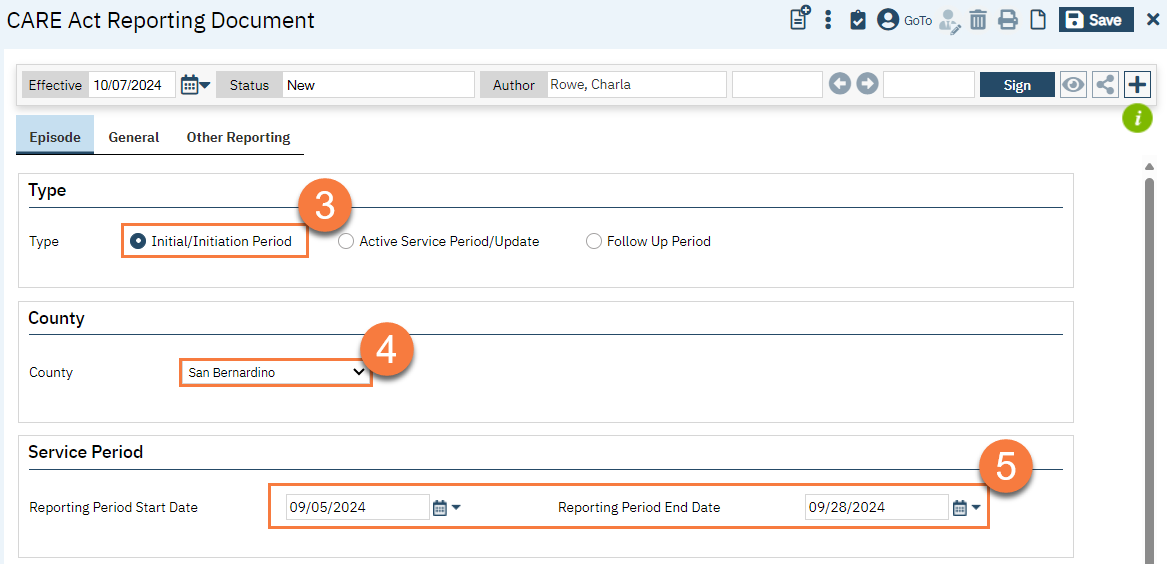
- This brings you to the CARE Act Reporting Document screen. You’ll start on the Episode tab. In the Type section, select “Initial/Initiation Period”.
- In the County section, your county should be automatically selected. If the county is incorrect, contact your system administrator.
- In the Service Period section, enter the reporting period start date and end date. For this first document, use the petition date as the start date.
- If the client is still in the Initiation Phase at the end of the month, enter the end of the month date as the end date.
- If the client transitioned from the Initiation Phase to the Active Phase during this month, enter the date before the client transitioned to the Active Phase in the end date. For example, if the client started the active phase on 9/15/24, enter 9/14/24 as the end date for the CARE Act Reporting Document associated with the Initiation Period.
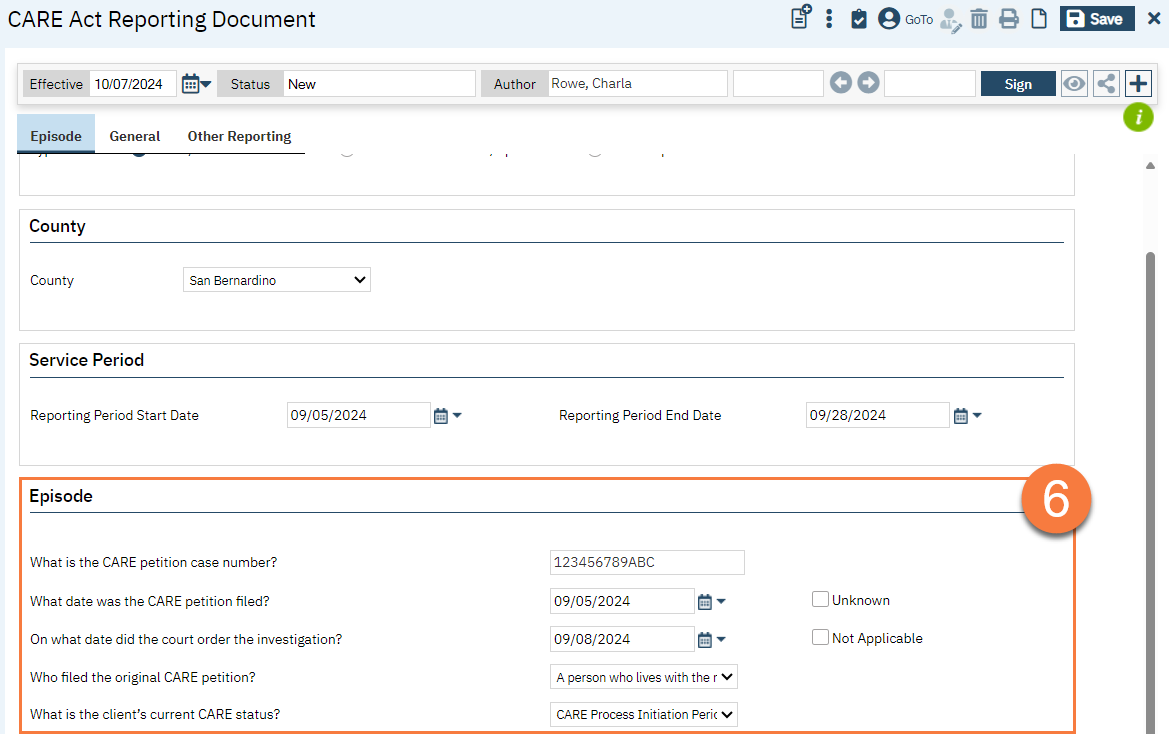
- Complete the Episode section
- Enter the CARE petition case number and the date the CARE petition was filed. If you don’t know the date the petition was filed, check the “Unknown” box to the right of the field.
- Enter the date the court ordered the investigation. If this isn’t applicable, click the “Not Applicable” box to the right of the field.
- Enter the type of person who filed the original CARE petition. This is a CARE Act specific dictionary for state reporting.
- The CARE status should automatically be filled as “CARE Process Initiation Period”. Confirm this is correct.
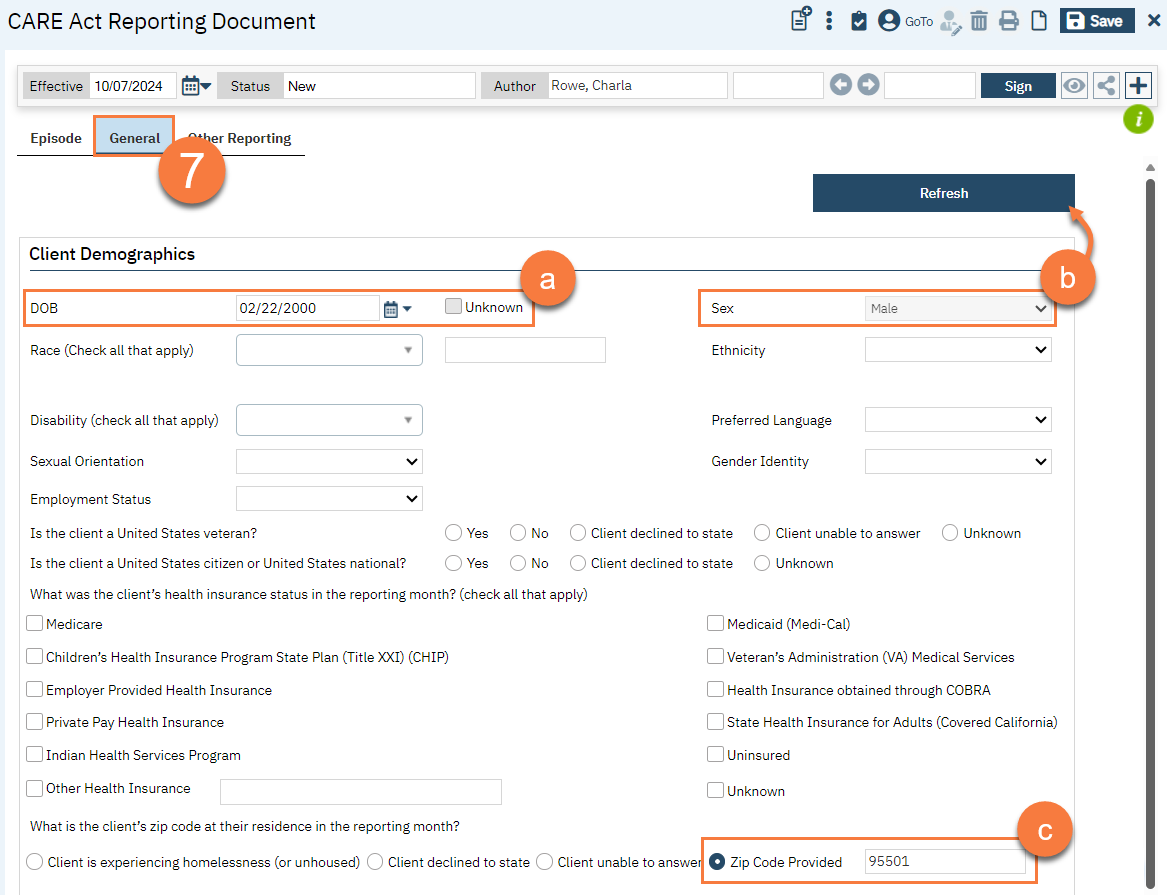
- Click on the General tab. Complete the Client Demographics section. Most demographic fields currently do not pull from the Client Information screen. This is because CARE Act data reporting uses specific state-defined data dictionaries that do not map well to other global codes used. Below are some exceptions:
- The client’s date of birth (DOB) will pull forward from the Client Information screen. Since this is required to create a client, sometimes a pseudo-DOB is used. If the client’s real DOB is unknown, delete the date in the field and check the “Unknown” checkbox to the right of the field.
- The client’s sex will pull forward from the Client Information screen. If this field is blank, navigate to the Client Information screen and update the client’s sex there. Once completed, navigate back to this document and click the “Refresh” button at the top of the screen. Any changes made on the Client Information screen that feeds this screen will re-initialize the data forward.
- If the client has an address that includes a zip code in the Client Information screen, this will pull forward into the Zip Code Provided option of the client’s zip code. If this doesn’t exist, you’ll have to select a different option.
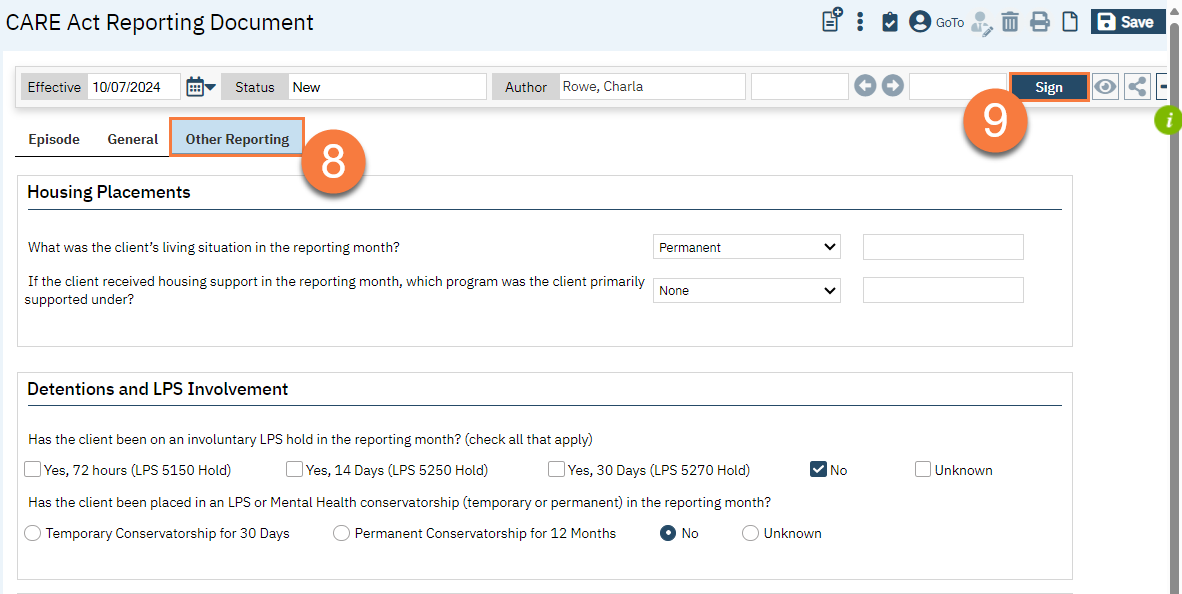
- Click on the Other Reporting tab. Complete all sections.
- For some fields, there is an extra text field for use when “Other” is selected in the corresponding dropdown. If “Other” is not selected but this field is still showing, leave this field blank. CalMHSA is working on getting these to only show when “Other” is selected.
- Click Sign.
How to Complete a Subsequent CARE Act Reporting Document
- With the client open, navigate to the CARE Act Reporting Document.
- Click on the search icon.
- Type in “CARE Act Reporting” in the search bar.
- Click to select “CARE Act Reporting Document (Client)” from the search results.
- This will bring up the most recent CARE Act Reporting Document. Click on the New button.

- This will bring up the CDAG Program Enrollment window to popup. Select the appropriate CARE Act program enrollment from the dropdown and click OK.
- This brings you to the CARE Act Reporting Document screen. You’ll start on the Episode tab. In the Type section, select the appropriate type.
- In the County section, your county should be automatically selected. If the county is incorrect, contact your system administrator.
- In the Service Period section, enter the reporting period start date and end date.
- If the client transitioned from the Initiation Phase to the Active Phase during this month, enter the date the client transitioned to the Active Phase in the start date and enter the last date of the month in the end date. For example, if the client started the active phase on 9/15/24, enter 9/15/24 as the start date and enter 9/30/24 as the end date for the CARE Act Reporting Document.

- Select the CARE Episode.
- This will bring up a confirmation message. Confirm you’ve selected the correct CARE Episode and click OK.

- This will lock the CARE Episode field and bring in information from the previous CARE Act Reporting Document for this client for this CARE Episode, including demographic information. The system will show a “processing” alert until the initializations have all been completed.
- Enter the client’s current CARE status.
- Click Save.

- Click on the General tab.
- Depending on the Type of report selected in step 4 above, there may be different questions showing in the CARE Plan/Agreement & Graduation section. Complete all fields that are showing.
- Complete the Client Demographics section. Most information will have pulled forward from the previous CARE Act Reporting Document. Confirm the information is correct and make changes as necessary. Some fields will not pull forward, as this information can change month to month. Make sure all fields are completed.
- Design currently didn’t have health insurance or employment status pulling forward, as this may change month to month, but CalMHSA is requesting this design change.

- If the type of this document is “Active Service Period” (see step 4 above), another tab will be available. Click on the Services and Supports tab. There are sections for each category of service types for CARE Act reporting that include all the specific services tracked by CARE Act reporting. For each service, there are 3 main columns:
- Services in CARE Plan/Agreement
- This should automatically populate based on the corresponding CARE Plan/Agreement that exists in SmartCare for this client, for this CARE Episode, for this reporting period.
- Services Provided
- This should automatically populate based on any services that have been completed for this client, for this reporting period. The system will only count services that have been “completed”, meaning services that are in progress will not count.
- Service in Plan Not Provided
- i. This should automatically populate based on a combination of a and b above. If the service is in the CARE Plan/Agreement (a) but does not have a corresponding service (b), then this box will automatically be checked.
- ii. If this is selected, then a subsequent column is activated: “Reason not provided”. Select the reason the planned service wasn’t provided. If you select “Other”, enter the details in the last column “Other – why not provided”.
- Services in CARE Plan/Agreement
If the information that’s been pulled forward is incorrect, you may make changes. It’s possible that a service was provided too recently and a service note has not yet been completed. In order to make sure staff can complete their state reporting on time, CalMHSA wanted to ensure that staff had flexibility in completing this section.
Some sections may have additional questions at the bottom of the section. Complete all sections fully. There are fields for “unknown” and “none” if needed.

- Click on the Other Reporting tab. Complete all sections.
- Click Sign.

Updated 1/9/25
