
Electronic Prior Authorization (ePA) in CalMHSA Rx – How it Works
When you finalize a prescription, the system automatically detects whether prior authorization (PA) is required and initiates the process. You no longer need to manually click a button to start a PA.
Once initiated, all prior authorization activities are managed within a dedicated dashboard that opens directly in CalMHSA Rx, allowing you to complete the process without leaving your prescribing workflow.
The electronic prior authorization (ePA) process works regardless of how you begin prescribing. You do not need to start a new prescription for ePA to apply. If a medication requires prior authorization, the process will be triggered when the prescription is finalized, whether you start the prescription by:
- Create New Rx: Search for a medication and select the appropriate dose.
- Favorites: Select a medication from your saved Favorites list.
- Renew: Renew a medication from the Active Medications list.
- Prescribe: Select Prescribe for a medication from the Active Medications list.
Create and Review the Prescription
In this example, the prescription is created using Create New Rx.
Complete the Sig screen, then select Review.
Before proceeding, verify that the following fields are completed:
- Quantity
- Quantity Unit
- Days Supply
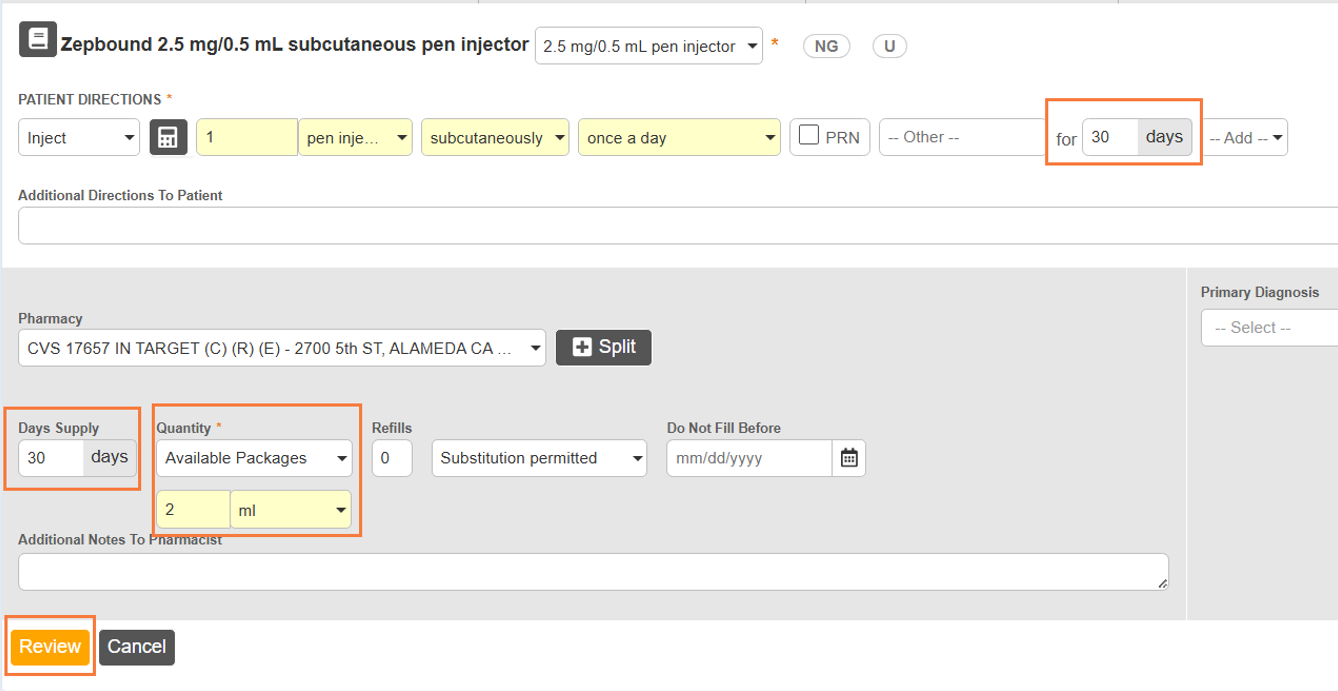
These fields are required for the system to perform a real-time benefit check. The results of this check determine whether prior authorization (PA) is required. If a PA is needed, the system automatically initiates the electronic prior authorization (ePA) process.
Note: If you are renewing or prescribing from the active medications list, these fields may already be pre-populated from the previous prescription. Review them for accuracy before proceeding.
After completing the Sig screen, select Review.
On the Review Prescription page, the system displays the results of the real-time benefit check. If prior authorization (PA) is required, you’ll see a message confirming that the system is automatically initiating the electronic prior authorization (ePA) process. No additional action is needed—the message is provided for your awareness.
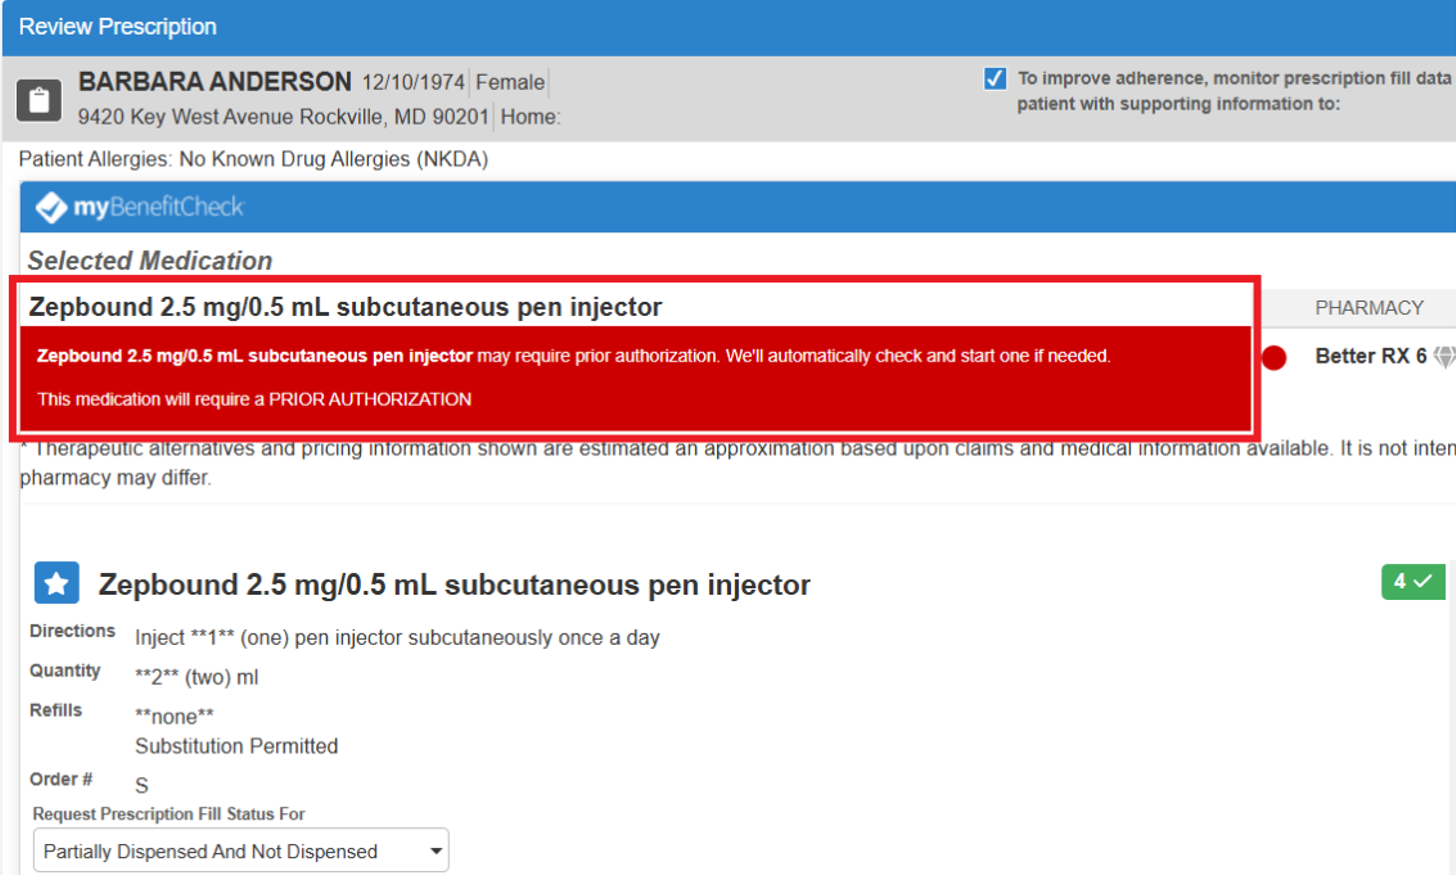
When you are ready, finalize your prescription by selecting one of the following:
- Send
- Send & Print
- Print Don’t Send
- Sign Don’t Send
After the prescription is finalized, the electronic prior authorization (ePA) process begins automatically in the background. The system creates the prior authorization task and submits it to the appropriate payer. You can continue working in CalMHSA Rx without interruption.
Monitor Your Prior Authorizations
Once ePA has been initiated, you can track your prior authorization workload at any time using the Mortar and Pestle icon in the top navigation bar of CalMHSA Rx.
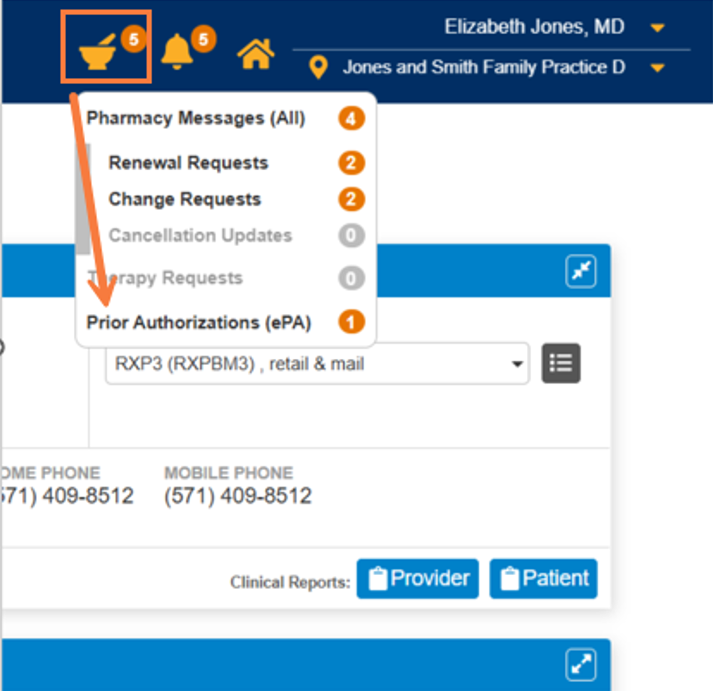
The badge on this icon communicates your current PA workload at a glance:
- An orange badge with a number means one or more prior authorizations are waiting for your attention. The number reflects the total count of open PA tasks across all of your associated NPIs at your current location.
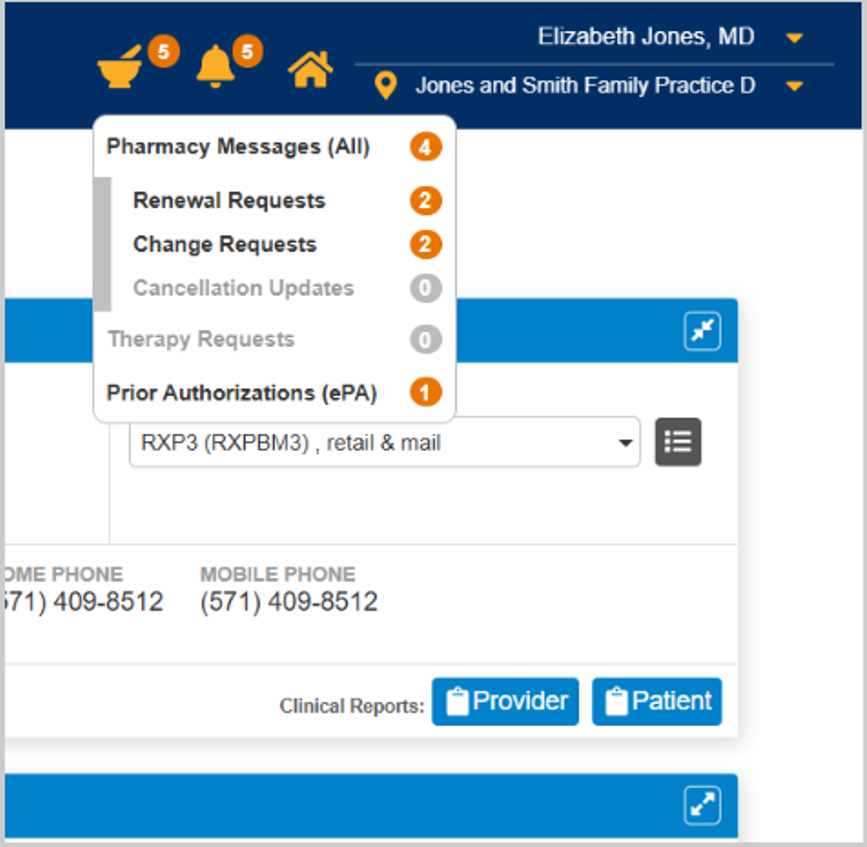
- A grey icon with no countmeans there are no prior authorizations currently requiring action. When the badge is grey, the icon is inactive and cannot be clicked.
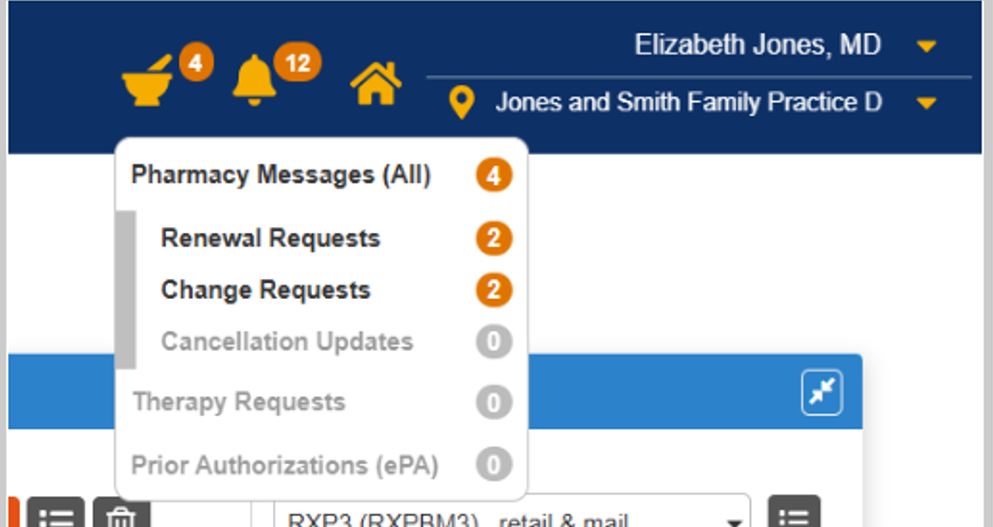
The badge updates automatically throughout your session to reflect your current prior authorization (PA) workload.
Updates occur when you:
- Sign in
- Change locations
- Load a patient
- Close the Prior Authorizations dashboard
Important: The badge displays the total number of open prior authorizations associated with your NPIs at your current location. It is not limited to the patient currently displayed.
Open and Manage the Prior Authorizations Dashboard
When the mortar and pestle icon displays an orange badge, click it to open the Prior Authorizations (ePA) dashboard. The dashboard opens as a full-screen overlay within E-Prescribing Desktop, allowing you to manage prior authorizations without leaving the application or opening a separate browser window.
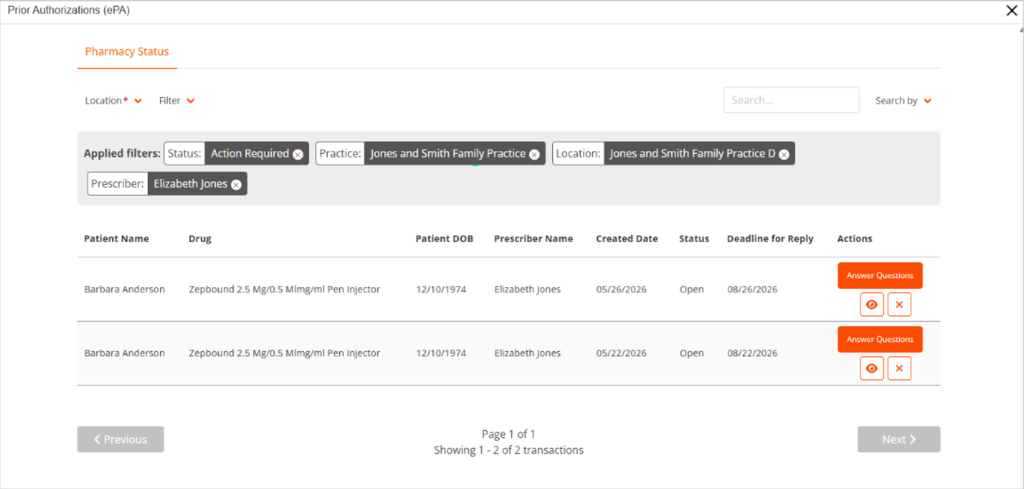
Your identity is automatically authenticated through Single Sign-On (SSO) using your active CalMHSA Rx session. No additional sign-in is required.
From the Prior Authorizations (ePA) dashboard, you can:
- View all active prior authorization cases and their current statuses.
- Respond to payer questions or requests for additional information.
- Review approved, denied, or cancelled prior authorization decisions.
- View case details and track the history of any prior authorization in your workload.
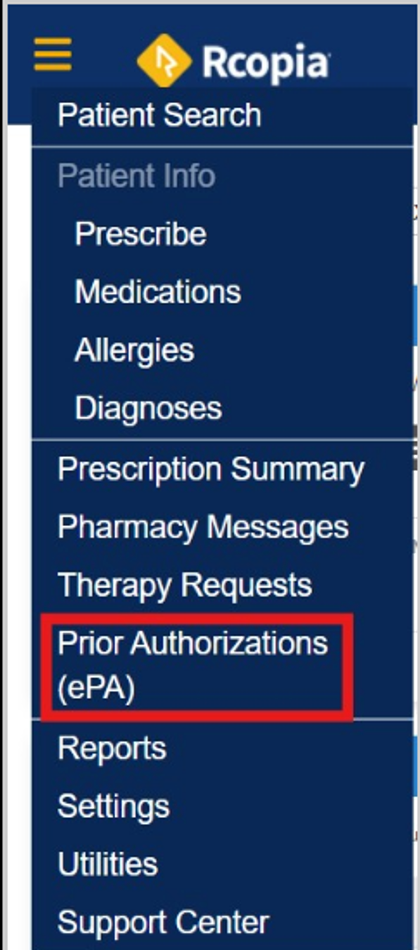
You can open the Prior Authorizations (ePA) dashboard at any time, even when the badge count is zero. To do so, select Prior Authorizations (ePA) from the Menu (≡) in the upper-left corner of the screen.
This allows you to review the status of existing prior authorizations or look up previously completed cases.
Respond to Payer Decisions and Requests
If the payer requires additional information to review a prior authorization request, they will return a question set for you to complete. When this occurs, the case status in the Prior Authorizations dashboard changes to Action Required, and the mortar and pestle badge count increases to indicate that your attention is needed.
Action Required is the status that most often requires provider intervention. Until the question set is completed and submitted, the payer cannot begin reviewing the prior authorization request.
Electronic prior authorizations (ePAs) are initiated automatically when you finalize a prescription that requires prior authorization. The system manages the initiation process in the background and notifies you only when additional information is needed from the payer.
What to Do When You See Action Required
Click the Mortar and Pestle icon, then click Prior Authorizations (ePA) to open the Prior Authorizations (ePA) dashboard.
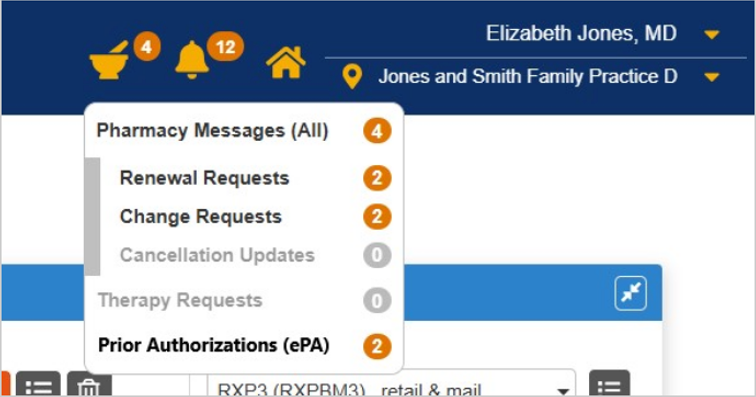
- Locate the case with a status of Answer Questions. This status indicates that the payer has requested additional information before the prior authorization can be reviewed.
If you’re managing multiple cases, use the filters or search bar at the top of the dashboard to locate the appropriate case. You can filter by Location, Status, Created Date, or Provider, or search by Prescriber Name or Patient Last Name
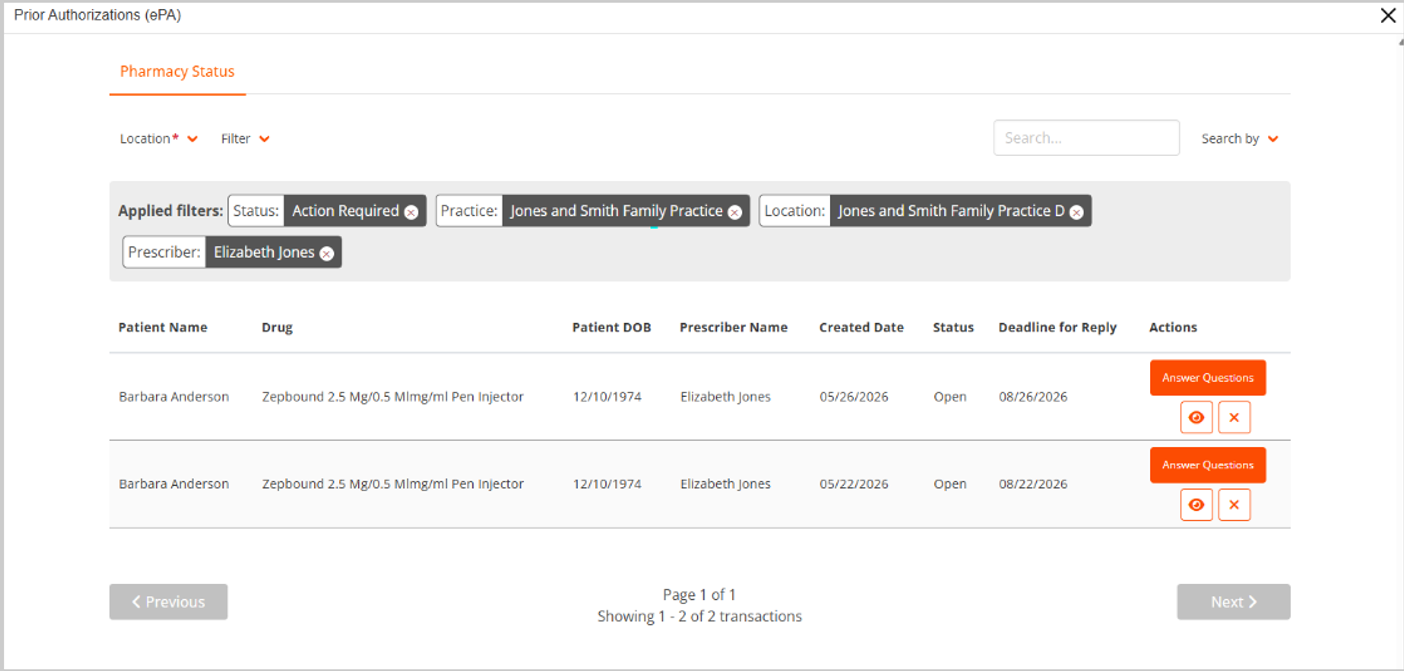
- To view details about the Prior Authorization, click the Eye
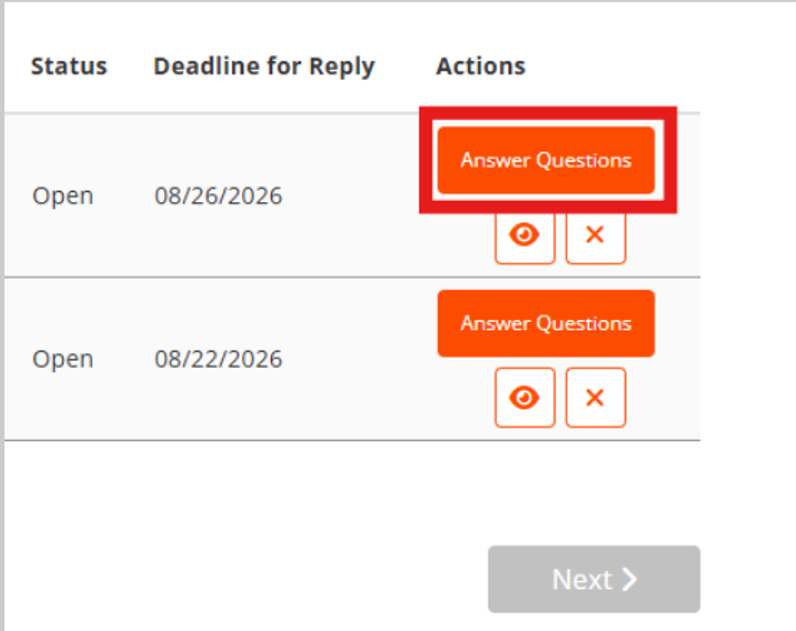
- Click the Answer Questions button on the case to add attachments and open the question set
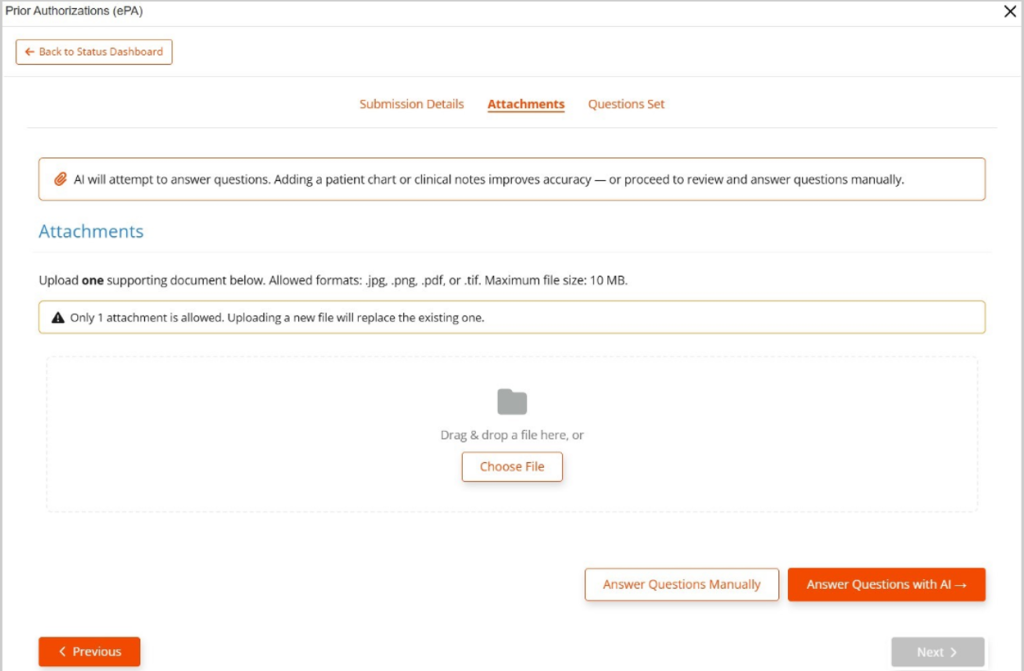
- Before answering, you can attach relevant clinical documentation at the top of the question set by selecting Choose File. Uploading documentation allows DrFirst to use the clinical content to help auto-populate responses, reducing the time needed to complete the question set.
- Once your desired attachments are uploaded, click Answer Questions with AIto launch the question set
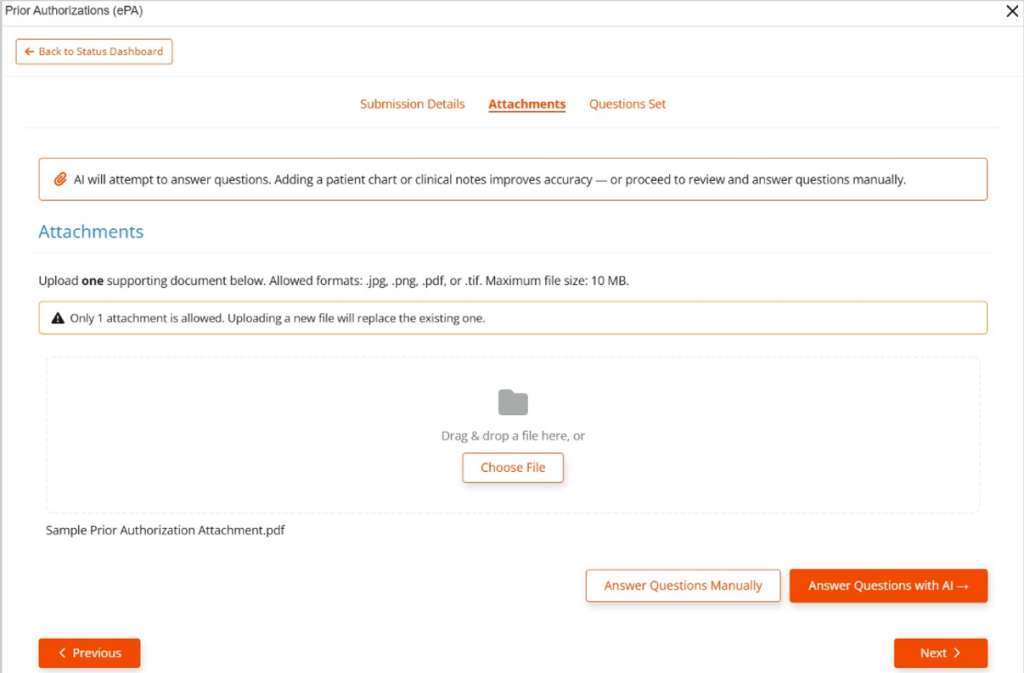
- If clinical documentation was attached, the system pre-populates answers based on that content.
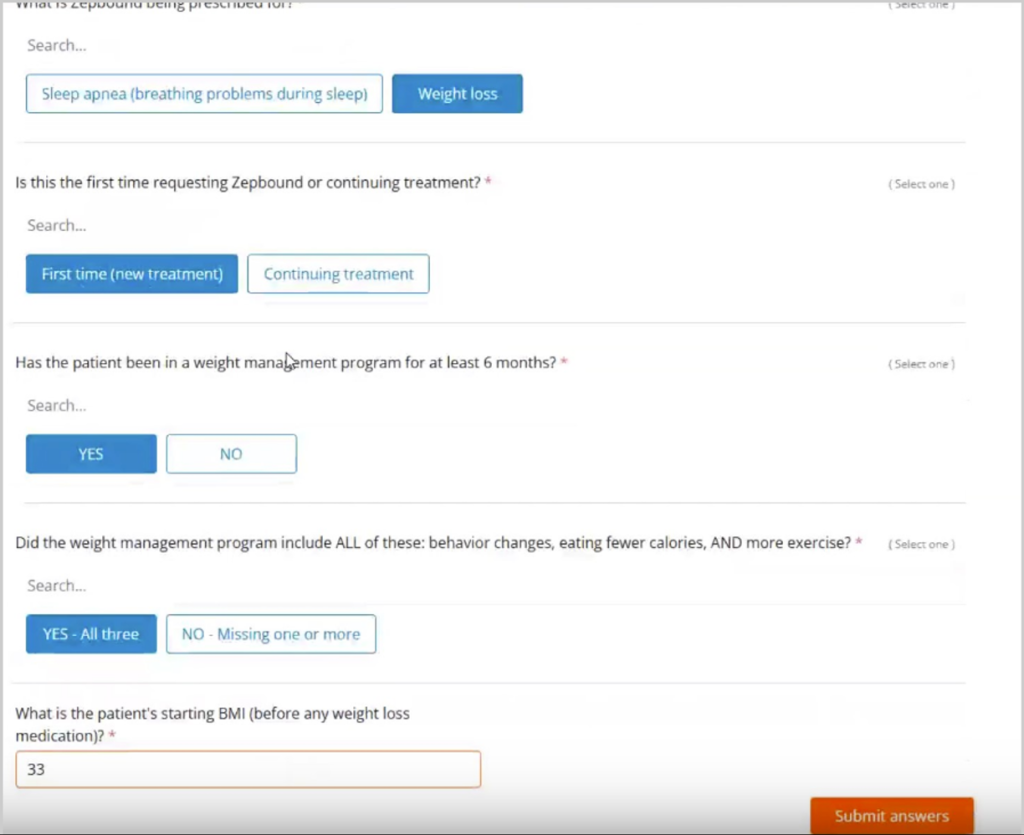
- Review each pre-populated answer for accuracy. Make any necessary corrections, then complete any questions that were not auto populated.
- Select Submit Answers to send your responses to the payer.
- To close the dashboard and return to CalMHSA Rx, select the X in the top-right corner of the overlay, press ESC, or click outside the overlay. The badge count will automatically refresh when the dashboard is closed.
What Happens Next
After submission, the case moves into payer review. No further action is required unless the payer requests additional information or issues a decision. You can monitor case progress at any time from the Prior Authorizations dashboard. For details on status meanings, see Review Decisions and Track Cases.
Review Decisions and Track Cases
Once a prior authorization is submitted, it moves through a series of payer-defined statuses based on review activity. You can track its progress at any time by opening the Prior Authorizations dashboard from the mortar and pestle icon or by selecting Prior Authorizations from the Menu (≡).
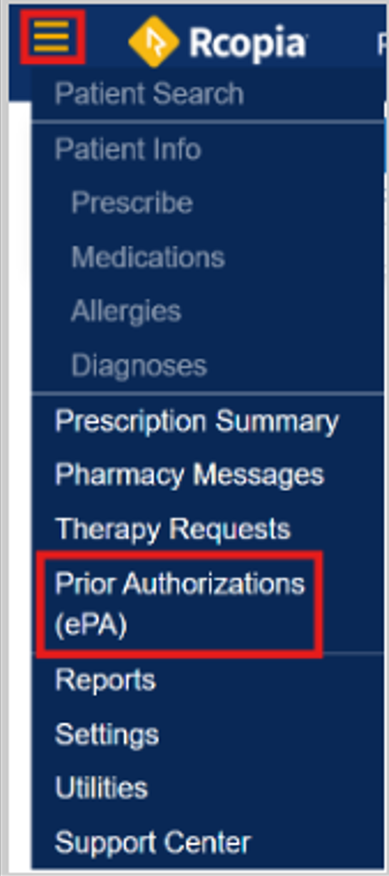
The Prior Authorizations (ePA) dashboard displays all submitted prior authorizations in one place, regardless of payer or submission type. Statuses are updated at least every two business days, but payer processing times may vary and are not controlled by DrFirst.
Understanding Case Statuses
Not all case statuses trigger an update to the mortar and pestle badge. The badge only appears when your action is required. All other statuses, including payer decisions, are available in the Prior Authorizations (ePA) dashboard for proactive monitoring.
Status | What It Means |
Action Required | The payer has returned a question set that requires your input before they can review the case. This is the only status that increments the mortar and pestle badge. |
Submitted To Plan | The prior authorization has been completed and the process of delivering it to the payer has been initiated. The case is now awaiting a response from the payer. |
Response Received | The payer has responded to the request. The response may be an approval, a partial approval, a denial, a cancellation acknowledgment, or a closure by the plan. Open the case to view the specific outcome and any payer-provided details. |
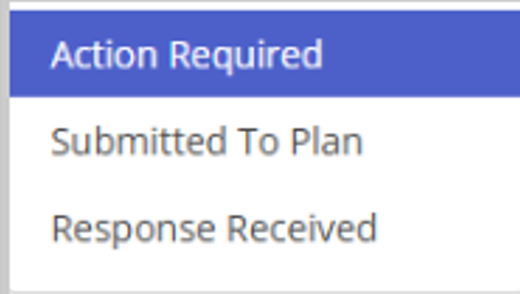
Note: When a case shows Response Received, open the case to view the outcome (approved, denied, partially approved, cancelled, or closed) along with payer details such as approval numbers, partial-approval limits, or denial reasons.
Important: Payer Decisions Do Not Trigger the Badge
Payer decisions—including approvals, denials, and rejections—do not update the mortar and pestle badge. A badge count of zero does not indicate that all cases are resolved; it only means there are no cases currently requiring your input.
You can review active and recently resolved cases at any time by opening the Prior Authorizations (ePA) dashboard from the Menu (≡), regardless of badge count.
Understanding the IDs in Your Prior Authorization
When reviewing a case, you may see multiple identifiers associated with the authorization. Each represents a different system or payer reference number:
ID | What It Means |
Approval Number | Provided by the payer upon approval. This is the number used to seek reimbursement and confirms that the payer agrees to be billed for the care. |
Submission ID | DrFirst’s internal tracking number for the authorization. This number is not visible to the payer but can be used to reference a specific case when contacting the DrFirst team. |
Case Number / Reference Number | A tracking number is provided by some payers once the authorization enters their system. Not all payers provide this. In some cases, the payer may use this number as the Approval Number if the authorization is approved. |
What Prior Authorizations (ePA) in CalMHSA Rx Do Not Handle
Determination status:
The system does not modify determination outcomes. All response information is returned directly from the payer without alteration. If you have questions or concerns about a determination, use the information provided in the response to contact the payer directly.
Appeals:
The system supports only the submission and tracking of prior authorizations. If an appeal is required, all available payer-provided information is included so you can pursue the appeal directly with the payer.
Close the Dashboard and Return to Your Workflow
When you have finished managing your prior authorizations, close the dashboard to return to CalMHSA Rx. You can close the dashboard in any of the following ways:
- Select the X button in the top-right corner of the overlay.
- Press ESC on your keyboard.
- Click Close in the bottom right corner.
- Click anywhere on the darker background area surrounding the overlay.
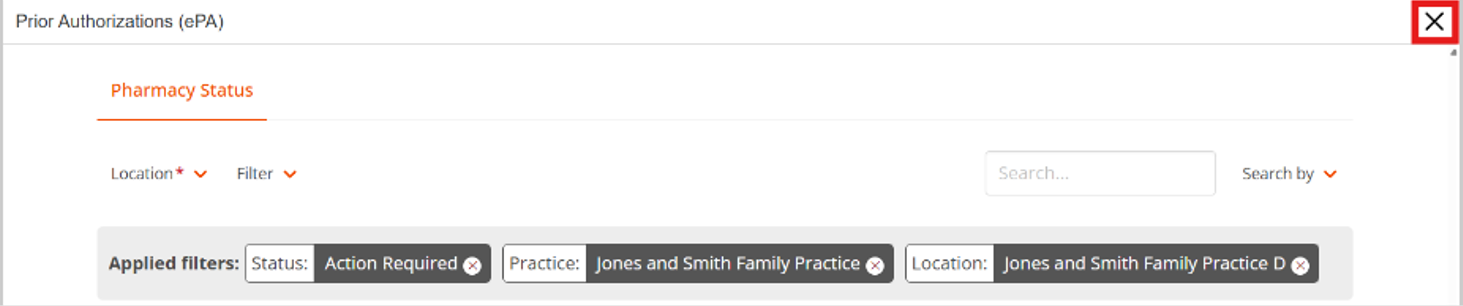
The Prior Authorizations dashboard closes and CalMHSA Rx returns to its previous state. The Mortar and Pestle badge count refreshes automatically at this point, so the number you see after closing reflects any changes made during your session in the dashboard.