When using the Client Search window, a user will only be able to see search results that match their Client Access Rules. The “All Client Search” button does not work the same way.
If a user has the checkbox “Allow All Client Search” in the Roles/Permissions tab of the Staff Details screen checked, then an “All Client Search” button will appear on the Client Search window. To use the “All Client Search” button, the user must enter all the fields required by the configuration key “EnableMultiFieldAllClientSearch”. CalMHSA has set the default requirements to be Broad, DOB, and SSN. This means the user must enter the client’s name (first and last, which will use the broad search functionality), date of birth, and social security number before clicking the “All Client Search” button.
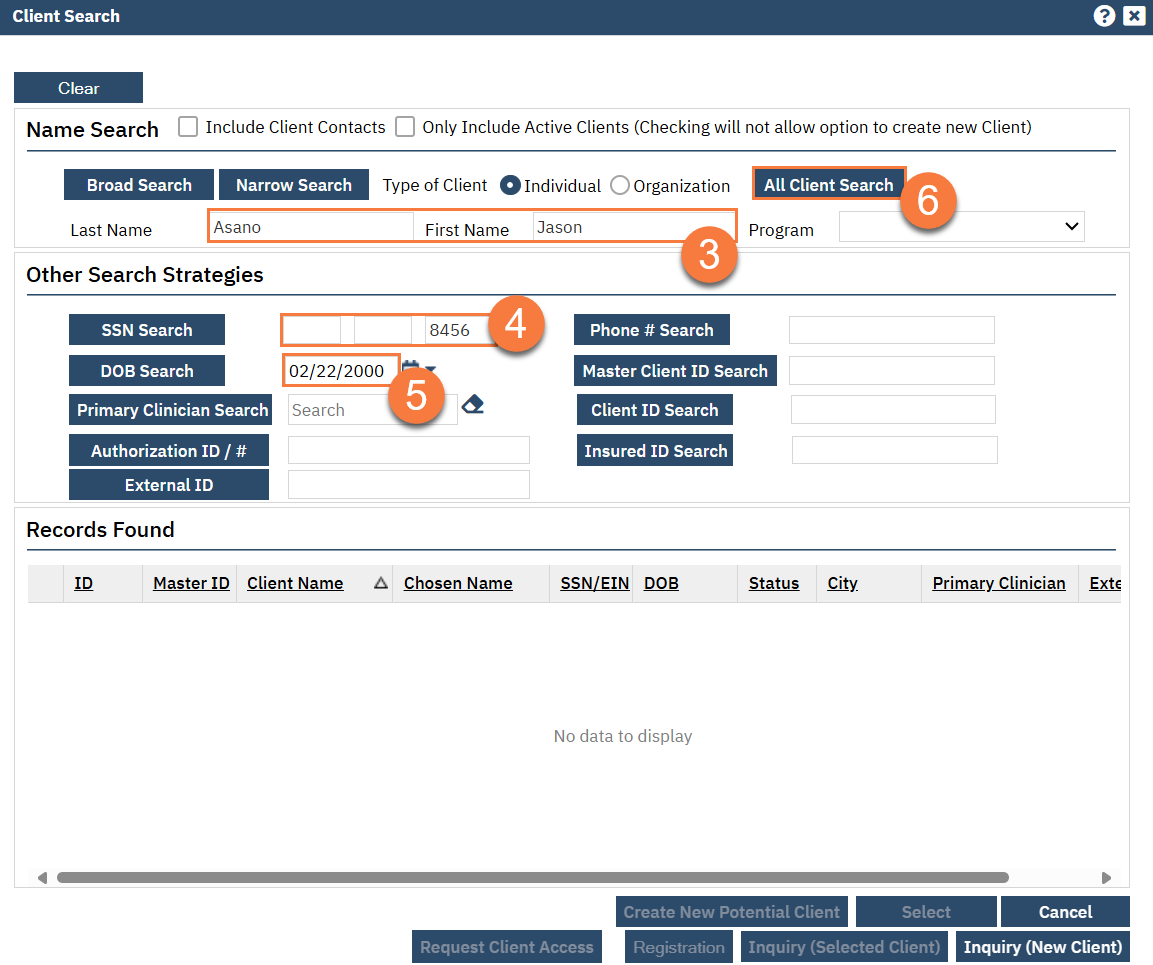
The user must type in the client’s name (first and last), the client’s date of birth, and at least the last 4 digits of the client’s social security number. A partial name (e.g. “Joh Smi” for “John Smith”), alias, or chosen name may be used. If the user does not enter one of these fields, they will receive a red alert telling them to complete the required field in order to use the “All Client Search” button.
The search results from this “All Client Search” button will utilize the Client Access Rules of the user role selected next to the “Allow All Client Search” checkbox in the Roles/Permissions tab of the Staff Details screen. This means that you can provide a user additional client access if they have very specific information about the client.
Use Cases
Some counties want to limit what clients a user can see to only those clients where they have a treating provider relationship. This can be done by limiting a user’s “Client Access Rules” permission to only “Clinician in Program Which Shares Clients”. This means that unless the client is enrolled in a program that the user is associated with, the client will not show up in the Client Search results. This also means that on list pages that show multiple clients, any clients that are not associated with at least one of the user’s programs will not show.
This would, of course, impact a user’s ability to find an existing client in SmartCare, thus creating duplicate clients that need to be merged later. To avoid this result, the “All Clients” permission for “Client Access Rules” can be granted to the users who are responsible for adding clients to their program. For example, if only the receptionist is ever adding clients to an agency’s program via the Client Programs and subsequent Program Assignment Details screen, then the receptionist may be the only user in that program to be able to search for all clients, while the clinical, billing, and administrative staff of the program would only be able to see clients within their program. The other option would be to provide the receptionist user the “Allow All Client Search” option in their Staff Details account, selecting an admin-level user role such as “County Affiliate SysAdmin” as the role associated with the “All Client Search”. This means that when searching for a client, the receptionist could see all clients across the system, access their Client Programs screen, and enroll them in their program. This would leave the limitation on list pages that the receptionist would only see clients associated with their program, and not all clients that exist in SmartCare.
All Client Search Instructions
- Click the Client Search icon.
- Click <Client Search>. The Client Search window will open.

Type the client’s Last Name and First Name in the corresponding fields.
Enter the client’s SSN. You need to enter at least the last 4 digits of the SSN.
- Enter the client’s date of birth.
- Click the “All Client Search” button to see the results. From there, you can select the client as usual.