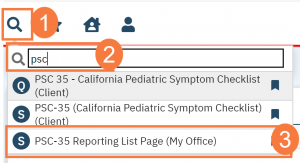
The PSC-35 Reporting List Page displays information about PSC-35 reports. This page shows the current record status and any errors in PSC-35 reports that must be corrected before batching. This page is client-specific, so you must select a client before reviewing the PSC-35 Reporting List Page.
- Click on the Search icon.
- Type PSC-35 Reporting List Page in the search bar.
- Select the PSC-35 Reporting List Page from the search results.

This will bring up the PSC-35 Reporting List Page.

Filters
- Date Range: You can put a custom date range using these fields.
- Record ID: Type in the Record ID here to pull records only associated with the Record ID.
- Batch ID: Type in the Batch ID here to pull records only associated with the Batch ID
- Client ID: Type in the Client ID here to pull records only associated with the ClientID
- Program: Click this down-down menu to filter by records associated with a specific program.
- Provider: If the County entity and is utilizing MCO, this will indicate which Contracted Provider the PSC record is associated with.
- Reason for Assessment: Here are checkboxes that allow you to choose more than one option such as, discharge, initial, urgent, etc.
- Record Types: This is defaulted to PSC and does not have another option.
- Record Status: Here you can select multiple options based on the status of the record.
- Responsible Staff: You can filter based on self-report or staff report.
- Managing Entity (county)
- Batch Types: This is defaulted to only PSC and there are no other options.
- Errors: Here you can filter by one or more error types.
- Click Apply Filter once the appropriate options have been selected.

Columns
- Record ID: This is the unique number associated with record and the hyperlink will take you to the PSC-35 Record Detail screen.
- Record Type: Will always be PSC.
- Effective Date: The date the record became effective. The hyperlink will take you to the PSC-35 (California Pediatric Symptom Checklist) document.
- Errors: This will display an error if one exists.
- Record Date:
- Client: Name of the client and client ID.
- Program/Provider: Here you will see the program associated with this record.

Upper Right-Hand Icons
- Action Drop-Down: From here based on the records you have selected, you can take actions like create a batch or refresh date, etc.
- New Favorites Icon: Clicking on the “new favorites” icon will allow you to add this screen to your favorites for quick access.
- Favorites Icon: If you have this listed as your favorite already, when you hover over this icon, it will tell you the favorite name.
- Export Icon: This icon is available to admins. You will be able to export the data from this screen into an excel spreadsheet.

Exported Columns
- Record Id
- Record Type
- Document Id
- Effective Date
- Record Status
- Errors
- Record Date
- Client
- Program/Provider
- Batch Type
- Last batch submission date
- Last Batch ID
- Responsible Staff
- Reason For Assessment
- Date Of Last CANS
- Date Of last ANSA
