The Inquiry Workflow should be used in the following situations:
- To document requests for services via the access line
- To document a referral from a managed care plan
- To document referrals from the emergency department
- To document referrals from social services
- To document paper referrals
Step by step video guide here:
To document an inquiry:
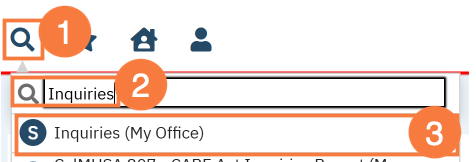
- Click the Search icon.
- Type Inquiries in the search bar.
- Click to select Inquiries (My Office).
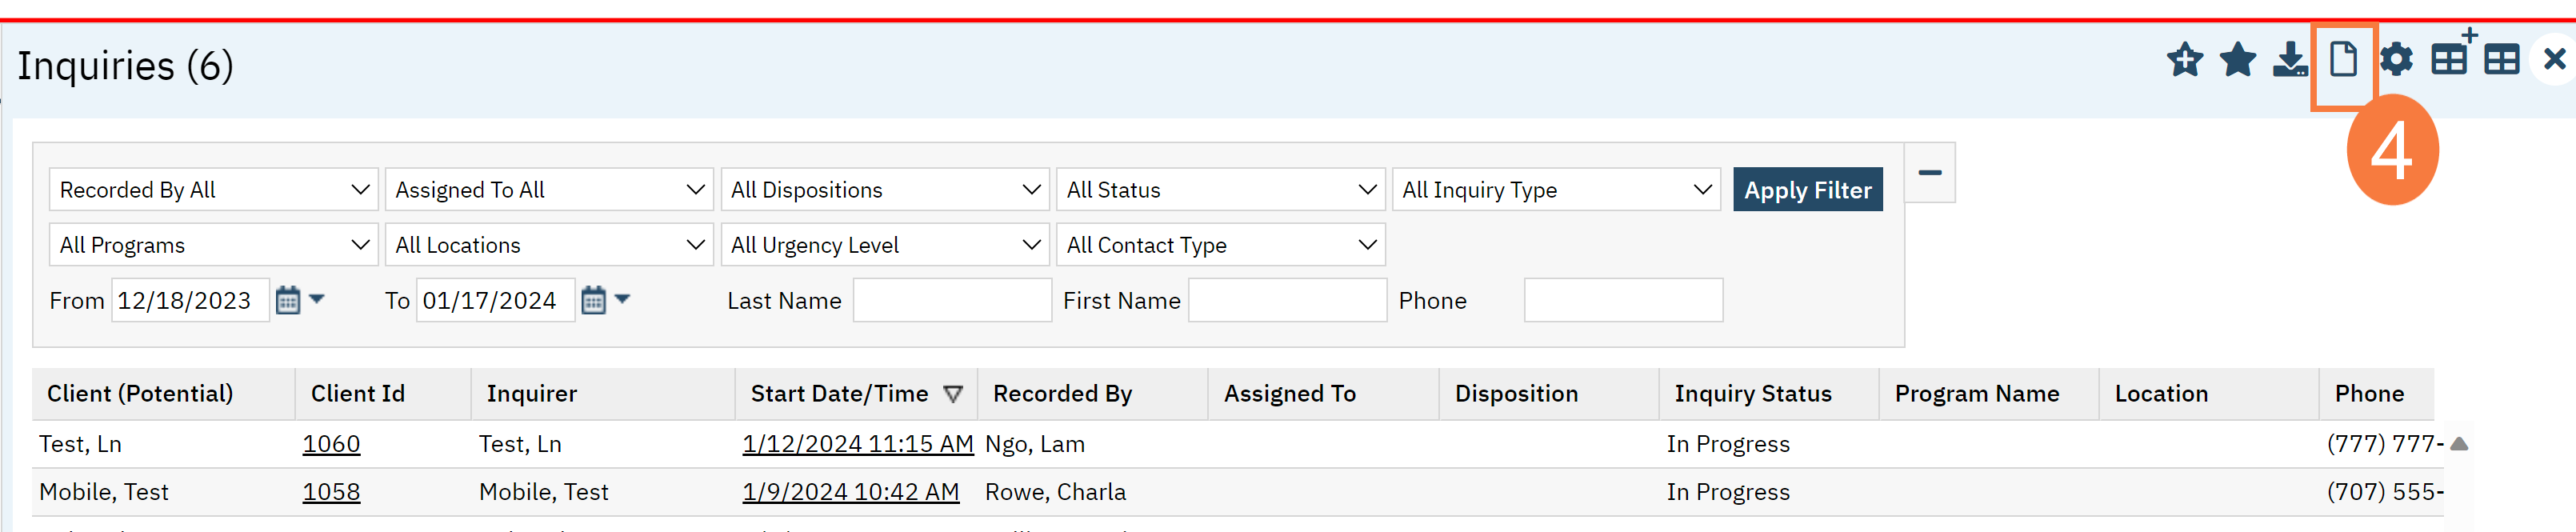
- This will bring you to the Inquiries list page. Create a new inquiry by using the new icon.
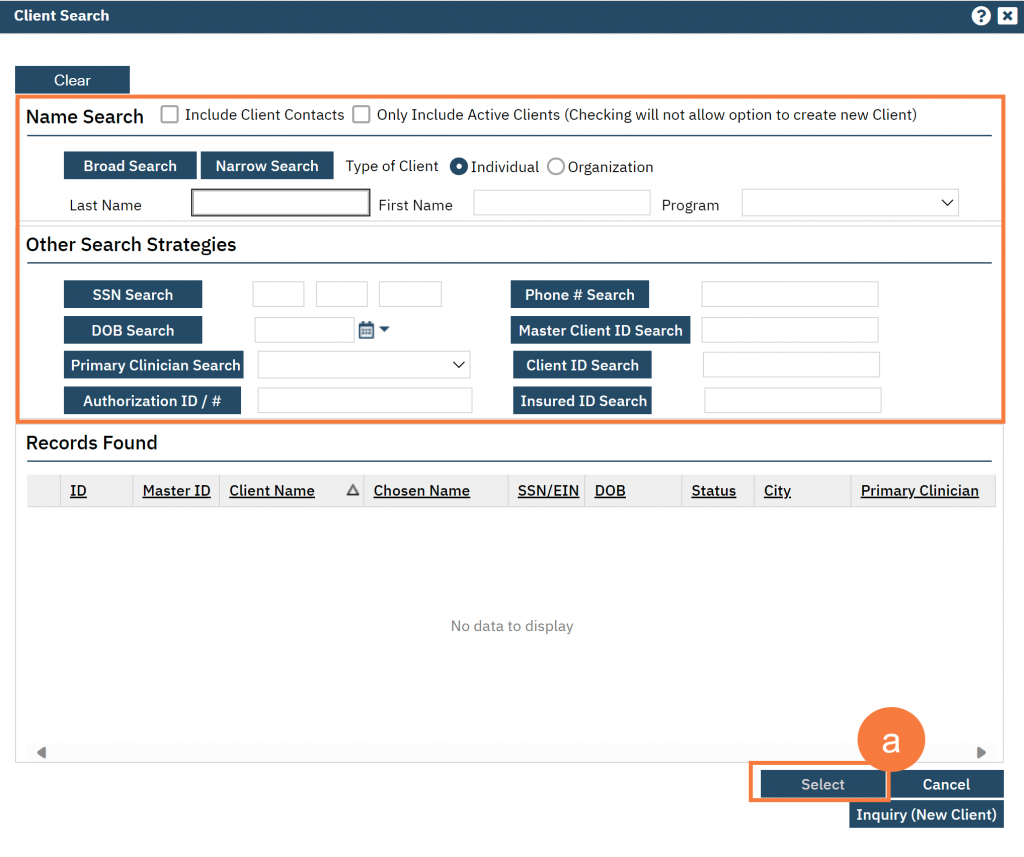
- This will bring up the client search window. You may search to determine if the person is a current client. If person is a new client, or you cannot find them in the system, click “Inquiry (New Client)”
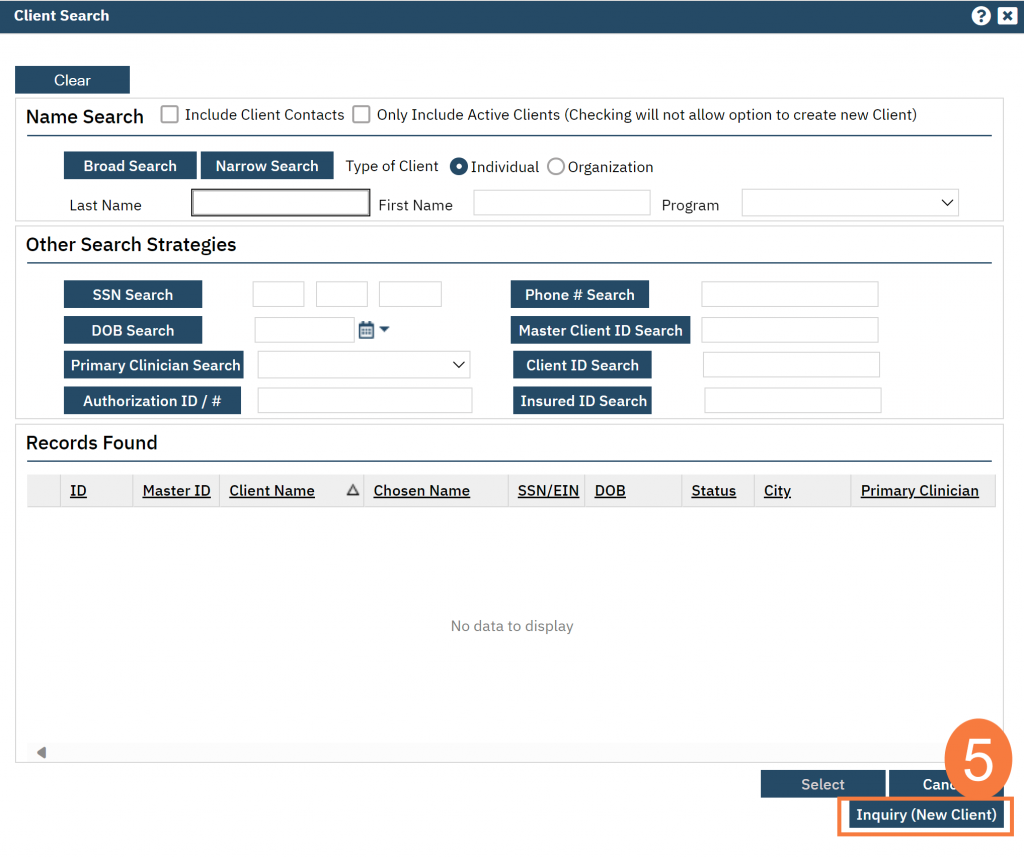
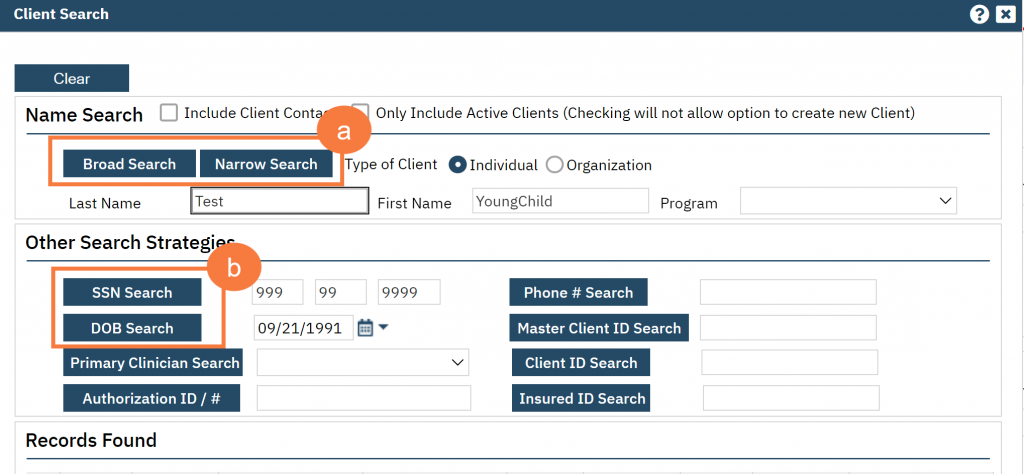
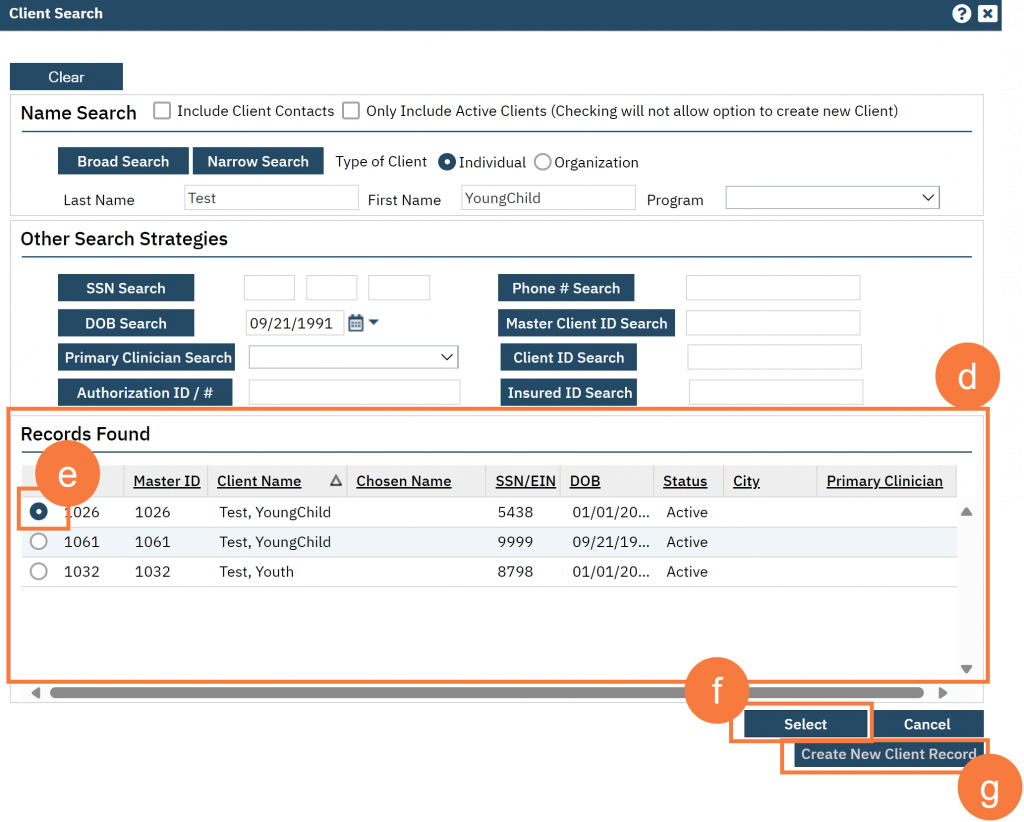
- To search for a client, enter their name and click “Broad Search.” You can also search by SSN by entering their social security number and clicking “SSN Search.” You can do the same with date of birth (DOB), phone number, etc. If you find the person in the system, meaning they show in the Records Found section, click “Select” to bring their information into the Inquiry screen.
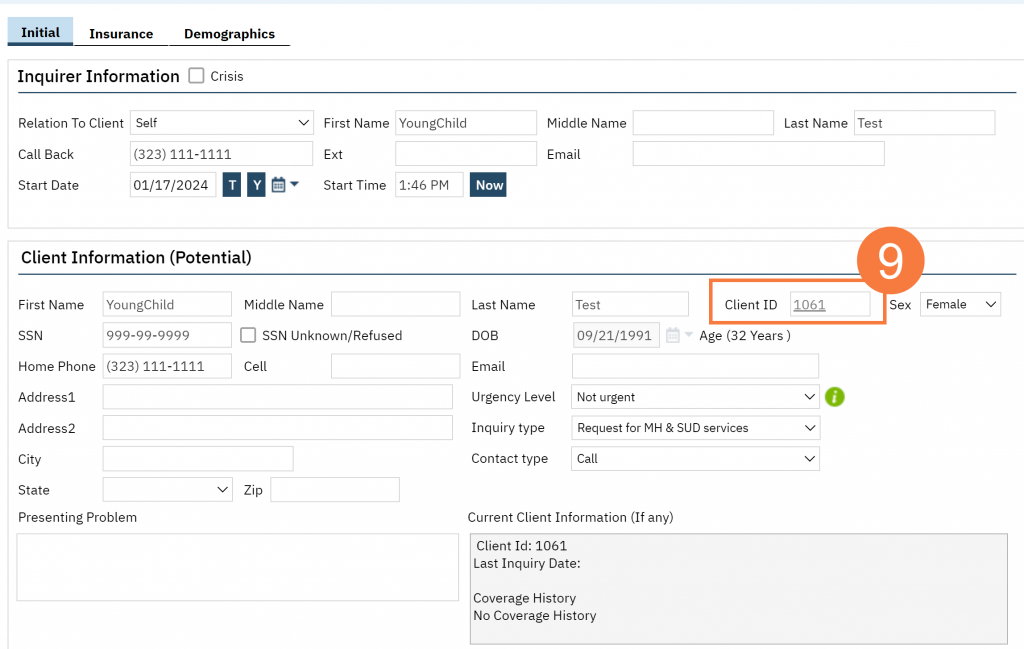
- This brings you to the Inquiry Details screen. Complete the information about the caller, or “Inquirer”.
- If the client is calling for themselves, select “Self” under “Relation to Client.” This way, as you enter the caller’s information, it will push this information automatically into the “Client Information” section.
- Make sure to input the start date and time of the call. There are buttons for “T” (today) and “Now” to help make this quick and easy.
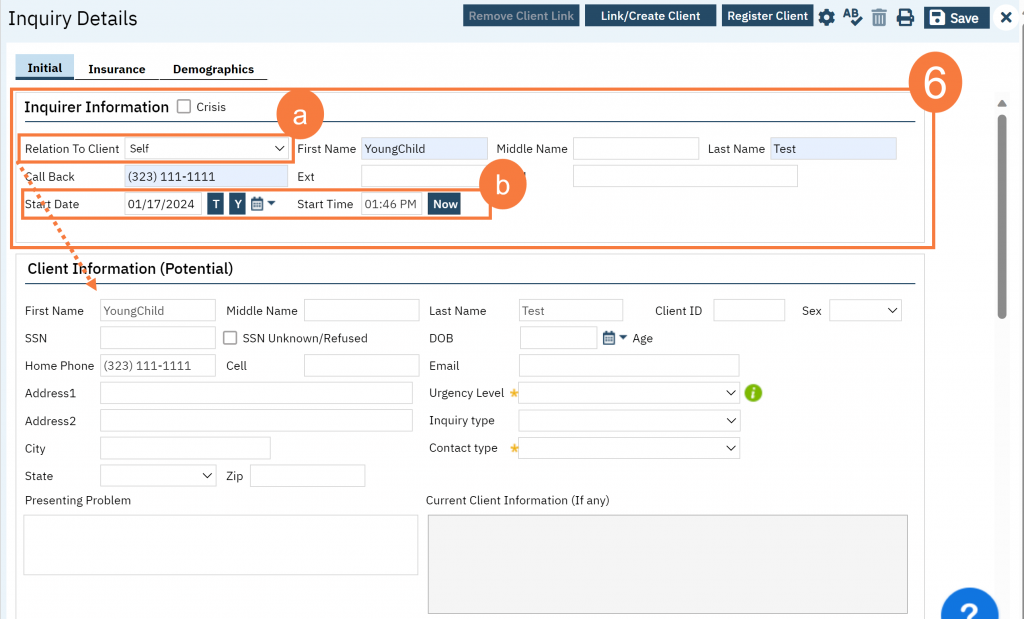
- Complete the information about the potential client.
- Complete the First Name and Last Name fields. Middle Name is not required but can be added as necessary.
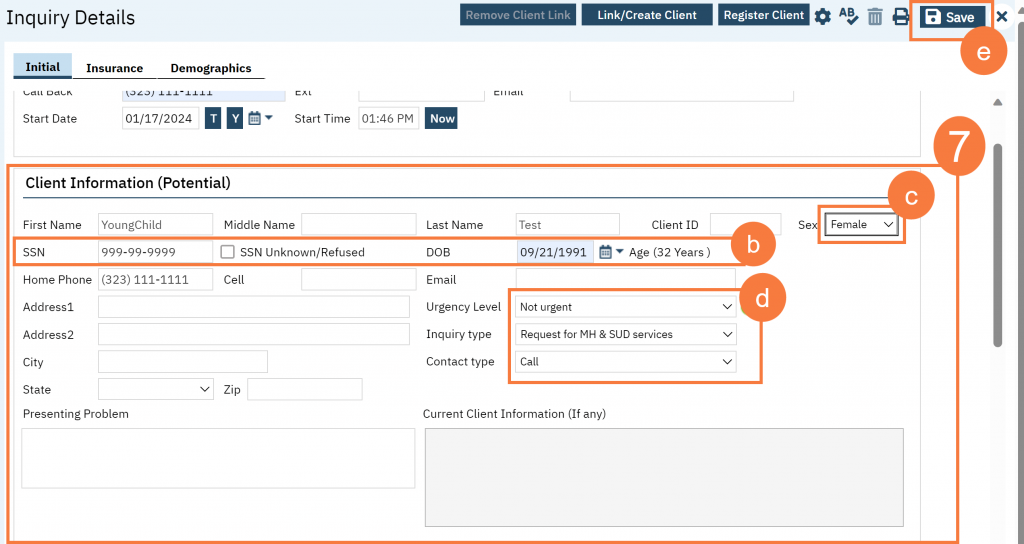
- Complete the SSN and DOB fields. This is for the client’s social security number (SSN) and date of birth (DOB), respectively. If the client refuses to share, or doesn’t know, you can simply check the box “SSN Unknown/Refused.” Once saved, this will fill in the SSN with “999999999”, which is SmartCare’s version of “no SSN”.
- You can complete the Sex field but it isn’t required.
- Complete the Urgency Level, Inquiry type, and Contact type fields. The options for each field are listed in the tables below. This includes a description of when to use each option.
- Click Save.
| Urgency Level | Description /Use Case |
|---|---|
| Emergent | Use if the call is an emergency |
| Not Urgent | Use if the call is a routine request for services |
| Urgent | Use if the call is an urgent request |
DHCS defines urgent as: “When the beneficiary’s condition is such that they faces an imminent and serious threat to their health, including, but not limited to, the potential loss of life, limb, or other major bodily function, or the normal timeframe for the decision making process would be detrimental to the beneficiary’s life or health or could jeopardize their ability to regain maximum function, decisions to approve, modify, or deny requests by providers prior to, or concurrent with, the provision of health care services to enrollees, shall be made in a timely fashion appropriate for the nature of the enrollee’s condition, not to exceed 72 hours.”
| Inquiry Type | Description/Use Case |
|---|---|
| Requests for services/screening | Use when the reason for the call is a request for new services |
| Crisis | Use when the reason for the call is for crisis services |
| Information | Use when the reason for the call is for information |
| Discharge/Transition Coordination | Use when the reason for the call is for another provider to coordinate transition of care to/from your agency |
| Jail Diversion | Use when the reason for the call is related to Jail Diversion programs |
| Consultation | Use when the reason for the call is for an outside provider seeking a consultation |
| Other | Use when the reason for the call is not addressed by any of the above |
| Contact Type | Description/Use Case |
|---|---|
| Call | Use when the inquiry was complete via telephone |
| Face to Face | Use when the inquiry was completed via in-person, such as a walk-in |
| Form | Use when the inquiry was completed via form, such as a referral that was sent to the county |
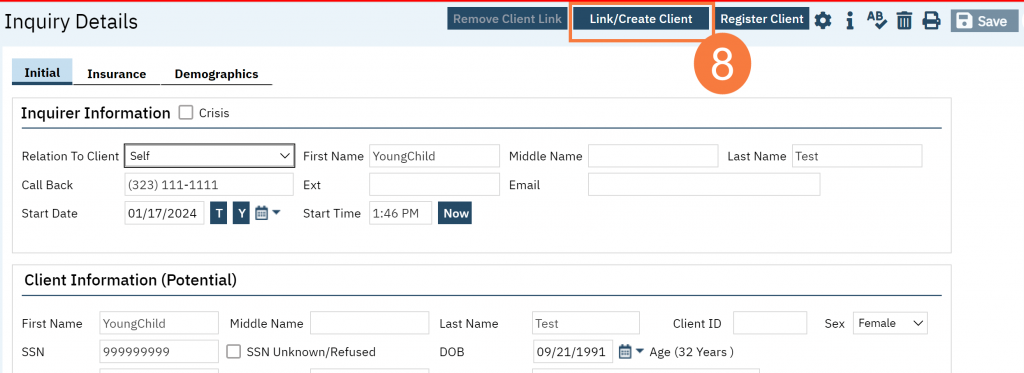
- Select the “Link/Create Client” button. This will bring up the client search window, with a few extra buttons at the bottom.
- You must search by name by clicking on either “Broad Search” or “Narrow Search”.
- You must also search by SSN and DOB by clicking on those respective buttons.
-
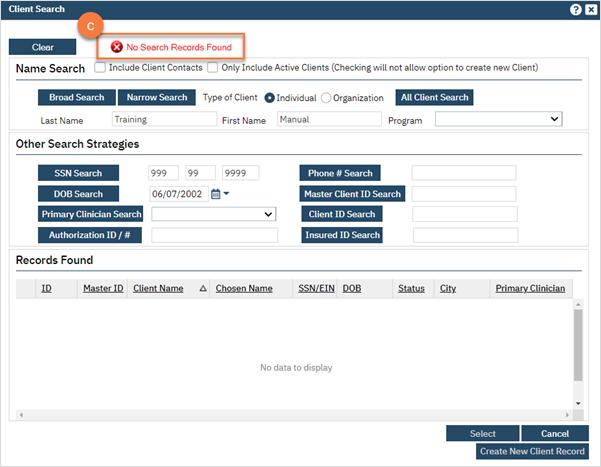
- If no records are found based on the search you do, an alert will show at the top of the window
-
- Any search results will show in the “Records Found” area. Review the Records Found to determine if the person is already in the system as a client.
- If the person is already a client in the system, select the button next to the appropriate record.
- Click “Select” to link the Inquiry to the selected client.
- If the person is not a client, meaning no records were found matching the client’s information, click “Create New Client Record.”
- This will take you back to the Inquiry screen but now a client ID number will be added.
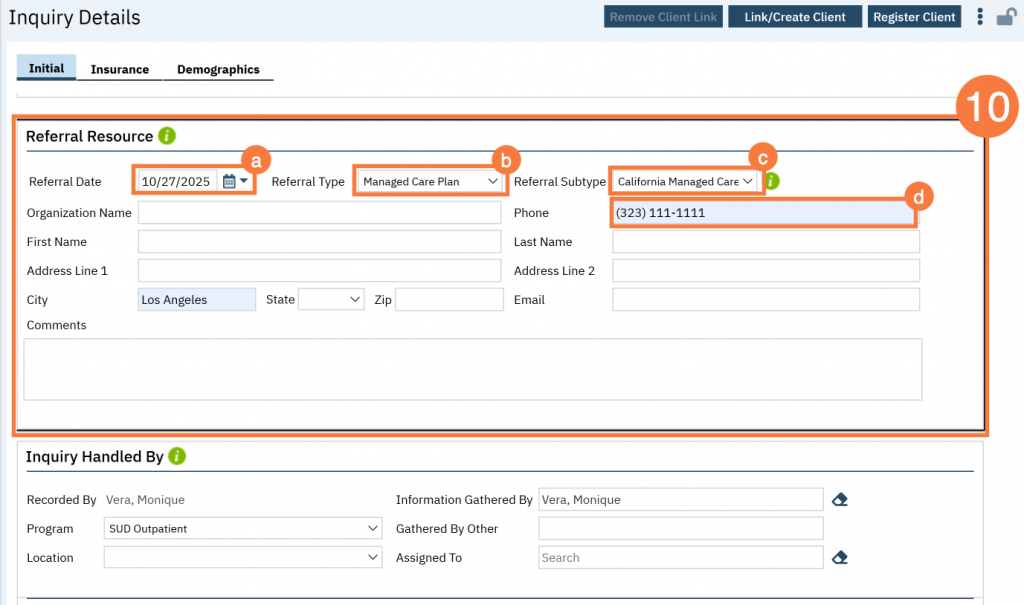
- Complete the Referral Resource section. This section is about the person/agency who referred the client to you. NOTE: If this is an access line call you can skip this step.
- Enter the referral date. This would be the date of the referral, not the date you received the referral.
- In the Referral Type field, select where you received the referral from such as; “Managed Care Plan” or “Emergency Department”.
- If this is a managed care referral, in the Referral Subtype field, select the referring Managed Care Plan’s name. Note: If you need a MCP added, contact your system administrator.
- Add any point-of-contact information. This can include a point-person, phone number, address, email address, etc. Add any comments as necessary.
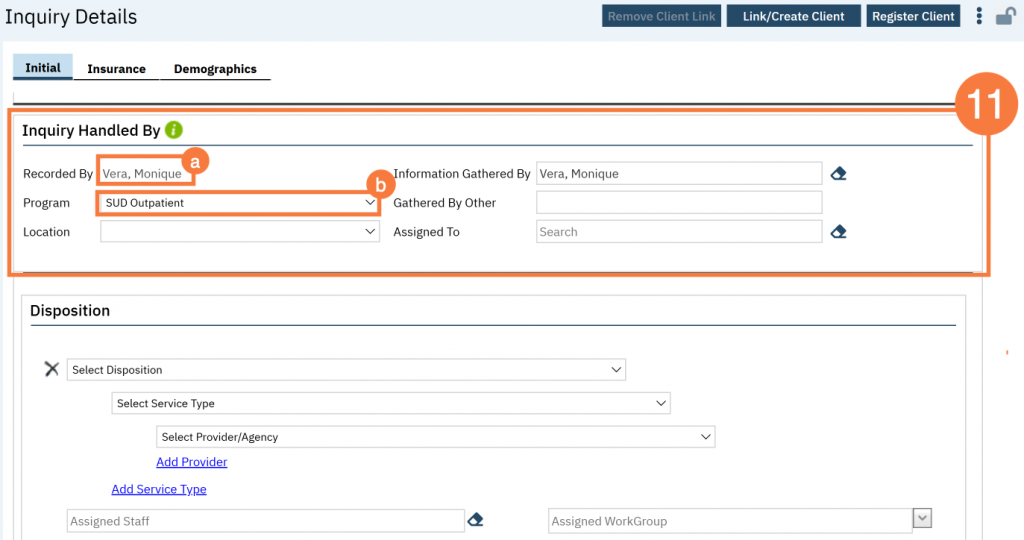
- Complete the Inquiry Handled By section.
- The system will automatically add you in the Recorded By field.
- Select the Program that received the inquiry or referral. Note: Your System Administrator may have disabled this as a required field.
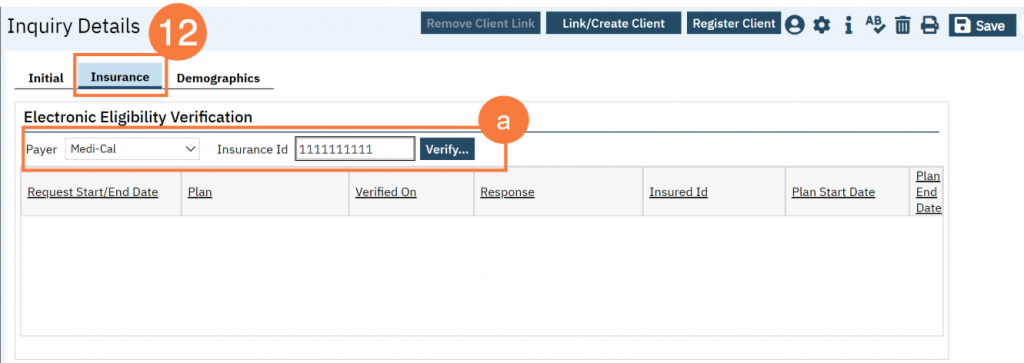
- Click on the “Insurance” tab. Note: this is not required.
- Select “Medi-Cal” from the “Payer” drop-down and enter the client’s Medi-Cal number (CIN) in the “Insurance ID” field. Click “Verify” to verify the client’s Medi-Cal insurance.
- Click on the “Demographics” tab. Note: This is not required.
- We recommend completing the “Gender Identity” and “Pronoun” fields to ensure the person is not misgendered as additional staff engage with the client.
- Complete the “Primary/Preferred Language” field. If the client does not speak English or requires an interpreter, make sure to check the appropriate checkbox.
- If the client has any transportation issues and will need transportation to and/or from appointments, check the Transportation Service checkbox.

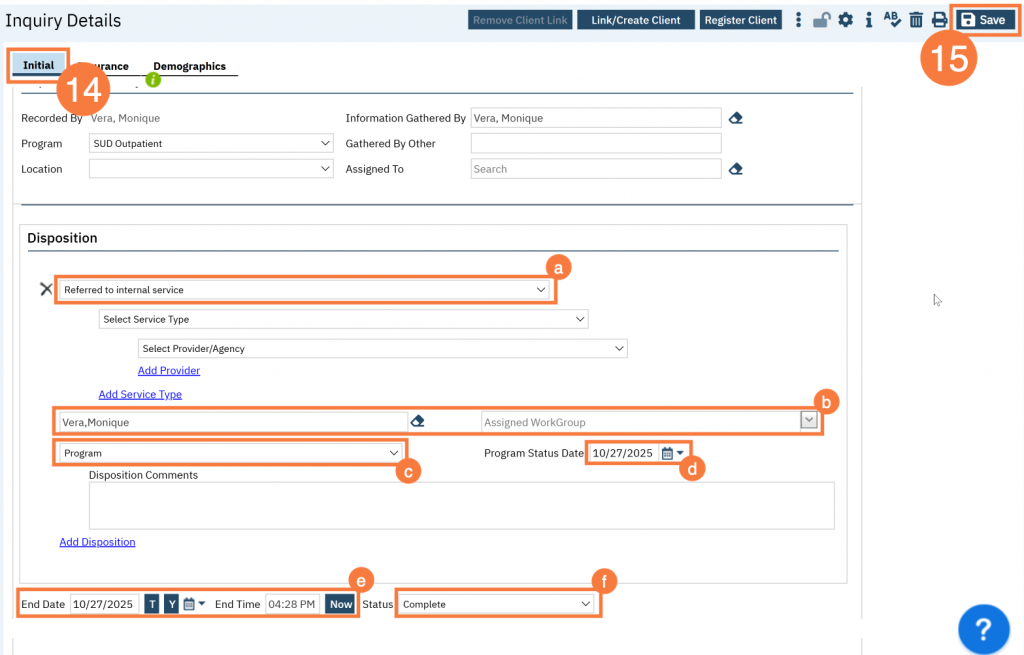
- Click back on the Initial tab and scroll down to the disposition section.
- Select a Disposition. Depending on the disposition selected, the Program field below will become available.
- Enter an Assigned Staff or an Assigned WorkGroup.
- NOTE: You have to select either an Assigned Staff OR an Assigned Workgroup (you can’t select both). These fields aren’t currently being utilized, but the system still requires this. If you’re handing this step off to someone else, put their name in there. If this is just a documentation of what the result was (e.g. “Information Only”), you can put yourself in this field.
- Enter the Program you are requesting the client be enrolled to. The system will automatically put the client in “Requested” status. Note:
- Enter the Program Status Date. Note: The system does not alert the program that a request was made. You still need to reach out to the program to let them know.
- Enter the End Date and Time of the inquiry, if applicable. This would indicate that you have finished processing the inquiry.
- Change the Status to “Complete” or leave as “In Progress” if more still needs to be done with this inquiry.
- Click Save.