How to Define Reception Views

The Reception/Front Desk screen allows front desk users to see any clients with scheduled appointments on a designated day. They can use this screen to check-in clients, reschedule appointments, and more. There are a few filters on this screen, one of which is “Views”. These views are set by the System Administrator. 

  1. Click the Search icon.
  2. Type in “Reception” in the search bar.
  3. Select “Reception Views (Administration)” from the search results.
  1. This takes you to the Reception Views screen. To create a new view, enter the name of your view in the “Reception View Name” field.
    1. Next, you’ll need to define what filters will be used for this view. Each section should have at least 1 item selected. Only the services that meet all section filters will show up. If you do not want to limit by a category, then select all for that category by clicking on the checkbox next to the category name. By default when creating a new view, ALL categories will have ALL options selected.
      1. Locations – Use if you want to limit the view to only show services with a specific location. This could be helpful if you wanted to only include services that occur at the facility and exclude any field-based services.
      2. Programs – Use to limit which programs you want to include in this view. You can select a single program to only view services for that program, or can select multiple programs, such as for a facility that houses multiple programs in the same building that shares the same receptionist.
      3. Staff – Use to limit which staff you want to include in this view. An example use case would be to view only the services for the three medical doctors at your facility.
      4. Types – Leave this to include all. CalMHSA does not use the Primary Care or Triage modules, so leaving these types included will not harm anything. If you want, you can select only “Services” as the type.
    2. Once you’ve defined your view, click Insert. This will add your new view to the Reception View List below.
  1. To update an existing Reception View, select the view from the Reception View List.
    1. This will bring up the information for that view. Make whatever updates you need. This can include renaming the view, adding/removing programs, adding/removing locations, and adding/removing staff.
    2. Once you’ve completed your updates, click Modify.
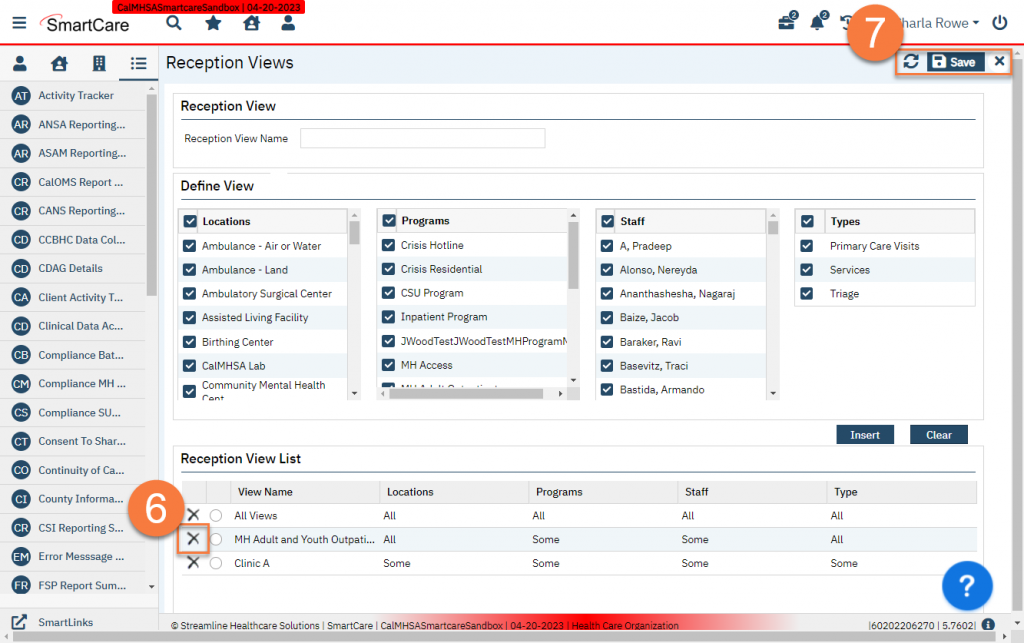
  1. To delete a view, click on the delete (X) icon next to the View Name in the Reception View List section.
  2. Once you’ve added, modified, and/or deleted any Reception Views as needed, click Save. Then click the “Refresh” icon   to Refresh Shared Tables. Then you can click close .

Updated 9/3/24